GetUSB.info Logo

Windows 7 Direct Download Gone For Now

Last week we posted an article for Windows 7 users to download a utility to make a bootable USB recovery stick.  Well, looks like that feature is [temporarily] gone. So what gives? It appears Microsoft lifted some GPL code to make their ImageMaster tool for bootable USBs.  Interesting. We posted how you could make your own nt60 USB recovery stick.  Check it out.

nt60 usb recovery stick

From eWeek here is a bit of detail: Continue Reading

How To Create USB Stick with nt60 Boot Sector

USB Tutorial: How to Create a Bootable USB Stick with the Specific NT60 Boot Sector Required for Microsoft Vista

Before we begin the USB tutorial on NT60 boot sector, review the checklist of items needed before you start. Chances are, if you find yourself searching for this tutorial, you already have everything needed to make a USB bootable with NT60 boot sector.

  • 4GB flash drive will do the trick
  • Your Vista installation disk
  • Set BIOS to boot from a USB device

When selecting your flash drive, be sure there is nothing you need on the device as this process to create an NT60 boot sector will clean the drive of all data.

  1. Put your Vista disk into the optical drive. If the autorun starts, close it all down and exit without performing any tasks.
  2. Plug in your USB stick that you want to make bootable with NT60.
  3. Open Command Prompt with Administrator rights.
  4. Type ‘diskpart‘ and press Enter.
  5. How To Create USB Stick with NT60 Boot Sector - diskpart command

  6. Now type ‘list disk‘ and press Enter. All the storage devices connected to your computer will be displayed. Make sure the size of the disk you plan to select is the USB flash drive you intend to use!
  7. USB Stick NT60 Boot Sector Tutorial - list disk command

  8. Now type ‘select disk [number here]‘ (example: ‘select disk 2‘).
  9. Create NT60 Bootable USB - select disk command

  10. Next, type ‘clean‘ and press Enter.
  11. NT60 USB Boot Sector - clean command

  12. Once this is done, type ‘create partition primary‘ and press Enter.
  13. Make USB Stick Bootable NT60 - create partition primary

  14. Type ‘select partition 1‘ and press Enter.
  15. NT60 Bootable USB Drive - select partition 1

  16. Type ‘active‘ and press Enter. This step is key to making the stick bootable.
  17. Activate NT60 USB Boot Sector - active command

  18. Format the device by typing ‘format fs=fat32‘ and press Enter. This will take 6–9 minutes for a 4GB drive.
  19. Format USB Stick NT60 Boot Sector FAT32

    Once you get 100% complete, type ‘assign‘ and press Enter. This will assign a drive letter (e.g., Drive L).

    Assign drive letter to NT60 USB stick

  20. Now type ‘exit‘ to close diskpart.
  21. To finish the process, load up the boot sector from your Vista DVD to the USB stick. Type: ‘D:\boot\bootsect.exe /nt60 L:
  22. Note: ‘D’ is the drive letter of the optical drive with the Vista disk. Adjust if yours differs.

    Load NT60 boot sector from Vista DVD to USB stick

  23. Exit out of the Command Prompt.
  24. As the last step, go to your Vista DVD and copy ALL the content to your NT60 bootable flash drive.

Congratulations, you have just created a bootable USB flash drive with the NT60 boot sector.

Note: If you are a Microsoft publisher, OEM or OED, please contact Nexcopy for more information about NT60 boot straps and related Microsoft specifications.


2025 Relevance Note

As of 2025, creating an NT60 bootable USB stick is rarely required. NT60 was designed for Windows Vista and early Windows 7 installations. Modern systems primarily use UEFI boot loaders and GPT partition tables, making this manual NT60 process mostly obsolete. The only common scenarios for creating an NT60 bootable USB today are for legacy system maintenance, forensic recovery, or historical testing environments.

Modern Alternative

For modern bootable USB creation on Windows 10, Windows 11, or newer operating systems, you can use dedicated tools that automatically handle boot sectors, partitions, and formatting. One of the most popular options is Rufus, which simplifies the process and supports both BIOS and UEFI systems without manual diskpart commands.

Continue Reading

USB Jewelry: USB Millefiori Gift Idea

Here is a great gift idea that includes a splash of tech…give the gift of millefiori glass with a USB stick tucked inside.  Granted, the picture is what caught my eye for this article, but the bottom line is that:  it IS a good gift idea.

USB millefiori

Personally an image like this might work even better…but who am I to judge. usb drive clevage
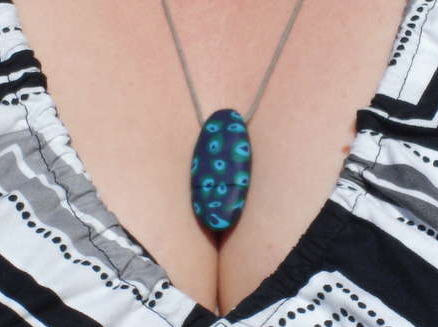
To create the millefiori USB drive can be done in several simple steps.  If you haven’t heard of millefiori then let me tell you: Millefiori is a glass work technique which produces distinctive decorative patterns on glassware.  The term “millefiori” is a combination of the Italian words “mille” (thousand) and “fiori” (flowers). The millefiori technique has been applied to polymer clays and other materials. Because polymer clay is quite pliable and does not need to be heated and reheated in order to fuse it, it is much easier to produce millefiori patterns than with glass.  And this is what we are going to do today. In seven steps you can produce a nice looking USB necklece.  The detailed how-to is over at Instructables but here is the general idea. Get a small USB flash drive and take it apart.  Get some polymer clay, such as Fimo Soft or Fimo Effect.  Prep the millefiori material into a cane like shape.  Include a core in the cane shape as this is where the USB stick will go.  Cut the cane so you have Continue Reading

How To: Assign Specific Drive Letter to USB Drive

Sometimes you need a USB stick to always use the same drive letter.  Whether it’s backup software needing to point to a specific storage device, or you use a Windows Office application which requires a specific drive letter – sometimes it is just needed. Given that Windows will assign a drive letter as a first-come, first serve basis to removable media it can get frustrating to always try for the same drive letter.  Here is one way to assign a specific drive letter to a USB drive. Before you can assign a drive letter to a USB device, take a look at what drive letters you have available.  This will vary depending on what’s connected, networked drives and mapped drives in your system.  Simply go to START > MY COMPUTER and take a look. Next, plug in your USB drive to your computer and let Windows enumerate it [see it]. Navigate to:  START > CONTROL PANEL > ADMINISTRATIVE TOOLS > COMPUTER MANAGEMENT > An alternate way to get to the same spot is START > RUN > “diskmgmt.msc”

assign drive letter to USB

In the left panel expand the Disk Management icon.  On the right side you’ll see all the drives available.  Right click on the Removable drive and select “Change Drive Letter and Paths” Click the Add button and choose a drive letter not already in use from the drop-down list.  Click OK. Now exit or close all the dialogue windows and you’re set.  Now, each time this specific USB stick is plugged in, Windows will assign it the same drive letter. Note:  Windows is associating the serial number of the device to the request you’ve entered above, SO, you’ll need to perform this same process for different flash drives. Spread the word and enjoy. Continue Reading

How To: Make Favicon For Flash Drive

How To Make a Favicon for a Flash Drive

In the heat of getting a new site launched over the weekend, I needed an .ico Favicon for the website.  I came across this free on-line tool which made everything a snap.  No software download, no .exe to load…just down and dirty ico creator.  Today I thought it would be a great review [from original post] to go over How To Make a Favicon for a Flash Drive. It’s just several easy steps.  Lets begin.
  1. Using a program to create an image file, make a jpeg for what you want the ico to look like.  You can use something as simple as Microsoft Paint or something as fancy as Photoshop.  When you make the jpeg, make the overal shape square.  Try and keep the logo simple – simple will translate best into an ico file.
  2. Browse to Chamie and click the “Favicon from Pics” link.  Upload your file.  Chami will automatically generate your ico file.  Chami gives you some great options for the USB favicon file.  You can get a static image or an animated .gif file.
  3. Once you have the .ico file, save that image to the root of your USB flash drive.
  4. Next, open Notepad in Microsoft [or any plain text editor] and type the following:
[autorun] icon=favicon.ico
Save this to the root of your USB stick as “autorun.inf

USB favicon - How To Make

Once you’ve done all the above, Continue Reading

F The DIY Solar Powered iPhone Charger – Just Buy One

Today I was doing some research for a good solar powered iPhone charger.  I went the direction of a DIY [Do It Yourself] project then realized this is all a waste of time.  Maybe there are a select few that would jump on a DIY solar powered iPhone charger project, but considering the complexity of the tutorials I found, very very unlikely my average reader would actually do it. So to save yourself the 30+ minutes of looking for a good tutorial, just spend 3 minutes and buy one that will A) work better, B) look better and C) be cheaper.

solar powered iphone charger

The project directions can be found here and you’ll quickly see it’s a complex project that requires some tools you might not have, plus supplies you’ll surely need to buy.  All in all, it’s about a $70 project, Continue Reading

USB Tutorial: Charge Any USB Gadget With Your Bike

The world is going Green.  This is your chance to keep those USB gadgets, yet charge them without consuming electricity and leaving your carbon footprint.  The idea behind this USB tutorial is taking the kinetic energy of your bike and turn that into re-powering any USB gadget.

recharge USB

I found this fun little project off the Instructables website.  Apparently the author received some grant funds from Lemelson-MIT program and put together a team of 6 students to create this solution. The team got their idea from shake-up flashlights which are based off the Faraday Principle – which is a type of electromagnetism reaction to generate energy. You will need to get a bread-board and create a small circuit to capture the energy produced by the bike and turn it towards your USB gadget.

USB recharge bike

Next, you’ll need a motor provider that will actually “capture” the energy, feed it through your newly made circuit.  There are many options for this, check Continue Reading

How To: TV Spy Remote To Wreak Havoc

So lets clarify exactly what I’m talking about here…a TV spy remote is a device that allows you to control someone else’s TV without being around, thus wreak havoc in their life.  After all, what could be more upsetting then turning off the TV at your neighbors house during American Idol or watching Jack Bower kick a$$ in 24?  I don’t think there is a greater pleasure. Since you can’t buy a TV spy remote at buy.com or Amazon, or anywhere else, check out this TV Spy Remote tutorial I found at Instructables.

tv spy remote

The tools and materials you need could be found anywhere, as this hack was done at a college dorm room and you know those kids have not $$ or resources. Required materials include: Continue Reading

How To: Make USB Volume Name Longer Than 11 Characters

By default the Windows operating system assigns the Volume name of a USB stick as “Removable Disk.”  However, there are times when you need a different Volume name…and many times the USB Volume name needs to be longer than 11 characters. Using the standard Windows “Rename” function, limits you to only 11 characters.  You can’t always get what you want with just 11 characters…so how do you make the Volume name of USB stick longer than 11 characters? It’s easy, with the help of an inf file.  An INF file (or Setup Information file) is a plain text file used by Microsoft Windows for installation of software and/or drivers. Today we are going to use the .INF file to increase the length of our USB Volume name past 11 characters. For those of you who are familiar with .INF files here is the meat of the answer:
[autorun] Label=type whatever you want here
For those of you less familiar with .INF files they are extremely easy to make and use.  For the USB Volume name this is what you do: Continue Reading

How To Make a USB Spy Camera

It’s not often you need a USB spy camera, but when you do, this is a quick and easy method.  The setup is putting a USB camera into your hoodie pocket then running the camera from your laptop stuffed in a computer bag.  The situation reminds me of a perfect setup for college days where you need to video a test or capture some funny footage at a party. Plenty of applications for this type of setup, check it out. Continue Reading

Install Windows 7 From Custom USB Flash Drive

With the backlash and failure of Vista, Windows is quickly moving to Windows 7.  This OS is focused on correcting all the Vista short comings, while providing a faster operating system and speedy USB enumeration. However, upgrading or installing Windows 7 from a DVD takes a long time.  You can speed up the process by putting the Windows 7 ISO file on a USB stick and install from there.

install windows 7 from usb

The guys at Think Computers, put together a nice tutorial.  The USB tutorial covers the placement of Win7 on a custom USB flash drive, then doing a complete install from the UFD. Windows 7 is about 2.5GBs so make sure you have a 4GB flash drive before you think about starting this process. Continue Reading

Copyright

Copyright © 2006 +

USB Powered Gadgets and more...

All Rights Reserved

Advertise with us

GetUSB Advertising

This is a high value website providing great exposure to your product and brand. Visit our advertising page to learn specifics.

For more information
Visit our advertising page.

Nexcopy Ad

Nexcopy Provides

USB copy protection with digital rights management for data loaded on USB flash drives.

Contact us learn more

Resources and References Page

Resources and References Page