GetUSB.info Logo

5 (legit) Reasons a USB Flash Drive Disconnects and Reconnects in Windows

Roll Play Scenario:

  • Windows: Sound of connected a USB flash drive to Windows…
  • User: Ah yes… let’s get to work!
  • Windows: The Windows sound of a disconnected USB device…
  • User: Oh no, what’s happening?

A quick Google search and here we are… let’s take a look:

Here are five legitimate reasons your USB drive might be disconnecting from your Windows computer.

1. Running on Battery

Windows OS is set at default to power down USB ports when running from a battery. The power down process usually doesn’t happen until 10-15 into a stalled USB port, but maybe your setting is different. So worth checking… but first… plug in your laptop and see if the problem is resolved.

To check your USB power setting do this:

Search for Control Panel and click Enter

control panel

In the Control Panel click the Hardware and Sound link

hardware and sound

From here (might be slightly different for everyone) click the Change battery settings and further click Change plan settings and then you’ll see an Change advanced power settings option. Click the Change advanced power settings you can scroll around to find the USB devices and adjust your power there.

USB power setting

2. Faulty USB Port

The number one reason for why a USB device doesn’t work is the physical USB port on the host computer. A laptop generally has only 3 or 4 ports and those ports get a lot of action. With a tower PC, the front USB ports on the bezel also get most the action. Question: When you insert the USB device can you wiggle it around? Was there very little tension or pressure when connecting the USB device? If the device wiggles, or extremely easy to insert… you might have a physically bad USB socket.

Continue Reading

How To – View Linux Files on USB Flash Drive

This article will help you view Linux files on a flash drive when connected to a Windows 10 computer.

This is a more common problem than one would think. As of 2020 the percentage of computers running Linux is 25%. With this in mind, there is a good chance you will receive a USB flash drive (formatted in Linux) which you’ll need to gain access to. This article is a “how to” for a Windows user to read a USB flash drive from Linxu.

Linux will format USB flash drives as ext2, ext3 or ext4. Note: It is possible for a Linux OS to read/write to a FAT32 or exFAT flash drive.

In Windows, when a USB is formatted as the ext type, Windows will try formatting the drive. Don’t format it, try our steps first. (Previous article on best way to format USB drives)

Do the following to access a Linux formatted flash drive in Windows:

This first tip might not be “required” but it is highly recommended.

In the Search field of Windows type Control Panel and click Enter

This will take you to the Control Panel.

Click Programs and then click Turn Windows features on and off

In the dialog box which pops up, you’ll need to scroll down most of the way when locking for

Continue Reading

Why Does the Partition Size Matter Inside an Image File?

This topic is brought up today because we hear some Users have issues understanding this point. The partition size inside an image file does matter. The question we will answer today is why it matters.

Let us start off with two simplified overviews. First, all storage devices use a partition to define it’s characteristics. A storage device has a file system, like FAT32 or exFAT or NTFS and that file system has a defined size or digital capacity. These characteristics, and some others, are laid out in the partition.

Second, an image file is the above partition with all its detail, the file system, defined capacity along with all the actual files and folders on that partition and put into a single file or .img file.

For a non-technical person, let me use a puzzle as an example.

partition table, puzzle, image file

  • The puzzle box is equivalent to the physical device.
  • The plastic bag inside the puzzle box, holding all the pieces, is the image file.
  • Print on the puzzle box indicating the number of pieces, is the partition.
  • The puzzle pieces inside the box are equivalent to the data.

Okay, so at this point we know the image file (.img) is the bag which holds all the puzzle pieces and the data are all the bits inside the bag. So let’s address the question of this post, “Why does the partition size matter inside an image file?”

Back to the puzzle box. As with any puzzle, the outside of the box lists the number of pieces. In this example, we can use the number of pieces printed on the outside of the box as the partition table size. If the physical box size is, let us say, 8″ x 11″ then it’s totally logical that a 1,000 piece puzzle would fit inside. In fact, it is logical to say even a 20 piece puzzle will fit inside the box. But, could a 5,000 piece puzzle fit inside this box?

From the three scenarios above, one doesn’t work, right? The scenario where the box says there are 5,000 puzzle pieces in a box that is physically to small.

Partitions are the same.

The situation which doesn’t work, is when the print on the outside of the puzzle is telling you the number of pieces inside the box are clearly more than what the physical box can handle.

Said another way, you cannot use a partition table size of 4GBs and try to have the image file fit on a USB stick that has only 1GB of storage space. Even if the image file itself is only 1GB large of actual data. Just like the puzzle, no matter what is printed on the outside of the box, if the number of pieces are larger than what can fit inside the box… it just doesn’t work.

Here is a real-world example: You can download this IMG file which is only 40MB large. The IMG itself has a 4GB partition inside it. As long as you write out the IMG file to a flash drive that is 4GBs or larger, everything will work. If you try and write out the IMG file to something smaller, like a 2GB stick, it won’t work.

What happens?

Windows is very smart. All versions of Windows (from 7 and higher) will take a look at the total available memory and compare that to the partition table size. If Windows sees the partition table is larger than the available memory of the device, she won’t let you do anything with the device… other than format it. Once the drive is formatted, Windows will automatically rewrite the partition table to fit the amount of available memory. In this example, Windows would format the drive to become a 2GB stick… not a 4GB stick.

Why does Windows do this?

They want to eliminate fraud. Windows 7 was introduced in 2009 and before that, the only OS was WindowsXP. Well, Windows XP didn’t have the capability to compare partition tables to available memory. The result was fraud. Many would sell some larger GB capacity drive… like at the time 32GB, but only 4GB of real, usable, memory was there. The user would run out of memory space long before the “printed capacity” of the drive was reached.

If you found this article; maybe there is a situation where an image file is not working when written out to a USB flash drive? If this is the case, be sure to check your partition table compared to the amount of physical memory available. The easiest way to check, would be mounting the IMG file on your computer and check Properties for the partition size. Keep in mind, the default “Mount” command in Windows doesn’t work. You need something like this.

Continue Reading

How To Format a Flash Drive as UDF (Windows 7 & 10 Solution)

How to Format a USB Flash Drive as UDF in Windows

When trying to format a flash drive in Windows (7 or 10), you will see the file system options best suited for the device. The proper file systems for a flash drive are: FAT, FAT32, or exFAT. Windows also provides NTFS as an option for USB flash drives, but as mentioned before, NTFS is not the best file system for a USB drive. During the format process, only the most compatible file systems will be displayed in Windows.

Why is UDF not listed as an option?

First, let me say it IS possible for Windows to format a USB flash drive as UDF (Universal Disk Format). Microsoft just doesn’t want you to do it—and with good reason.

Important: If you think formatting a flash drive as UDF will make the thumb drive appear as an optical drive in the computer, you are mistaken!

According to the Universal Disk Format (UDF) specification governed by the Optical Storage Technology Association, many believe UDF will make a device work like a disc. UDF is most widely used for DVDs and newer optical disc formats. While it can be used on flash drives, it does not make them function as optical drives.

Some may assume that formatting a USB flash drive as UDF makes it universally compatible across Windows, Mac, Linux, Symbian, and other proprietary systems. In reality, exFAT offers the same cross-platform compatibility without the drawbacks of UDF.

Why You Should Avoid Formatting USB Drives as UDF

Here are the main reasons not to use UDF on USB flash drives:

  • Lack of fully functional filesystem check tools.
  • 64GB limit with Windows & Linux (a bug, not an inherent UDF limit).
  • Risk of quick wear-leveling failure on SD and USB mass storage devices.
  • UDF is read-only on Windows XP.

The most important issue is the lack of filesystem check tools. If the USB is removed during operation and data corruption occurs, there are no tools available to diagnose or repair the UDF file system. Since flash drives are designed for portability and frequent quick access, this risk makes UDF a poor choice.

How to format a flash drive as UDF:

1. Connect the USB flash drive to your computer and note its assigned drive letter.

2. Make sure no programs or data are accessing the drive.

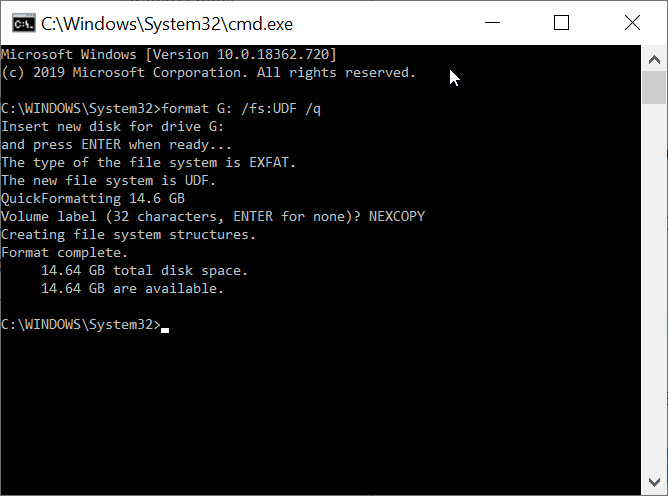
3. Navigate to your C: drive in Windows Explorer. In the search field, type “CMD” (case-insensitive) and press Enter. Administrator privileges are required.

How To Format a Flash Drive as UDF

4. In the command prompt window, type the following command:

format G: /fs:UDF /q   (Replace G with your USB drive letter.)

The /fs parameter specifies the file system (UDF), and the /q parameter tells DISKPART to perform a quick format.

5. The OS will prompt you to insert the drive (it’s already inserted), press Enter.

6. Next, you’ll be prompted to enter a Volume name. Press Enter to leave it blank or type a custom name (e.g., “Nexcopy”).

How To Format a Flash Drive as UDF, other than FAT or exFAT

DISKPART will process the command and notify you once formatting is complete.

7. Type exit to close the command prompt window.

Note: The /q command deletes the file table and root directory of the previously formatted flash drive but does not perform a full sector scan for bad areas. This highlights the problem mentioned earlier: UDF lacks robust filesystem check tools, making it a risky choice for USB flash drives.

Continue Reading

Change USB Connection Sound, #Easy

We all spend so much time on our computer, its worth customizing sounds and events we experience while using the computer. Today, we will cover the topic of changing the USB sound when a USB device is connected. You can really have some fun with this, especially if you consider some of the USB jokes mention before, and how those jokes could apply when a USB is shoved into a USB port.

While your mind wonders, I’ll move along to the tutorial part of this post:

In the search field, type in Control Panel and select the Control Panel.

From with in the Control Panel click Hardware and Sound

From the Sounds category, select Change system sounds

The window will pop up on the “Sound” tab and you’ll need to scroll down through the list of “Program Events” to find Device Connect and you will click on that time to highlight it.

Continue Reading

USB Flash Drive Doesn’t Get Assigned a Drive Letter: Solution

You’ve connected a USB flash drive, heard the familiar Windows sound of connection, yet no drive letter shows up. You then go into Disk Management for Windows and see the device and memory, but the USB flash drive doesn’t get assigned a drive letter.

What should you do?

USB Flash Drive Doesn't Get Assigned a Drive Letter

Most of the time, Windows will automatically assign a drive letter to any connected storage device—whether it’s a USB stick, USB hard drive, or other mass storage device.

However, if a drive letter isn’t assigned, there’s a quick fix to get your computer working properly again:

  1. Open Command Prompt as Administrator (search for CMD, then right-click and select “Run as Administrator”).
  2. Type diskpart and press Enter.
  3. Once in DISKPART, type automount enable and press Enter.
DISKPART command prompt for USB drive automount, USB Flash Drive Doesn't Get Assigned a Drive Letter

If the above steps don’t solve the problem, there could be conflicting registry entries from past USB devices that disabled or interfered with the automount function.

Nexcopy offers a registry cleaning tool specifically designed for USB devices connected to your computer. This utility is an executable file that requires no installation and contains no spyware or malware. Nexcopy is a reputable company that provides direct support via phone, email, or live chat, so you can trust their software is safe and reliable.

USBScrub is the utility name and is available for download here.

Continue Reading

How To Enable Disable USB Write Protection in Windows 10

The link below is for a ZIP file that contains two batch files to either enable or how to disable USB write protection on a Windows 10 computer. These batch files also work on Windows 7 machines.

This solution is ultra-easy and very quick: one click to run the registry edit file and one click to confirm the task. That’s it.

Typically, a person will want to lock down the USB ports of a computer to ensure a virus doesn’t spread through a USB device, such as a flash drive. This batch file provides a fast and simple way to both lock down your USB ports and easily unlock them again.

Important: Do not have a USB flash drive connected to the system when you run either batch file.

For those seeking more technical details, here is the specific registry edit being applied. Changing the DWORD value to 00000001 sets the device policy for the computer to be write-protected. Changing that value back to 00000000 restores normal read/write access.

[HKEY_LOCAL_MACHINE\SYSTEM\CurrentControlSet\Control\
StorageDevicePolicies]
“WriteProtect”=dword:00000001

Note: This USB write protection method is specific to the PC on which it is applied. It is not device-specific and will not follow the USB drive to other machines.

If you require USB write protection that is permanent on the device itself and universal across all computers, contact Nexcopy.com and ask about their Lock License USB drives. This hardware-level solution is embedded in the USB controller, ensuring the drive is always write-protected, preventing any possibility of a virus being written to the USB stick. This is the best universal solution for USB write protection.

Screenshots of the Batch File Process

Batch files included in the ZIP:

USB Write Protection batch files

Windows confirmation prompt after running the batch file:

Windows confirmation prompt

Task completion screen:

USB write protection task complete

Download link for the two batch files:

USB Write Protection Registry Edit Batch Files

Continue Reading

Only One USB Drive Can Be Used In Windows – Others Are Ignored

The most common reason why only one USB drive can be used in Windows is due to multiple USBs connected with the same USB device signature, or disk signature collision.

If you are dealing with bootable devices and seeing this problem, we are confident a collision is the issue. If you are not dealing with a bootable device, then our information below will probably not help.

Only 1 USB Drive Can Be Use  In Windows, hard drive sketch image

What is a USB signature collision?

A signature collision can happen on any bootable device, such as Compact Flash cards, SD cards, microSD cards, and USB flash drives. A disk signature is a unique identifier number (UID). It is a unique identifier stored as part of the MBR (Master Boot Record) for an operating system loaded on the device. The operating system uses the UID to identify and distinguish between storage devices. It is commonly made up of eight alphanumeric characters. A disk collision occurs when your operating system (Windows) detects that there are two disks with identical signatures.

For Windows 7, 8, 8.1, and 10, these versions of Windows will disable the second drive and will not allow that second volume to mount until the disk collision has been rectified. If you are reading this article, chances are, this is exactly what is happening to you.

The first thing to do is navigate to the Disk Management tool within Windows. To do this, use the search tool and type in Disk Management. This will take you to the utility that Windows offers. Here you can see your multiple devices connected. If you click or hover over the device not working you will see one of two messages:

“The boot selection failed because a required device is inaccessible” or “This disk is offline because it has a signature collision.”

What created the USB disk signature collision?

Making a bit-by-bit copy of one device to another, like using a USB duplicator, would create a disk signature collision. Because these binary duplicators copy the MBR information, that UID is also copied to the target device. Stepping forward, once those two devices are connected to the same computer, “boom” you get the collision.

Chances are, the situation you are in right now is due to a cloning process you have just completed. But don’t worry, we have the fix!

Fixing a USB disk signature collision

There are two methods for fixing the collision issue. The first solution is using DiskPart, which is a free command line tool provided by Microsoft and is found on all Windows 10 computers. This is a one-by-one process. If you have multiple devices with this problem and need to fix all of them, best to use option number two.

DiskPart Method

To launch DiskPart, simply go to the search function and type DiskPart

You now see the command prompt for DiskPart and type list disk

DiskPart will list all the storage devices connected to your computer. From this list, identify which USB is your problem device. The easiest way to determine this is to check the capacity for the drive listed by DiskPart.

Select the disk you want to change the signature ID for, for example Disk 1, which is the second disk listed (typically disk 0 is your C drive). Type select disk 1

Now that disk one is selected, type uniqueid disk and the utility will spit out the disk signature for disk 1.

Our final step is to change this value. Knowing a hexadecimal value we can use, such as A53AEBE9, type the following in DiskPart: unique disk ID=A53AEBE9 and click Enter.

With this change, you can now go into Disk Management and put the device Online. When the device is online, Windows Explorer will see the device and you can use it. There is no longer a USB disk signature collision.

If your hexadecimal value will not take, it means your MBR file doesn’t have a signature you can change. You will need to flash the device with your bootstrap code. More details on that from a previous article found here.

Another reason why option number two, below, is better is that the hexadecimal number assigned to the partition is automatic and works. There is no guessing on what hexadecimal to assign to the partition, a step you must do in DiskPart.

Partition Wizard utility example

The second solution is downloading the free Partition Wizard and opening the software. The Partition Wizard software will automatically identify the USB disk signature collision and update the necessary MBR. Super simple!

There is more technical information about disk collision issues from Wikipedia. You can brush up on the details there if so inclined.

Continue Reading

Solved Windows Will Not Assign Drive Letter To USB Flash Drive

Problem Issue: Windows Will Not Assign Drive Letter To USB Flash Drive

This is happening on Win8 and Windows 10.
When I remove a USB drive and reconnect it, Windows will not assign a drive letter. Clearly this is a problem as every other computer I use assigns a drive letter.

There are three solutions. All of which will work:

  1. You can go into Disk Management and select the device to assign a drive letter. This is a manual process and not ideal for each time you plug in a flash drive.
  2. There’s a good chance the driver or registry entry for that device is rogue or corrupt. Use this USBScrub tool to remove the registry entry. Chances are this will fix the problem. USBScrub link
  3. Use ‘diskpart’ and enable the automount feature.
Windows Will Not Assign Drive Letter To USB Flash Drive
  • Open Command Prompt as Administrator (search for Command Prompt in the Start Menu, right click, Run as Administrator)
  • Type ‘diskpart’ and hit Enter.
  • Once in the ‘diskpart’ command prompt, type ‘automount enable’ and hit Enter.
  • Type ‘exit’ and click Enter.

For solution number one from above, Disk Management is really the GUI version for diskpart, but with scaled-down functions compared to what diskpart can really do.

Diskpart has 37 commands that you can use to perform very cool tasks. The 38th command is

Continue Reading

Windows 10 Update, Hickup With Flash Drives

We have read on-line that Microsoft’s May 2019 update might not happen for those with connected USB sticks or SD cards. Microsoft claims the update will simply not happen if the OS detects these connected devices. The reason, Microsoft might re-assign drive letters to those connected devices.

On my first pass of reading this, the reassignment of drive letters doesn’t sound all that bad. Especially for a removable drive. However; Microsoft goes on to state that internal hard drives could also be affected by the drive letter shuffle.

There is your red flag!

The newly published Windows 10 support document reveals; those computers already having the April 2018 (version 1803) or October 2018 (version 1809) updates installed will receive this error message: “This PC can’t be upgraded to Windows 10.”

The Microsoft documentation does not referrence internal hard drives getting reassigned drive letters when no USB or SD card is detected and for that reason we feel you are safe during the update process. This is why Microsoft is blocking the update all together when a USB or SD card is detected in your system. Microsoft understands the importance of mounted internal hard drives; thus their blocking of the update.

Continue Reading

Copyright

Copyright © 2006 +

USB Powered Gadgets and more...

All Rights Reserved

Advertise with us

GetUSB Advertising

This is a high value website providing great exposure to your product and brand. Visit our advertising page to learn specifics.

For more information
Visit our advertising page.

Nexcopy Ad

Nexcopy Provides

USB copy protection with digital rights management for data loaded on USB flash drives.

Contact us learn more

Resources and References Page

Resources and References Page