Have you seen this error message before from your Windows machine when a USB device is connected: “This USB Device can Perform Faster if Connected to Hi Speed USB 2.0 Port?” Well, I’ve seen it recently and went through a fairly long process to figure out how to correct it. Surprisingly it’s not difficult.
First, let me say I’ve found little information on WHY this error occurs and how to avoid getting this error message when a USB device is connected to your computer. From the research I’ve done, this USB error message of “device can perform faster when connected to hi-speed USB” stems from a corrupt setting for a device on your computer in relation to how it communicates with the hi-speed USB host controller.
So here is the quick and easy fix: Reinstall the drivers for your Enhanced USB controller. Sounds complicated, but it isn’t. In fact, it’s a simple right click and a reboot. That’s it. Here’s how you do it:
Step 1: Unplug any USB devices from your computer with the exception of your keyboard and mouse [if they are connected].
Step 2: Navigate to your Device Manager page by doing:
Start > Control Panel > System > go to Hardware tab > Device Manager
From this window scroll down until you see the + sign for “Universal Serial Bus controllers.” Click the PLUS sign and another list will expand out. Simply identify the item which references a “USB Enhanced” controller and right click. From the options provided from your right click select “uninstall.”
You will get a warning sign, but don’t worry. Click OK.
Your computer will go through the process of uninstalling the USB Enhanced USB controller. Your computer will then immediately go through the installation process as well. After the re-installation you computer might seem all-is-well; however, your error message will not go away until you reboot your machine. Do that now.
If you have any questions or comments hit the forum post for follow up.
Continue Reading
BootIt is a Lexar based utility to flip the Removable Media Bit setting of a USB drive. What this means, is you can take a Lexar drive (and many other brands) and make it appear as a Local Drive on your PC rather than Removable Storage.
This is absolutely necessary if you are looking to partition your USB drive or try some trick hack like run your iTunes from a USB stick.
The RMB or Removable Media Bit is present on all flash drives, but whether the Lexar utility can flip it is something of trial and error. Although it goes without saying…and I’ll say it anyway…the utility works with Lexar drives, everything else, use at your own risk.
Back in July 2007 I made a USB tutorial post about putting WordPress on a stick. Shortly there after, several visitors emailed me indicating I had too much time on my hands and it really wasn’t worth the effort. But how do I disagree!
Even in the past year, WordPress has gain momentum in the blogisphere and becoming the #1 blogging platform. Even Alexa, a fairly decent gauge on web traffic ranks WP as #26 in most popular sites.
Given this information, I’ve seen more and more website – not blogs – use the WP platform to create their static website and webpages. So for those SEO and web designers out there, putting WordPress on a stick allows them to demo the site to clients, run SQL runtimes for testing and troubleshooting and isolating their web environment during development.
A good example is my RSS Filter website: FilterMyRSS. Take a look at the source code, you’ll see the script which runs the utility along with supporting pages and blog entries…all based off WordPress.
I do agree the masses wouldn’t care about putting WordPress on a stick, but if the web is your bread-n-butter it would probably be smarter for you to know how – than to not.
Today LifeHacker syndicated a short description on how to place a Wiki on a USB stick…and I thought…hmm interesting idea. So digging into things a little deeper it seems no more complicated than putting WordPress on a stick. But I think most of you would ask, why? The reason would be for off-line edits, organizing or remote access where there is no internet connectivity or you are in a facility which limits your access (schools & gov’t agencies).
Here is the web page from the MediaWiki website which gives you all the juicy details on placing a wiki on a stick.
Continue Reading
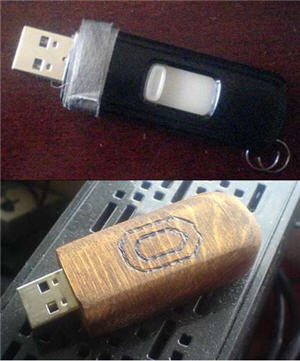
One of the most common problems with USB drives is the plastic casing getting cracked and breaking apart. It’s a shame that such a cheap piece of plastic might encourage some to drop another $20 or $30 on a new device. Of course fixing the plastic is never going to work as a long term solution – just a stop-gap.
Instructables has a nice USB tutorial on taking a UFD and turning it’s case into a nice, customized wood piece. Sure you could buy a fancy wood drive made from material carbon dated back 600 years or more, but sometimes making your own stuff is much more satisfying.
The USB tutorial displays 12 steps from start to finish with a list of equipment you’ll need, but after reading through the tutorial, I think a dremel would replace most of the tools required. And we all have one of those.
So get going and as Eric would say “go build something…”
Link to USB tutorial lesson.
Continue Reading
With “going green” such a big trend right now you might find yourself wanting to put a little green in your workspace – and no, I don’t mean that green. The following is a video USB tutorial on taking some supplies from around your office or home, LED lights and some USB power to create your very own USB LED Greenhouse.
Video is 3 minutes.
Continue Reading
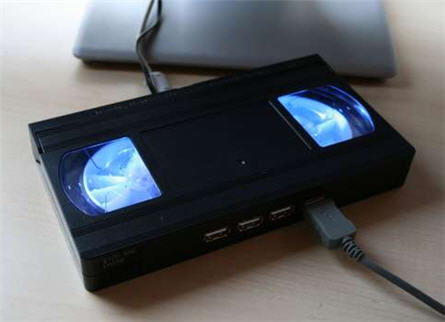
Instructables posted a great little USB hack for turning an old VHS tape into a glowing USB hub. I like this mod because it takes an old, out of date medium, puts some retro lighting in there which creates a modern day device I can use everyday.
Instructables also brings up a good point with hubs getting smaller these days, it’s more likely you’ll lose it behind your desk. Having a honk’in big VHS tape solves that problem.
So what is this USB tutorial all about? Well, in short, you will destroy an old VHS tape, cut out some through-holes for USB ports and power. Secure some LEDs for effect and reassemble everything to impress your buddies. Since this outline isn’t enough to start or finish the project, jump over to Instructables for the full low down.
Continue Reading
Waterproofing your USB drive is a good preventative maintenance procedure as you never know when it’ll end up in the wash. Below is a video on how to use epoxy and little skill to waterproof your UFD. Enjoy this USB tutorial:
Continue Reading
Here is an illuminating tutorial for you. A simple “how to” on making a USB flash light. In just a few minutes you can have a handy flash light for peaking into your PC tower, under the desk or behind the office credenza for that lost business card.
Continue Reading
With over 5,300 Diggs, I figure this would be a good article to report about on how to make a sawed-off USB key. Nothing about this project is too technical, but the idea is clever enough it’s gained a lot of attention.
The sawed off UFD is a mod of using a slim Kingmax USB drive, USB cable and some glue + knife for a very cool looking storage device.
The intro line to this tutorial from the main page is:
“Holy crap– somebody just went and TORE MY FREAKING USB CABLE IN HALF while it was still attached to my laptop!!!
No– wait– sorry. That’s just my USB drive. My bad. Never mind.”
Which I think is pretty funny.
So besides getting a slim Kingmax USB drive (here is a 4GB for $15), you will need the following:Â USB cable, X-acto knife, glue, pliers, small screwdriver and some mad cutting skills.
First thing you will want to do is cut open the female end of the USB cable so you can insert the memory for storage. It’s fairly straight forward in the process. Some additional pictures are available
Continue Reading
Here is a nice quick and easy USB tutorial.
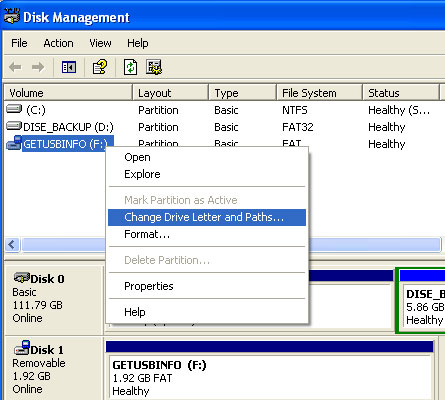
Swapping storage can become a headache in Windows as you never know or can remember which drive letter Windows assigns your drive. At Lifehacker, they posted a nice tip on assign USB drives to folders. This method not only keeps things organized, but adds one additional benefit most wouldn’t think of.
First, the tip.
Create a main USB folder where we will mount all the USB drives once connected. Then assign all your USB devices to sub-folders within that main folder. After creating the folder structure, do the following for assignment.
Click > Start > Run then enter diskmgmt.msc and hit enter. This opens the Disk Management configuration that should display all drives and devices currently connected to your computer.
Pick an USB device from the list and right-click that entry. Select Change Drive Letter and Paths from the menu.
This should open a new window that is displaying the current drive letter of the device and three buttons at the bottom which are named Add, Change and Remove.
Click on the Add button, select Mount into the following empty NTFS folder and click on browse. Now navigate to the subfolder that you want to assign the usb drive to and confirm the assignment. The USB drive will from now on be accessible from that folder as well if it is connected to the computer.
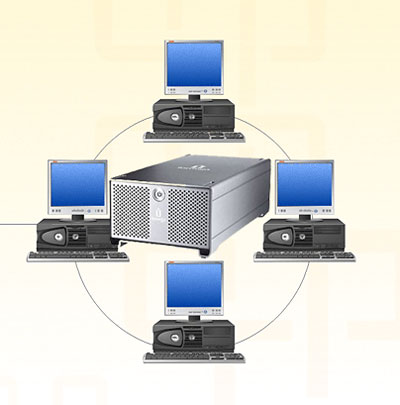
Someone once asked the question if they could network their external USB hard drive so other computers could share and store information on it.
Surprisingly it isn’t that hard. There is no need to build a NAS (Network Attached Storage) server or configure NAS software on a host computer. All you need is changing some privileges to the USB external hard drive.
Granted, this solution isn’t for the hard-core network user(s) environment, nor is it ideal for business applications where large or frequent data storage transfers are required or networks where users are accessing storage via a remote server. Rather, this is a simple solution for a home network or small business office.
Simply use the file and printer sharing setting in Windows to network a USB external hard drive. Or you can use the Windows mapping tool to map and share a drive to other computers on the network.
Continue Reading
 First, let me say I’ve found little information on WHY this error occurs and how to avoid getting this error message when a USB device is connected to your computer. From the research I’ve done, this USB error message of “device can perform faster when connected to hi-speed USB” stems from a corrupt setting for a device on your computer in relation to how it communicates with the hi-speed USB host controller.
So here is the quick and easy fix: Reinstall the drivers for your Enhanced USB controller. Sounds complicated, but it isn’t. In fact, it’s a simple right click and a reboot. That’s it. Here’s how you do it:
Step 1: Unplug any USB devices from your computer with the exception of your keyboard and mouse [if they are connected].
Step 2: Navigate to your Device Manager page by doing:
Start > Control Panel > System > go to Hardware tab > Device Manager
From this window scroll down until you see the + sign for “Universal Serial Bus controllers.” Click the PLUS sign and another list will expand out. Simply identify the item which references a “USB Enhanced” controller and right click. From the options provided from your right click select “uninstall.”
First, let me say I’ve found little information on WHY this error occurs and how to avoid getting this error message when a USB device is connected to your computer. From the research I’ve done, this USB error message of “device can perform faster when connected to hi-speed USB” stems from a corrupt setting for a device on your computer in relation to how it communicates with the hi-speed USB host controller.
So here is the quick and easy fix: Reinstall the drivers for your Enhanced USB controller. Sounds complicated, but it isn’t. In fact, it’s a simple right click and a reboot. That’s it. Here’s how you do it:
Step 1: Unplug any USB devices from your computer with the exception of your keyboard and mouse [if they are connected].
Step 2: Navigate to your Device Manager page by doing:
Start > Control Panel > System > go to Hardware tab > Device Manager
From this window scroll down until you see the + sign for “Universal Serial Bus controllers.” Click the PLUS sign and another list will expand out. Simply identify the item which references a “USB Enhanced” controller and right click. From the options provided from your right click select “uninstall.”


 Today
Today