GetUSB.info Logo

I can’t Format FAT32. Where did FAT32 go? Where did it start and end?

I can't Format FAT32.

Has anyone noticed FAT32 format option is gone in Windows?

Microsoft has not issued an official statement explaining why the FAT32 formatting option is unavailable for storage devices 32GB and larger but we’ve done some digging and came up with a possible answer.

On both Windows 10 and Windows 11, users are typically presented with formatting options for NTFS (New Technology File System) or exFAT (Extended File Allocation Table). The choice to format a drive as FAT32 is missing once the drive exceeds 32GB in capacity.

Since Microsoft has not clarified this change, it’s widely assumed that the decision was made to avoid problems caused by FAT32’s limitations—especially its inability to store files larger than 4GB. As file sizes have continued to grow over the years, this limitation has become more noticeable.

The FAT32 file system cannot handle single files larger than 4GB. This is due to its 32-bit file allocation table, which caps the maximum file size at 4,294,967,295 bytes. Regardless of the cluster size, FAT32 simply cannot address a file above that cluster size.

For users who need to store high-resolution videos, system backups, or other large files, switching to exFAT or NTFS is essential. NTFS, which is the default for most internal drives in Windows, offers better support for large files, access permissions, and journaling. ExFAT, on the other hand, was created as a lightweight, high-capacity alternative for external storage that’s compatible across multiple operating systems. But don’t format USB flash drives as NTFS as we’ve mentioned before.

We think Microsoft removed the FAT32 option for drives above 32GB to prevent user confusion and/or support issues. For example, trying to copy a 5GB video file to a FAT32 drive will result in a frustrating error message. By defaulting to exFAT, Windows helps users avoid this issue without needing to explain file system limits.

ExFAT supports significantly larger file sizes compared to FAT32. In theory, exFAT can handle files up to 16 exabytes (16 million terabytes), although real-world limits are much lower and depend on the device’s implementation. Even so, it’s more than sufficient for most consumer and professional use cases, from video production to large-scale backups.

While exFAT offers excellent cross-platform compatibility and large file support, users should be aware that some older operating systems or embedded devices might not support it natively.

Real Quick: A Brief History of File Systems

The concept of a file system—the method by which data is organized and stored on a storage device—has evolved steadily since the early days of computing.

General Motors needed a file system in the 1950s to help their early computers store and organize large amounts of business data—like payroll, inventory, and production schedules. Working with IBM, they developed one of the first operating systems (GM-NAA I/O) to manage these tasks. It allowed the computer to access and manage files on magnetic tape, making it easier to run multiple jobs and retrieve information efficiently. This basic file system helped move computing from scientific use into real-world business operations.

A few years later, more advanced systems like MIT’s Compatible Time-Sharing System (CTSS) introduced features like named files and user access control. By the 1970s, UNIX and Multics brought in hierarchical directory structures that closely resemble the file systems we use today.

Dumb Question: Why Did Microsoft Call It “FAT”?

Continue Reading

Get USB Flash Drive Serial Number with PowerShell or Command Line

Easily get the hard coded serial number of a USB flash drive with either the Command prompt in Windows or Powershell. Of the two, Powershell is easier. Below are the instructions. After the instructions there is a bit more information about the different types of serial numbers which can be found associated with a Mass Storage Device (USB flash drive) so be sure to read that part as well, so you get what you want!

In the Windows Search bar, type “powershell” and click Enter

The Powershell utility will run and simply copy and past the following:

Get-WmiObject Win32_DiskDrive | select Model, Name, InterfaceType, SerialNumber

The screen shot below shows the hard drive of the system and a USB flash drive. The command doesn’t clearly label each, so be a little aware of the devices connected compared to what is listed. It is suggested to have only one USB device connected while running Powershell so it is easy to identify the device.

get usb serial number using powershell

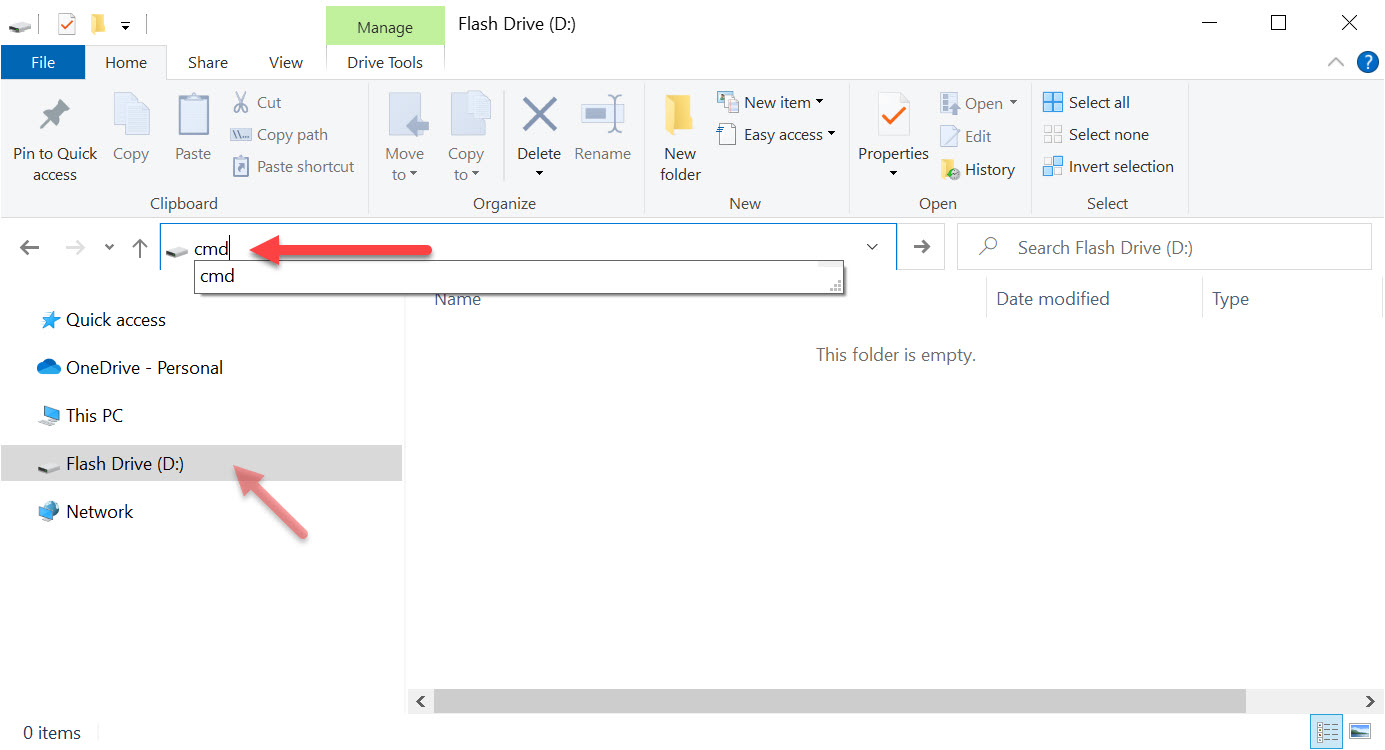
For the Command prompt, go to the USB flash drive itself. In the navigation field at the top (where you can type things) type in cmd. This will open the Command prompt for the USB flash drive itself. From here, copy and paste the following:

wmic path Win32_USBControllerDevice get Dependent | find “USBSTOR”

The screen shot below shows the same result as the Powershell command, BUT the string does have an extra &0 which is not part of the USB flash drive device. So a bit of parsing is required when looking at the number, or parsing of code if you plan to use the Command prompt to find the device serial number programmatically.

get usb serial number using command line

From the two above the Powershell solution is a bit more elegant.

However; may we suggest a third option? If you find yourself on this page, there is a high probability there are other features you can benefit from, like making an Image file of your USB stick, or speed benchmarking the performance of your flash drive.

If that is the case, then we recommend our free program, no installation required, standalone exe file that will fetch the serial number of a device as well as provide a tool to create image files or speed test your USB flash drive.

usb flash drive utility, image file, speed test, get serial number

You may download the free program here. Again, no installation required, this is a standalone exe file that can run from your flash drive or hard drive:

FREE DOWNLOAD: Nexcopy USBScrub

Continue Reading

Disable USB Flash Drive Pop Up Messages in Windows 10

Users can turn disable USB flash drive pop up messages in Windows 10 by performing a very simple step in Settings. While it may seem counterproductive to turn off USB notifications in Windows 10, once you’ve been using Windows for a while you will likely want to reduce the number of pop-up messages.

There are two ways to disable USB flash drive messages in Windows. Performing a RegEdit or modifing a Settings feature in the Windows GUI

Disable the USB flash drive pop up message via Windows Registry Edit

  • Open RegEdit by typing “regedit” in the Search bar
  • Navigate to: HOKEY_LOCAL_MACHINE\SOFTWARE\Miscrosoft\Shell\USB
  • Click the USB folder on the left of the screen to highlight the registry entries for \USB\
  • On the right side of screen select “NotifyOnUsbErrors” by clicking on it
  • Right click and select “Modify”
  • Set the value to “0” (zero). Zero is off, One is on

Disable USB message Windows 10, regedit

NOTE: Most users will receive a message saying they do not have privileges to modify the registry value. That is meant by design, and please see the comments at the end of this article for why.

Disable the USB flash drive pop up message via Settings

  • Type “settings” in the Seach bar of Windows
  • Select “Devices”
  • Select the USB tab near/at the bottom on left
  • Uncheck “Notify me if there are issues connecting USB devices

Disable USB message Windows 10, Settings

The second method via Settings is the preferred method because changing registry entries is not recommended unless the user is very experienced with computers. Windows 10 does a good job of not allowing users make registry changes that would crash their computer or brick the operating system, but the risk is still there.

If you received some sort of permissions message when attempting our regedit method, I would stay away from trying to resolve that security message. The reason Miscrosoft locks downt he registry in certain areas is to provide a more secure computer system for the user and reduce potential risk of malware or hackers getting control of your computer.

Over the years, numerous reports have come out about how hackers will expose certain USB protocols to insert malware or take control of a system. The registry is the main point of focus for hackers.

If you are persistent about changing the registry entries the first thing you can try is running RegEdit as Administrator. If that doesn’t resolve your issue then you may Google search for your specific error message and see if another website offers up a solution.

Continue Reading

Solved: (Video) Windows Cannot Delete the System Volume on This Disk

Sometimes Windows cannot delete the system volume on the disk because the partition table is corrupt. The solution is very easy and all the tools required to solve this problem are pre-installed and ready to use on any Windows 10 (+) computer.

Windows Cannot Delete the System Volume on This Disk

In short, the Disk Management utility cannot delete the volume because there is corrupt data in the partition table of the device. This issue we are talking about is most likely associated with a USB flash drive and sometimes USB hard drives.

One of the reasons a user will get a corrupt partition table is from formatting the USB device over and over again. Sometimes computers just don’t do what they are supposed to do! Surprise!

A common reason a user would like to delete the volume of a flash drive is to start “clean” with a fresh device. The reason to start “clean” is because some other function or task is not working as expected. For example, a user trying to create an digital image file (.img) from a physical USB flash drive continues to create corrupt image files. Well, when you start with a corrupt partition table, you’ll end up with a corrupt image file.

Another reason could be a user is trying to make a two partition flash drive using Disk Management. However, you cannot make a two partition flash drive if you cannot delete the volume in the first place!

We did a great write up about “How to partition a USB flash drive in Windows” a while back. A good read if you have the time.

The below steps will show you exactly how to fix this problem. There is a video at the bottom of this post showing the steps.

  • Connect your flash drive
  • In the search field in Windows (bottom left white box that says “Type here to search”) type “Disk Management” and click ENTER on the keyboard. Disk Management should pop up.
  • In the search field in Windows type “diskpart” and click ENTER on the keyboard. DiskPart will either pop open, or a dialogue box will ask if you want to open it, click YES
  • In DiskPart type “list disk
  • From the list provided determine which disk number represents your USB flash drive or hard drive
  • In the screen shot below, our disk is #1
  • Type “select disk x*In this example we typed “select disk 1”
  • Type “clean
  • When that is complete, toggle over to the Disk Management utility
  • Right click the box which represents the USB flash drive and select “New Simple Volume
  • Follow the prompts in the wizard to complete the process

After completing the above steps the flash drive is now ready for use. In addition, if it is required to go back and delete the volume, say to make a two partition flash drive, you can now do this without the error message “This Request Is Not Supported”

Here is a video for the above process:

Continue Reading

Make USB Flash Drive Bootable in Anything

USB flash drive, bootable, in anything

Doing some research for why some HP computers do not boot from a USB flash drive, I came across Ventoy.

Ventoy is a software tool to create a USB flash drive bootable in anything and supports the most common image files.

We tried Ventoy to make a USB flash drive bootable, and it works like a champ. In fact, the software is so easy to use, it is worth commenting about a previous post we did. A while back we talked about how to check if your USB flash drive is bootable, and to be honest, rather than putting in the time and work to read the article and do the steps, your time is better used flashing your drive with Ventoy. The result is a bootable USB flash drive for any device.

Ventoy is an open source tool for creating bootable flash drives when using image files like ISO, IMG, WIM, VHD and EFI files. The project team tested over 900 image files which tested successfully on over 90% of the distro packages.

What we like about this solution is no need to flash the drive with boot code using the source CD-ROM like so many tutorials out there (for Windows at least) because the Ventoy tool creates a second partition which all the boot code and the Ventoy utility flashes that partition with the boot code needed. You can see from the Disk Management screen shot below there are now two partitions on the tested flash drive.

usb flash drive, bootable, disk management, ventoy

You can tell there have been plenty of Ventoy updates and what is (also) very nice about their software tool is the display of Ventoy version on your device. Nice feature to cross reference if your device is current or needs an update. The update process is just as quick as the original creation of the bootable device.

usb bootable in anything, ventoy software screen

Considering the above, it goes without saying it is easier than ever to make a USB flash drive bootable in anything without having to re-do the work. This software eliminates the need to re-create a bootable image to USB and flash it over and over. Simply update the image file content, not the boot strap code.

The only thing even slightly annoying, which is easy enough to correct is the Volume name for the primary partition defaults to “Ventoy” Would be nice if an edit feature was in the software to customize this without the additional step of renaming the volume after-the-fact.

USB volume name, ventoy, for bootable flash drive

Here are a list of feature copied from the website. The project is open source and we suggest making a donation if you do in-fact use the code. It’s only fair, right!

Continue Reading

How To: Hide Files on a USB Flash Drive

How To: Hide Files on a USB Flash Drive

close up picture of flash drive

This article, “How To: Hide Files on a USB Flash Drive,” explains two free methods to conceal files on a USB drive using built-in Windows features. One method is quick and basic; the other is more advanced and harder to detect.

Overview of the Two Methods

Method 1: Standard Hidden Attribute

This method is the easiest. Anyone can right-click a file or folder, go to Properties, and select the Hidden checkbox. This will hide the file unless a user has Windows configured to show hidden files.

Pros: Easy and fast
Cons: Easily bypassed

Method 2: System Hidden Attribute

This method hides a file using both the system and hidden attributes. Windows will not show these files—even if “Show hidden files and folders” is enabled—unless the user also disables “Hide protected operating system files.”

Pros: Harder to detect
Cons: Slightly more technical

How to Hide a File Using the Hidden Attribute

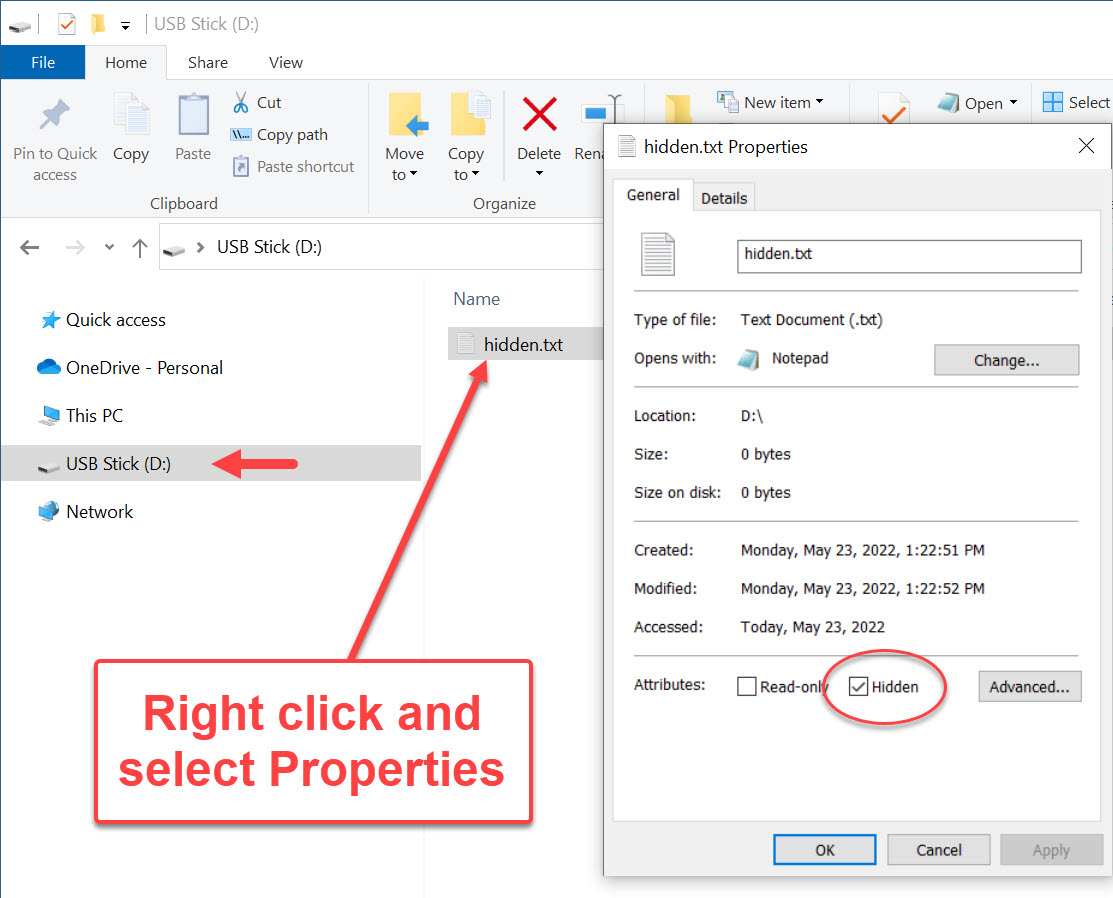
Right-click the file or folder ? Properties ? check the Hidden box ? click OK.

properties of hidden file on USB flash drive

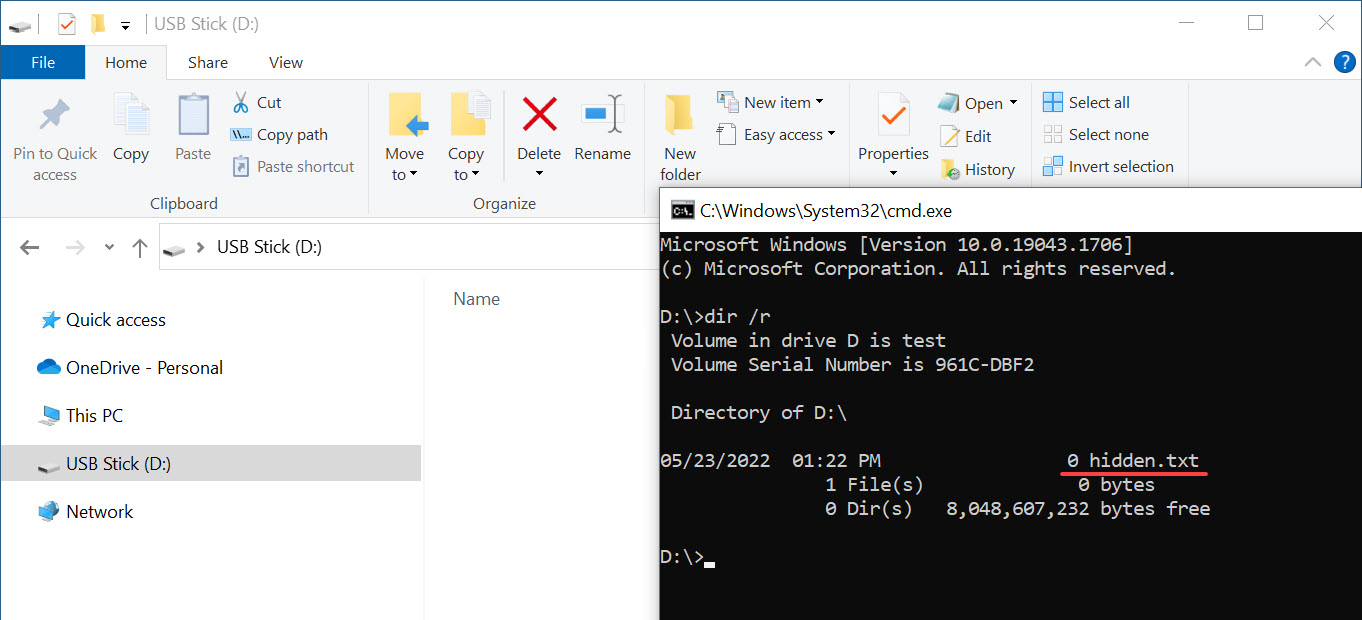
If Windows is set to not show hidden files, it disappears from File Explorer. However, it still shows in the Command Prompt:

command line of hidden file on USB flash drive

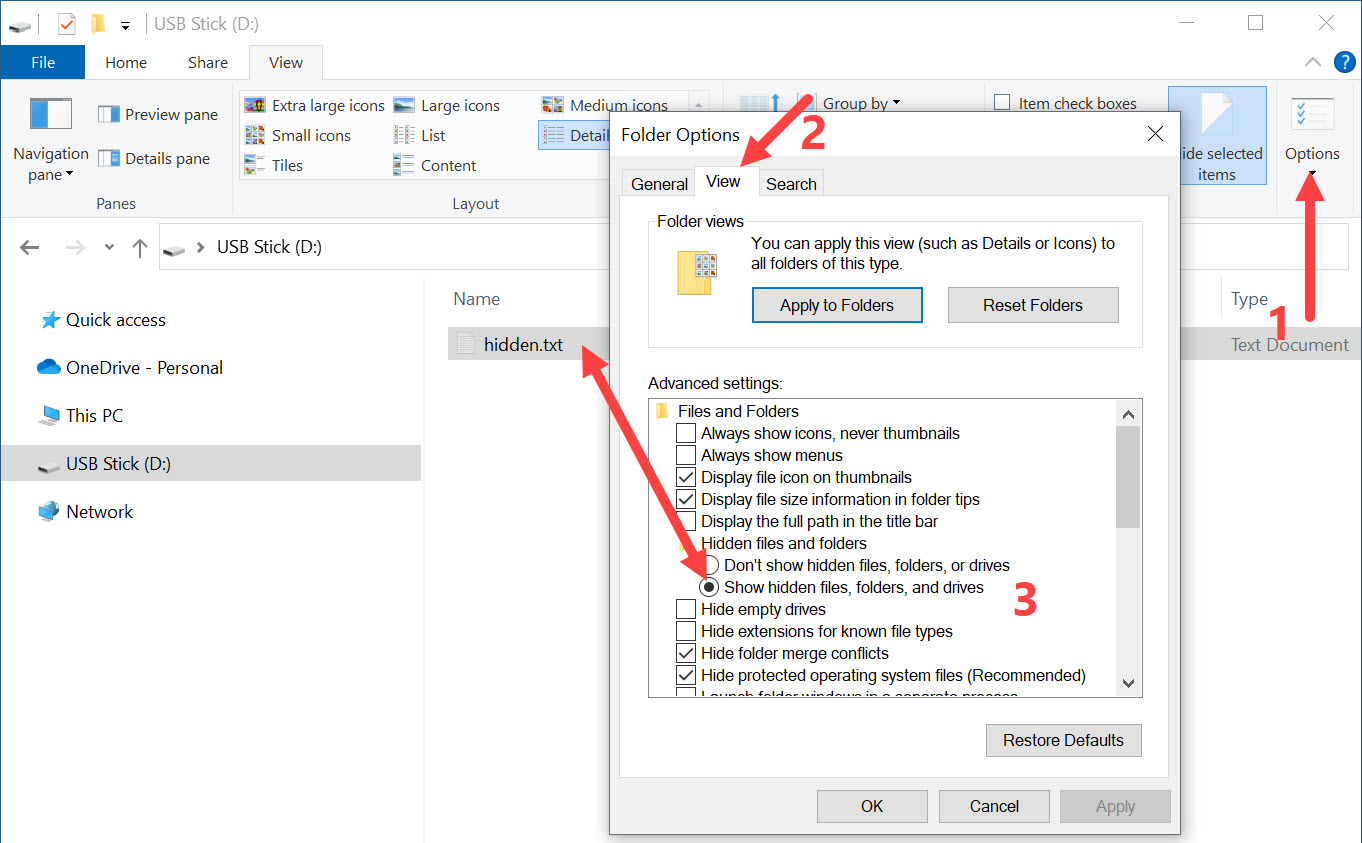
If the user has “View hidden files and folders” enabled, the file is visible again:

show hidden files on USB flash drive

How to Use the System Hidden Attribute

Let’s take it a step further and apply the system attribute in addition to the hidden flag.

Step 1: Prepare the File

Place the file (e.g., text.txt) onto the USB flash drive.

Step 2: Open Command Prompt on the USB Drive

Click in the File Explorer address bar, type cmd, and hit Enter.

use command line to hide files on flash drive

Step 3: Apply the System Hidden Flags

At the prompt, type:

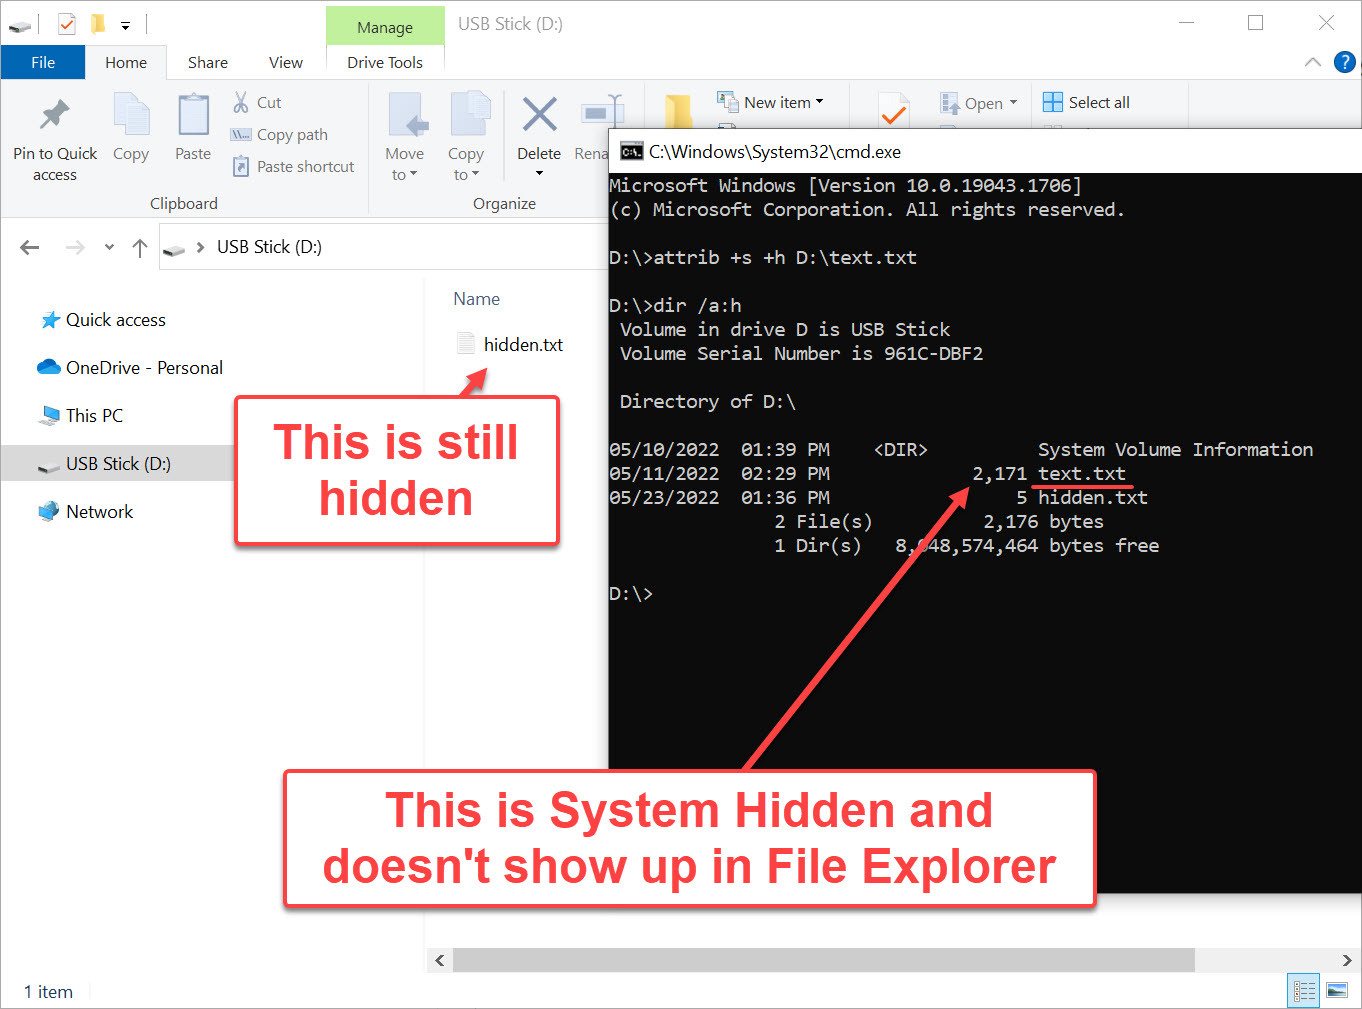
attrib +s +h D:\text.txt

Replace D:\ with your actual USB drive letter.

system hidden file property to hide file on a USB stick

Type exit to close the prompt. Then unplug and reconnect the USB drive. The file will now be invisible—even with hidden files shown—unless the system file setting is also disabled.

Confirming the Hidden File

Open Command Prompt and type:

dir /a:h

You’ll see hidden files listed—even the system hidden ones—but they won’t appear in File Explorer.

view system hidden file on USB drive

How to Open or Restore the Hidden File

Option 1: Show Protected Files (Not Recommended)

Enable “Hide protected operating system files” in Windows Explorer. This reveals system-hidden files but also exposes critical OS files to potential deletion.

Option 2: Remove Attributes

In Command Prompt, type:

attrib -s -h D:\text.txt

Option 3: Open Without Changing Attributes

To open the file without unhiding it, use:

notepad D:\text.txt

open hidden file on USB flash drive from command line

Need Stronger File Protection?

If you require stronger security, consider a Secure Disk solution. These USB flash drives hide entire partitions until a password is entered. They’re hardware-based, making them immune to software workarounds or hacks.

For more info, check out Nexcopy’s Secure Flash Drives.

Continue Reading

How To: Create a Website Shortcut on a USB Drive

This article will show you how to create a website shortcut that works from a flash drive. The article includes the instructions, a video on the instructions and a template file one can download and tweak for their own use.

The reason for this topic of creating a website shortcut on a flash drive is because dragging and dropping your desktop shortcut to a flash drive doesn’t work.

The shortcut on a desktop is a relative path of the computer to the website. Which means the shortcut doesn’t transfer well to a flash drive for others to use. Rather than a working shortcut, the shortcut either errors off or takes you to a generic page within the browser.

Creating a shortcut that works on a USB flash drive is very easy. Like, crazy easy.

  • Open Notepad (type notepad in search and click Enter)
  • Type: [InternetShortcut]
  • Type website landing page: URL=https://www.getusb.info
  • Now Save As the file to your USB flash drive with .URL extension.

You have now successfully made a website shortcut on your USB flash drive.

This link can be used on any flash drive or hard drive or desktop location. The shortcut is truly a universal file that will work from any location.

Here is the text file which you can use as a template if the above instructions are too complicated or you simply don’t want to perform the steps.

Here is the video: How To: Create a Website Shortcut on a USB Drive

Continue Reading

Fix: Computer Will Not Boot With USB Device Plugged In

There is nothing worse than a blank screen after pushing the power button on your computer. The heart stops, the shoulders sink and this feeling of utter despair and anxiety quickly overtake the body.

Why? Why is this happening right now! I have emails to check, orders to process, papers to submit.

It is inevitable a computer problem starts whenever you most need the computer.

A quick examination of the computer shows a flash drive sticking out of a USB port. Could this be the problem? Let me pull the USB out and restart my computer.

A few moments later you discover removing the flash drive did the trick, the computer boots up and starts, as expected. So what happened? Why will my computer not boot with a USB device plugged in?

In this scenario the explanation is very simple. When the USB is connected the operating system thinks it should boot from the flash drive, not the computer hard drive.

At one time in this USB’s life, the drive was made to be bootable and book-strap code was flashed to the device. Because the computer BIOS sees the drive and the boot code, the BIOS will instruct the computer hardware to reference the USB stick for the operating system.

This doesn’t mean any flash drive connected will force your computer to boot from a USB stick, only if the USB stick was made bootable at some point. Most flash drives are not bootable by default and have the boot-strap code to overtake the machine.

The other important point to consider,

Continue Reading

How To: Get Serial Number of USB Flash Drive

Using the CMD prompt in Windows 10 or 11, it is a one line request to get the serial number of a USB flash drive. The serial number in question is the device serial number which follows the device and will be the same serial number to identify the physical device. This serial number is written into read-only memory on the flash drive and cannot be duplicated or deleted or modified. This is different than the volume serial number which we talk about from a previous post.

Steps are very simple:

# Insert a flash drive (or multiple)

# Select a flash drive by clicking on the drive letter

# In the Explorer path field type cmd

usb flash drive, cmd prompt

This will open the Command Prompt

# Copy the text below and click Enter

wmic path Win32_USBControllerDevice get Dependent | find “USBSTOR”

This request is asking Windows to search the computer for any Mass Storage devices (flash drives) connected to the computer USB Host Controller on the motherboard.

How To Get Serial Number of USB Flash Drive

Serial Number of USB Flash Drive, multiple drives

You do need to parse some information out because more than a serial number is given.

The serial number of the USB flash drive is listed last and there is a &0 at the end which is not part of the serial number. The hardware serial number can range in length so we don’t have a guideline for how long it should be. Typically we see serial number lengths range from 8 to 30 alpha-numeric values.

Using a 3rd party program, you can see the serial number of the USB flash drive matches that of the cmd prompt request.

software to get serial number of USB drive

Continue Reading

Greyed Out USB Flash Drive (help)

If you have a greyed out USB flash drive this article should be able to help you resolve the issue.

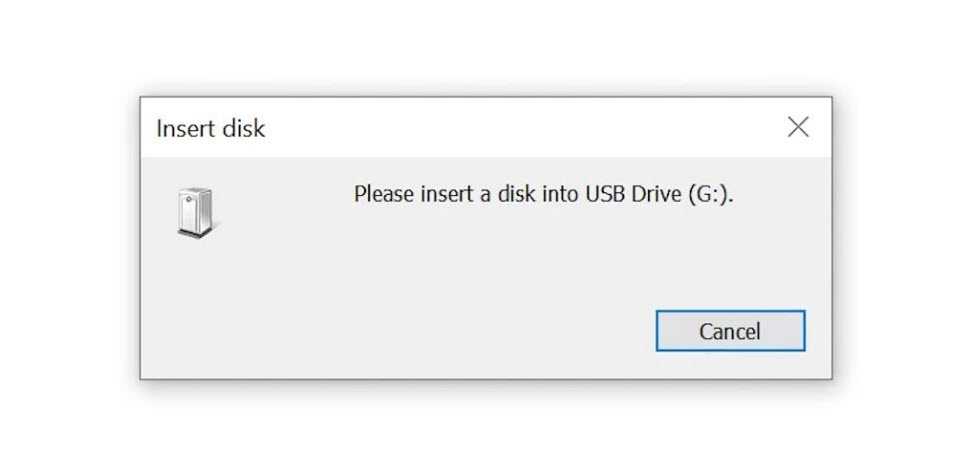
The most common reason is the USB flash drive has a different file system and you simply need to format the drive. For example, Ext3, Ext4 or HFS are file systems for Linux and Mac. By formatting the USB drive it could restore the drive and it’s no longer greyed out.

please insert disk into USB drive

If this didn’t do the trick, then try the next suggestion ↓

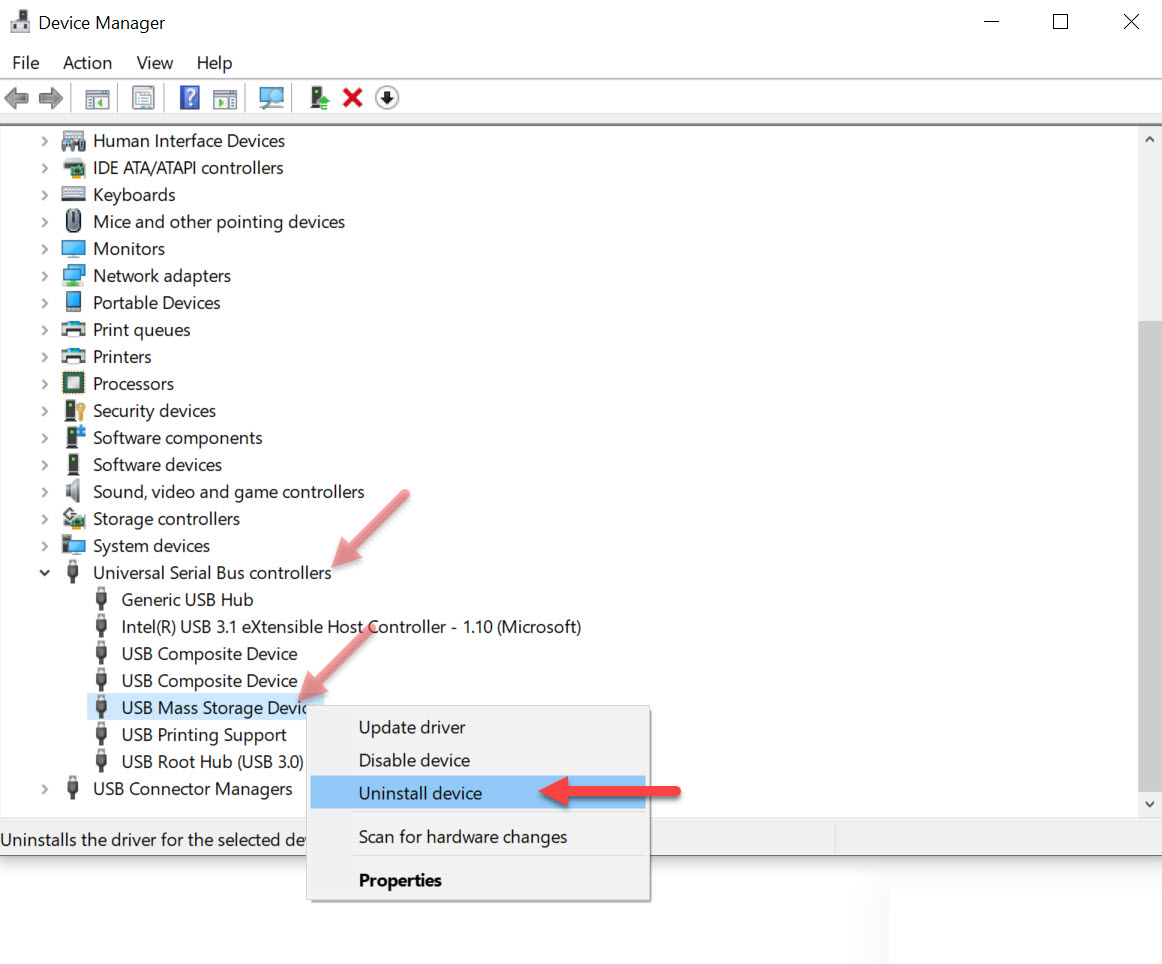
It is possible the greyed out USB flash drive has a bad device driver. We can uninstall the drive and try re-installing the USB stick (reconnecting).

Do the following:

In the Search area type “Device Manager” and good chance Windows will auto-suggest before you are even done typing. Select Device Manager.

device manager, windows to find greyed out USB flash drive

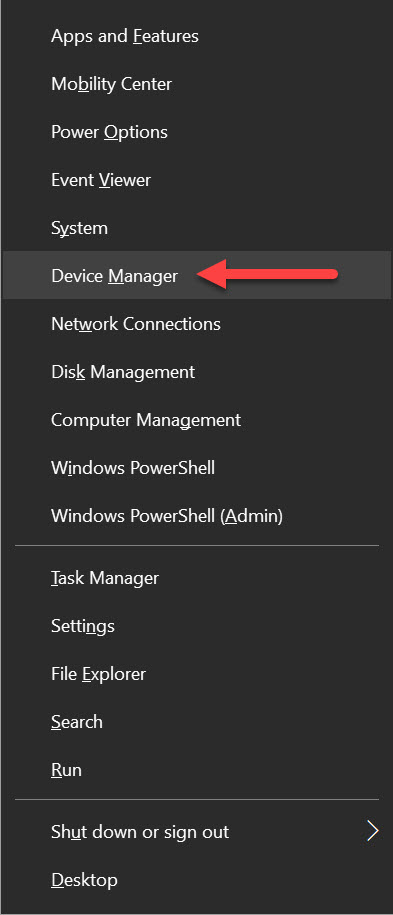
Alternatively you can click the Windows key along with “X” and from the list select Device Manager

Win Key + X, windows to find greyed out USB flash drive

Device Manager lists things alphabetically so scroll towards the button and expand the carrot > for Universal Serial Bus controllers.

In the sub-listing you will see the Mass Storage Device and then right click that device and select Uninstall device

uninstall USB driver, greyed out USB stick

Now the device drive has been removed, please reconnect the device and see if the greyed out USB flash drive is still greyed out.

If this didn’t do the trick we have one last suggestion for you before declaring the USB stick most likely dead ↓

Continue Reading

Eject USB Flash Drive From Windows Command Prompt Any Version

Eject USB Flash Drive safely, Free Download

Microsoft does not provide ways to eject USB flash drives with a single click, or automatically. Universal Serial Bus (USB) is the #1 method for expanding storage in Windows, yet Microsoft makes ejecting a storage device such a manual process! Frustrating to many, like you, because you are here. {wink}

Today we cover how to eject a USB flash drive in Windows using the command prompt. In addition, this article also provides a software way to eject a USB flash drive with the single click of a button. Yes, that is right, a single click!

Let us start by covering how to eject a USB drive using the command prompt.

Like mentioned above, Microsoft does not make this easy. The user must get into DiskPart, List the volumes (drives) connected, select the specific volume (drive) then eject by typing “release.”

The above commands may be performed via the command prompt, but honestly it’s a pain in the a$$ because all the typing involved and manually selecting the device. This process needs to be automated. {hint}

If you are reading this article you want to make things quick to remove USB, easy and simple.

Nexcopy solved this problem with a free utility that doesn’t require installation, doesn’t require Admin rights, and doesn’t require you to select the drive. The tool is ultra-quick and ultra-easy. In addition, anyone can bundle the free exe file into their own software to automate the process.

The free software tool is called USB Eject Button

Here is the free download link to eject USB flash drives from Windows command prompt

Below is the command prompt using a single word to eject a USB flash drive. The command is “release”

Continue Reading

Solved: Can’t Mount IMG File in Windows 10

The first thing to understand is that image files are a messy business. There is plenty of cross-over information and functionality between image file extension types – it is easy to get confused!

Don’t be surprised if you can’t mount an .img file in Windows 10 with their default utility – it’s a common problem and this article will help.

Windows image mount utility

Windows, disc image file is corrupt

It is important to understand not all image files are the same. Heck, not all .img files are the same. Some basics: For the term “image files” you typically see .img files and .iso file extensions and they have similar functionality and conceptually accomplish the same goal. The goal is for an image file to hold digital content, in a single file, of a file system and a its set of data. If that sentence is confusing, then maybe think of an image file this way: a zip file (but without compression).

A very quick summary explaining the difference of .img and .iso image files. An optical disc holding data is configured differently than hard drive storage space. The optical disc has data written in a linear configuration and is a digital binary copy of the ISO 9660 standard or derivative UDF standard. The ISO file extension is a single file which contains all the digital information just described.

An .img file is a digital copy of the contents of a hard drive or flash drive. Technically you can have an .img of a CD or DVD as well, but most should associate the image of a disc as ISO. An .img file is a disk image which begins with a FAT sector which is used to identify the file system and files contained inside the image file. The image file of a disc (ISO) begins with a descriptor file which describes the layout of the disc.

That last sentence is important:

Continue Reading

Copyright

Copyright © 2006 +

USB Powered Gadgets and more...

All Rights Reserved

Advertise with us

GetUSB Advertising

This is a high value website providing great exposure to your product and brand. Visit our advertising page to learn specifics.

For more information
Visit our advertising page.

Nexcopy Ad

Nexcopy Provides

USB copy protection with digital rights management for data loaded on USB flash drives.

Contact us learn more

Resources and References Page

Resources and References Page