Microsoft does not provide ways to eject USB flash drives with a single click, or automatically. Universal Serial Bus (USB) is the #1 method for expanding storage in Windows, yet Microsoft makes ejecting a storage device such a manual process! Frustrating to many, like you, because you are here. {wink}
Today we cover how to eject a USB flash drive in Windows using the command prompt. In addition, this article also provides a software way to eject a USB flash drive with the single click of a button. Yes, that is right, a single click!
Let us start by covering how to eject a USB drive using the command prompt.
Like mentioned above, Microsoft does not make this easy. The user must get into DiskPart, List the volumes (drives) connected, select the specific volume (drive) then eject by typing “release.”
The above commands may be performed via the command prompt, but honestly it’s a pain in the a$$ because all the typing involved and manually selecting the device. This process needs to be automated. {hint}
If you are reading this article you want to make things quick to remove USB, easy and simple.
Nexcopy solved this problem with a free utility that doesn’t require installation, doesn’t require Admin rights, and doesn’t require you to select the drive. The tool is ultra-quick and ultra-easy. In addition, anyone can bundle the free exe file into their own software to automate the process.
The fourth industrial revolution or “Industry 4.0” is a term used to categorize today’s trend with industrial control systems (ICS) and how these machines interact with each other and humans.
The fourth era of “industry” combines hardware, software and biology and emphasizes the advancements in communication and connectivity. When the term IoT (Internet of Things) is used, this is the type of example that would apply. Industrial Control System USB Flash Drives designed for ICS security are critical to industrial systems and how they are controlled by their owners. The key when a USB flash drive is introduced into a control system, is security. Without security, one could lose control of the industrial system and ultimately introduce risks into a population or region.
Before we look closer at Industry 4.0 and data storage, let us provide a short summary of the first three phases of the industrial revolution.
First Industrial Revolution
The first industrial revolution was marked by a transition from hand production methods to machines through the use of steam power and water power. The integration of these new technologies took a long time, and spans a period between 1760 and 1840 for Europe and the United States. The first phase had the greatest impact on virtual industrial channels such as textile manufacturing, iron production, agriculture and mining (in general).
Second Industrial Revolution
The Second Industrial Revolution, also known as the Technological Revolution, is the period between
If anyone searches for “burn ISO to USB” they will get pages and pages of Rufus links. However, there is a big misconception with Rufus… it doesn’t create USB CD-ROM drives! Review Rufus with us now:
The only thing Rufus does is take a bootable ISO file and write the data to a USB stick. Basically Rufus will extra the data on an ISO file and write it to the flash drive. You can do the same thing with WinRAR.
There is nothing magical about Rufus when it comes to “making a CD” because Rufus doesn’t make a “CD.”
If you need to make a USB CD-ROM flash drive the best solution found so far, is the Disc License drive. The Disc License drive is a blank USB CD-ROM flash drive. Using their Drive Wizard software (free), easily write ISO files to USB. The resultant drive will be a USB CD-ROM flash drive.
Before we get into Disc License technology, we do need to clear up some points about WinRAR and Rufus software. WinRAR will extract all the files contained in an ISO file and write them to your USB flash drive; however, if the ISO is bootable, WinRAR won’t write the boot code. This is where Rufus does shine. The Rufus software will write all the files contained in an ISO file along with the boot code to make your device bootable. With that said, there is a clear advantage for using Rufus over WinRAR.
Does Rufus burn any ISO file to USB? NO.
Does Rufus make your USB flash drive read-only, like a CD? NO.
If the ISO file isn’t bootable, there isn’t much [more] Rufus can offer. A non-bootable image will display an error message saying “This image is either non-bootable, or it uses a boot or compression method that is not supported by Rufus.”
This is a brilliant solution which after viewing the video you will say: “this should have come out years ago!”
This is the least expensive, yet most secure way to hold a USB flash drive in a DVD case.
The era of CD and DVD is coming to a close with USB flash drives taking its place. Yet many CD and DVD duplication facilities have shelves and shelves of DVD jewel cases which they need to put to good use. This DVD-to-USB-Insert card is the quick, easy and cheap solution. The insert allows users to keep their DVD case and related jewel case artwork to remain the same, but now secure a USB flash drive inside the DVD case, rather than an optical disc.
So many businesses enjoy the DVD case because the DVD case is a great storage box. The case is a good size with a thick spin to print what the contents in the DVD case are.
Continue this same “library” methodology with the DVD-to-USB-Insert card.
In case you can’t see, or didn’t see, the video posted above the solution will hold two USB flash drives in a DVD case. The DVD-to-USB-Insert is a thick 0.65mm clear plastic which is the same diameter as a DVD. However, the clear plastic has two rectangles which are inverted to hold just about any sized USB flash drive. This solution will fit two USB flash drives into a single DVD case. The two rectangles are the same size and as said, will fit darn nearly all USB sticks with a size that is 3″ long by 3/4″ wide and a depth of 3/8″ ( for you metric folks, that is 76mm long, 21mm wide and 9.5mm deep).
The clear plastic has a hole in the center the same size as a DVD disc and will snap into the “holder” of the DVD case. Using any DVD case on the market you can easily hold a USB flash drive inside a DVD case. The video shows how secure the USB flash drive is when inside the DVD case. The flash drive will not fall out during shipping or transit.
To be clear, the DVD-to-USB-Insert is only the clear plastic that holds the USB flash drive using the nipple snap that holds the DVD. The DVD case itself is not sold with this solution because the assumption is you (the user) already have stock or inventory of the DVD case itself.
This solution to hold a USB flash drive in a DVD case does not infringe on any patents from other manufacturers who use alternate solutions to secure a flash drive inside a DVD type case.
Please contact USB Copier for more details. This is a USB duplication service company.
There are two popular methods to get large videos off your iPhone.
The most common problem is having a large video on your iPhone which you need on your computer. Email programs usually limit a file size at 20MBs, so if the file is larger, what can you do?
There are two popular options which come to mind: Use QuickTime or Use a USB flash drive.
Option #1
Use QuickTime. Macs already have QuickTime built into the OS, but Windows users must install it. Before deciding this as your best route to get large videos off your iPhone here is a list of things to consider:
You must backup your iPhone on QuickTime before you access the video
You need your computer (an authoized computer) to perform the backup
Windows user smust download and install QT
QuickTime is an invasive program which most Windows users will not like
Not a “portable” way to get the videos off your iPhone
However, this is a free solution!
Option #2
Use a flash drive.
Yes, you need to buy a specific flash drive, but after this investment it’s infinitely easier to get videos off your iPhone. Some advantages worth considering:
Get large videos off your phone without a PC
Share the videos immediately to another user’s PC
External storage device for backups of those videos
Point number one is really the value in all this {wink}.
Yes, you need to make a purchase of a product so you won’t be able to make the transfer ‘right now’ but will be able to once you have the USB device.
Specific USB drives have software which work with the iOS allowing the download of files from the phone to the drive. The one tested is the SanDisk iXpand flash drive at 128GB capacity and will cost about $40ish dollars.
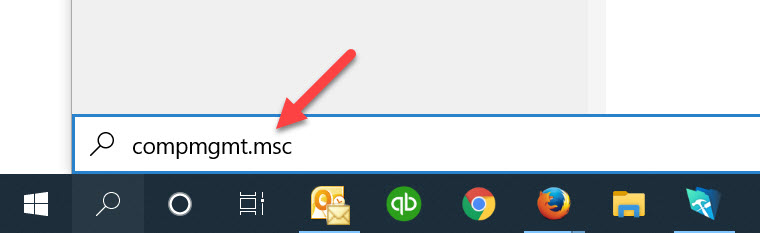
The following article will explain how to check your USB flash drive for if it’s bootable. There is no software needed, no download, just a couple of simple commands in your Windows 10 operating system.
A master boot record (MBR) is a special type of boot sector at the very beginning of a partition storage device like a fixed disk (hard drive) or removable drive (USB thumb drive). The MBR contains executable code to function as a loader for the installed operating system. This loader turns over the functions of the hardware (mother board bios) and passes that loading responsibility off to the operating system (Windows).
This is how you check if your USB is bootable, or not:
First, please have only the one USB stick connected which you want to check if it’s bootable. It’s not required to do this, but will my the instructions below a bit easier to follow, that’s all.
Using the Windows search function copy and paste this into the search field and click Enter
compmgmt.msc
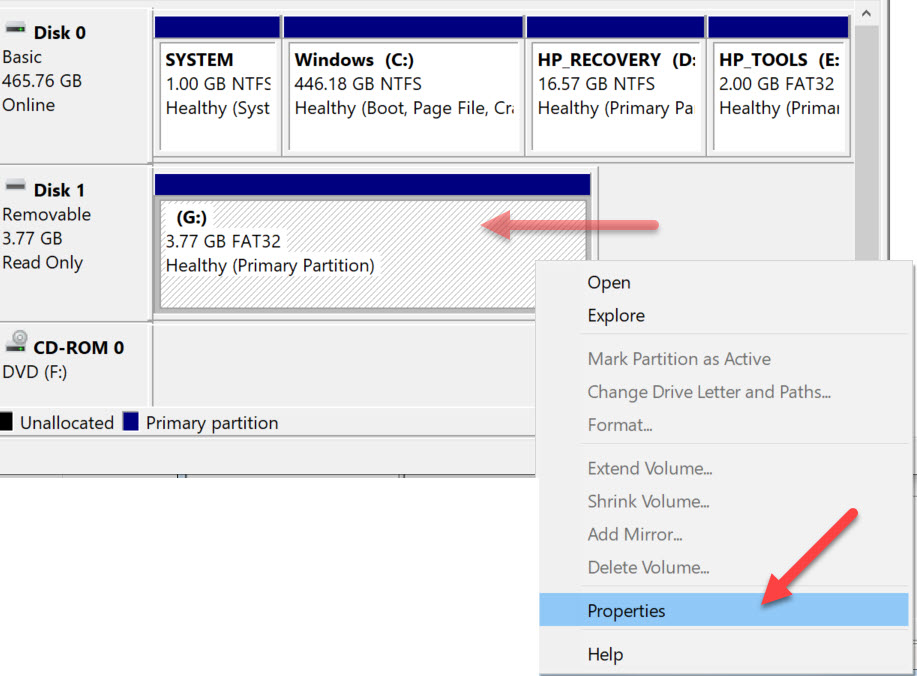
The screen shot below will pop up after you click Enter. Using the image as a reference, select “Disk Management” under the “Storage” folder“. In the middle of the dialogue box you will see the drive letter associated with your USB flash drive. In the middle of the box you will probably see the USB listed two different times. The top portion of the box, the USB will be listed along with other devices, like your hard drive and optical drive. The bottom portion of the box, the USB will be shown as “Removable“
Once you’ve determined which drive letter is your USB drive, you may Right Click on the drive letter and select Properties.
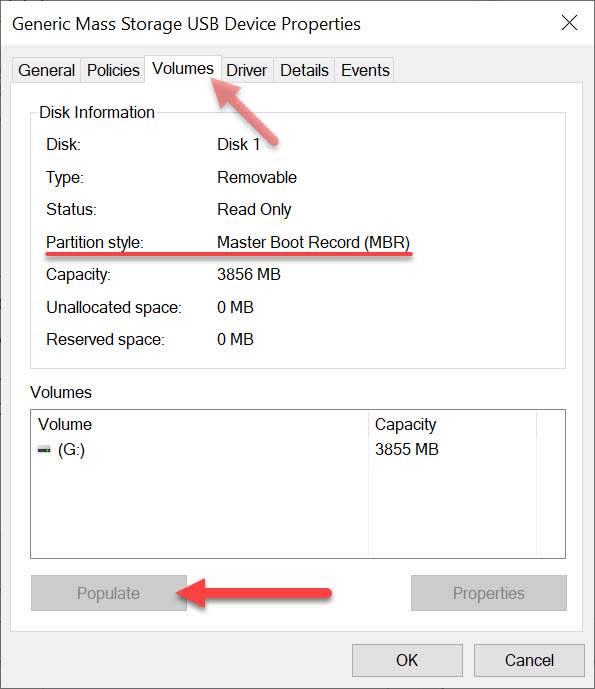
A Properties dialogue box appears giving you the option to select any one of the devices show in the previous window (the Disk Management window). From this dialogue box, click the Hardware tab and select the “Mass Storage USB Device” by a single click. Then click the Properties button at the bottom.
The last dialogue box are the Properties of your specific flash drive.
Click the Volumes tab at the top, you then must click “Populate” to get the device information. . The “Partition Style” will read either Master Boot Record (MBR) or the field will be empty.
If the above information isn’t detailed enough for the information you are looking for, the next step is to use a hex editor and check if the boot strap code is actually in the Master Boot Record. This is a bit more detail and the guys at Hakzone did a really good job of summarizing how this would be done using a hex editor program.
The lifespan of a USB flash drive depends on three main factors. In general, a flash drive will last much longer than most people expect. Below are the key elements that influence its durability.
Factors That Affect USB Flash Drive Lifespan
How the drive is made
Wear leveling technology
How the drive is treated
USB flash drives are largely commodity products driven by the lowest price. Manufacturers often cut corners to reduce costs. Understanding the quality of the device you’re using is essential for reliable, long-term storage.
1. How the Drive is Made
A USB flash drive consists of five main components: the PCB (printed circuit board), flash memory, USB controller, supporting components, and soldering that holds everything together.
Printed Circuit Board (PCB)
Many promotional USB drives use a two-layer PCB to save costs. However, the USB specification requires a four-layer PCB for proper grounding and interference-free data transmission. A two-layer board is more likely to experience performance issues. If you received a USB stick from a trade show, avoid using it for long-term or critical storage.
Example: A four-layer USB flash drive by Nexcopy with Micron memory offers write speeds of 12MB/s.
Flash Memory Quality
USB drives often use downgraded NAND memory. High-quality NAND chips go to phones, set-top boxes, and other premium devices first. Lower-grade chips are repurposed for USB sticks. A 512MB USB drive may have gone through several downgrades, making it unreliable.
Quick Test:
For USB 2.0, a good-quality drive should have a write speed of at least 9–10MB/s.
For USB 3.0, look for 18–20MB/s or higher.
Slower speeds suggest lower-quality silicon struggling with phase changes during data writes.
USB Controller
The controller is the “brain” of the flash drive, managing communication between the host computer and NAND memory. The quality of the controller and its firmware significantly affects drive performance and longevity. Firmware determines whether the device prioritizes speed, capacity, or compatibility with specific NAND chips. Unfortunately, it’s impossible to test this without knowing the manufacturer and their firmware configuration quality.
Device Components
Capacitors and resistors are typically reliable due to mature manufacturing processes. However, cost-driven production may result in lower-quality components, which can slightly reduce lifespan over time.
Soldering Quality
Poor soldering or the use of hot glue instead of precision solder joints can lead to device failure. If you’re curious, you can open a USB casing to inspect build quality. Sloppy soldering is a red flag for long-term reliability.
2. Wear Leveling Technology
Wear leveling is a firmware-based algorithm that evenly distributes write and erase cycles across memory blocks, preventing premature failure of specific sectors.
Dynamic wear leveling: Maps data writes to unused blocks but ignores untouched areas, potentially shortening lifespan.
Static wear leveling: Periodically shifts data across unused memory areas, improving overall durability.
Thanks to wear leveling, modern USB flash drives can theoretically last up to 100,000 write cycles per individual memory block, not just per drive.
Even a high-quality flash drive can fail if mishandled. Proper storage plays a huge role in lifespan:
For long-term archival storage, keep the drive in a safe, dry place away from physical stress.
A promotional flash drive or very small capacity stick (e.g., 2GB or less) is often unreliable for archiving important data.
Frequent handling, heat, and physical shocks can damage internal solder joints and components.
Final Answer: USB Lifespan
There’s no universal number for how long a USB flash drive will last. Quality manufacturing, proper wear leveling, and careful handling all extend its life. Under optimal conditions, data stored on a good-quality drive can remain intact for 15–20 years or more.
The average user inserts a USB stick into their computer from a trusted source. However, there are companies and situations who receive USB flash drives or USB hard drives and they are not certain if the device is infected. Some information to help with USB firewall for connecting USB devices.
Globotron is a company based in New Zealand who designed the product. The product is called Armadillo and is an open-source USB firewall.
Some research has shown, as many as 29 different types of USB attacks can happen from plugging in mass storage devices (like USB flash drives and USB hard drives) or also HID devices (human input devices like keyboards and mouse).
The USB stack which is the low level code used in the host computer, is very complex and over time researchers and hackers have discovered ways to compromise a computer system through these vulnerabilities.
The Armadillo is an open-source device which is a firewall between a USB device and computer. The firewall isolates the firmware of the USB device so as not to infect your PC if the device has been infected with malicious firmware. You just need to plug in Armadillo between your computer and the USB device using the provided micro-USB cable. Armadillo is an upgrade over USG, the original or first-generation USB hardware firewall device.
The Armadillo has bot detection. This means if the USB firewall device detects malicious codes are being entered via keyboard or mouse (HID devices) the device will block transmission and a red LED indicator light will turn on.
The Armadillo has the ability to temporarily make your USB read only. This is valuable if the computer is infected and you need pull information (recovery software) from the USB stick and want to insure virus’ do not infect the flash drive. The USB is read-only, but it is read/write when not connected to the Armadillo.
Note: If you need a USB stick that is always write protected at the controller level, yet need to temporarily turn off the write protection for data changes, the Lock License drive from Nexcopy is your solution.
This last point about the Armadillo is a bit strange, but we like it. The body is sealed with glitter epoxy so it is easy to identify if the box itself was tampered with. Very creative!
The last two decades have ushered in an enormous number of electronics. Prices get lower, users upgrade, society reapes the benefits of these advancements. This explosive growth in electronics has led to an escalating burst for EOL (end-of-life) electronics and e-waste. When electronic devices are left in traditional landfills toxic materials can be released into the soil and environment.
With new cheap devices, society has reaped tremendous benefits. This explosive growth in the electronics industry, however, has led to a rapidly escalating issue of end-of-life (EOL) electronics or e-waste. In landfills or primitive recycling operations, toxic materials can be released from old electronic devices into the environment.
E-waste is growing, and with that surge comes the need for effective electronics recycling programs. As of 2018, e-waste is now the fastest-growing waste stream in the world, with an estimated waste stream of 48.5 million tonnes in 2018, valued at 62.5 billion US Dollars.
The amount of e-wast from USB flash drives is unknown from the above statistics, yet it’s not entirely necessary to make flash drives part of the e-waste equation. There are options for recycling USB flash drives.
Option One:
Run antivirus software from a USB flash drive.
If your computer is infected with malware, running an antivirus within Windows may not be enough to remove it. If your computer has a rootkit, the malware may be able to hide itself from the antivirus software. The only proven way to ride your system of a nasty virus would be starting your computer from outside the Windows environment and start the cleaning process from there.
This is where bootable antivirus solutions come in. They can clean malware from outside the infected Windows system, so the malware won’t be running and interfering with the clean-up process. The HowToGeek website did a nice write-up on this topic. If this is a tool you need, don’t e-waste your USB flash drive, rather make a bootable antivirus software stick.
Option Two:
Run Linux from a USB flash drive.
As of 2020 the percentage of Windows computer users is still an impressive 88%. Mac users are 10% and Linux users are the remaining 2%. Have you ever used Linux? It’s actually a fantastic operating system and at least something to play around with if you have spare USB media. Rather than e-cycling your USB stick, you can download a Linux operating system and give it a run. The process is not difficult and (nearly) any non-technical person can download and install Linux on a flash drive.
Slax is a well know Linux package. The instructions for download and installation are straight forward and simple. It is highly recommended to try this version of Linux as your first exposure to the operating system.
Several benefits of running Linux from a USB include trying the operating system without investing money in new hardware, or making changes to your current Windows operating system.
Learning to run Linux from a flash drive will give you an advantage in the event of a computer failure. For example, a computer gets bogged down with a nasty virus and you need to access some files quickly. There is no time for a lengthy cleaning process (scanning a hard drive can take hours). Booting into Linux from a USB stick will give you access to the memory of the hard drive to access the files you need.
Option Three:
Recycle USB drives for a good cause.
“One man’s garbage is another man’s treasure.”
Isn’t that how the saying goes? Said another way, you can donate your USB drives to an organization who can re-purpose those drives and provide them to others in need. Pivoting from option number two, a non-profit organization called SugarLabs.org puts a Linux based operating system on a flash drive. The operating system is a special version of Linux and is designed to teach young kids how computers work. The not for profit organization sends these donated drives all over the world. SugarLabs is based in Boston Massachusetts and founded by Walter Bender a graduate of Harvard and technology researcher from MIT Media Labs.
Part of the SugarLabs process is insuring each USB drive is clean from any personal data or potentially harmful malware. RecycleUSB.com is a website and business which manages the sanitizing and cleaning of the donated USB flash drives before sending to Walter and his team at SugarLabs. The recycle USB website lists the “how to” steps on donating media, contact information for any questions someone might have and sanitizing steps used to clear data from the flash drives. The partnership between RecycleUSB and SugarLabs started back in December of 2009 when flash drives began having the storage capacity to hold a portable operating system (about 2GBs).
After reading the above options for recycling USB flash memory and you find yourself still wanting to e-waste the flash drives, be sure to check your community or city about e-waste programs. In nearly all cities and counties it is not recommended to throw away electronics into the standard garbage service. Be sure to enlist the use of recyclers who are certified through either of the voluntary certification programs that have been established to ensure responsible recycling, including R2/RIOS and e-stewards.
Some really smart researchers at the National Institute of Standards and Technology (NIST) and some of their colleagues at the University of Maryland developed a step-by-step recipe to produce the atomic-scale devices. Atomic scaled devices is the heart of quantum computing. Said in a very simple way; “quantum” is the Latin word for “amount” and is the smallest possible physical unit which has energy (or matter).
These really smart scientists demonstrated they could precisely control the flow of electrons through a really small physical gap or electrical barrier, known as a transistor. The hard thing is controlling the flow of energey (electrons) through stuff that is really, really small, like an atom. What the team came up with, is a reciepe to create atoms that could be controlled with electrons.
In really simple terms, this is the recipe:
The team used a known technique in which a silicon chip is covered with a layer of hydrogen atoms, which readily bind to silicon.
Used a fine tip, like really fine tip, scanning microscope and removed hydrogen atoms at selected parts of the silicon.
What was left is a hydrogen barrier with only certain parts removed from the scanning device (above).
Next, the team directed some phosphine gas at the silicone and the gas covered the hydrogen atoms but leaked through where hydrogen atoms had been removed.
As the last step, the smart guys heated the silicone which created a reaction. The reaction created a foundation of a series of highly stable, single atom devices that act like a quibit… or bit.
This is all a bit overwhelming to understand so the below video will help. The exciting thing is a repeatable process has been defined to make a single quantum unit programmable. Translated into day-to-day applications, there is great hope we will all get computers 100x more powerful than today’s in about the size of an Apple watch.
Today, more than ever before, individuals are working from home offices. A comfortable and productive environment is one of the main reasons so many love working from home. However, even with all the conveniences, sometimes the home office lacks the computer equipment needed to handle specific tasks. With many businesses now practicing social distancing, certain tools are still essential. Let us look at a unique product by Nexcopy, the home office USB duplicator.
Consider the niche requirement to make USB duplicates at home. For example, an IT manager might need to prepare bootable recovery sticks, or a software engineer might need to send program updates to remote sales teams. These professionals require a fast, simple, and economical device to do the job efficiently.
The compact USB flash drive duplicator from Nexcopy is the perfect solution for this need. Measuring just 15cm long and 10cm wide, it fits easily into any computer bag and is as light as a book.
The USB duplicator is a one-master to four-target copy station. It is a digital binary copier capable of duplicating any file system or structure provided by the master flash drive. Using a USB cable, the duplicator can power up to five USB flash drives, though it is not recommended for USB hard drives.
With this device, making duplicates in a home office is quick and easy. The unit has four menu buttons: Enter, Escape, Up, and Down. It operates with a single button press, making it ideal for non-technical users. The duplicator can be set for a standard binary copy or a copy-and-compare function, ensuring every duplicate is an exact match to the master for added peace of mind.
Four language modes on the LCD menu (English, Spanish, Portuguese, Simplified Chinese)
USB speed benchmark utility
Firmware upgradeable for future updates
Is this mini-sized USB duplicator worth the investment for a home office? The easiest way to decide is to consider how much time it saves. The Nexcopy USB104SA can copy 1GB of data to each device in just over one minute. If an IT manager or developer had to manually load 12GB of data onto four drives using a PC, it would take about 12 minutes. The duplicator accomplishes this in a fraction of the time. Using the copy-and-compare mode adds some time, about 1.5 minutes per GB, but still remains extremely fast.
The Erase function is another valuable feature. Unlike a simple format, which only removes the file allocation table (directions to data), Erase overwrites memory blocks with random binary data, making data recovery impossible. Quick Erase scrubs portions of the drive, corrupting most data, while Full Erase writes random 0s and 1s to the entire NAND memory, ensuring complete and irreversible data removal.
The USB benchmark utility is a convenient tool for testing read and write speeds, especially with lower-quality promotional USB media, which can be unstable. A write speed below 4MB/s indicates poor quality memory. Speeds above 8MB/s for USB 2.0 or 20MB/s for USB 3.0 are considered good quality.
This Nexcopy duplicator is backward compatible with USB 1.0, 2.0, and 3.0 flash drives and writes as fast as the connected device allows. For best performance, USB 3.0 media is recommended.
When trying to format a flash drive in Windows (7 or 10), you will see the file system options best suited for the device. The proper file systems for a flash drive are: FAT, FAT32, or exFAT. Windows also provides NTFS as an option for USB flash drives, but as mentioned before, NTFS is not the best file system for a USB drive. During the format process, only the most compatible file systems will be displayed in Windows.
Why is UDF not listed as an option?
First, let me say it IS possible for Windows to format a USB flash drive as UDF (Universal Disk Format). Microsoft just doesn’t want you to do it—and with good reason.
Important: If you think formatting a flash drive as UDF will make the thumb drive appear as an optical drive in the computer, you are mistaken!
According to the Universal Disk Format (UDF) specification governed by the Optical Storage Technology Association, many believe UDF will make a device work like a disc. UDF is most widely used for DVDs and newer optical disc formats. While it can be used on flash drives, it does not make them function as optical drives.
Some may assume that formatting a USB flash drive as UDF makes it universally compatible across Windows, Mac, Linux, Symbian, and other proprietary systems. In reality, exFAT offers the same cross-platform compatibility without the drawbacks of UDF.
Why You Should Avoid Formatting USB Drives as UDF
Here are the main reasons not to use UDF on USB flash drives:
Lack of fully functional filesystem check tools.
64GB limit with Windows & Linux (a bug, not an inherent UDF limit).
Risk of quick wear-leveling failure on SD and USB mass storage devices.
UDF is read-only on Windows XP.
The most important issue is the lack of filesystem check tools. If the USB is removed during operation and data corruption occurs, there are no tools available to diagnose or repair the UDF file system. Since flash drives are designed for portability and frequent quick access, this risk makes UDF a poor choice.
How to format a flash drive as UDF:
1. Connect the USB flash drive to your computer and note its assigned drive letter.
2. Make sure no programs or data are accessing the drive.
3. Navigate to your C: drive in Windows Explorer. In the search field, type “CMD” (case-insensitive) and press Enter. Administrator privileges are required.
4. In the command prompt window, type the following command:
format G: /fs:UDF /q (Replace G with your USB drive letter.)
The /fs parameter specifies the file system (UDF), and the /q parameter tells DISKPART to perform a quick format.
5. The OS will prompt you to insert the drive (it’s already inserted), press Enter.
6. Next, you’ll be prompted to enter a Volume name. Press Enter to leave it blank or type a custom name (e.g., “Nexcopy”).
DISKPART will process the command and notify you once formatting is complete.
7. Type exit to close the command prompt window.
Note: The /q command deletes the file table and root directory of the previously formatted flash drive but does not perform a full sector scan for bad areas. This highlights the problem mentioned earlier: UDF lacks robust filesystem check tools, making it a risky choice for USB flash drives.