Jared Bouck from InventGeek come up with a great mod for those USB Missile Launchers from Dream Cheeky. Rather than toy around with a foam missile, Jared up’d the anti with a soft air gun able to shoot plastic BBs up to 250 FPS. This is an ideal mod for rabbit control or pidgin control with a high level of fun involved. The other benefit from swapping out the foam missile launcher head, is the higher accuracy rate you’ll get from the soft air gun. When I reviewed the USB circus cannon [basically same product] that was a big down fall is lack of accuracy.
The full USB hack isn’t listed here, but visit the InventGeek site for the 7 step process.Start your mod…
Continue Reading
With “going green” such a big trend right now you might find yourself wanting to put a little green in your workspace – and no, I don’t mean that green. The following is a video USB tutorial on taking some supplies from around your office or home, LED lights and some USB power to create your very own USB LED Greenhouse.
Video is 3 minutes.
Continue Reading
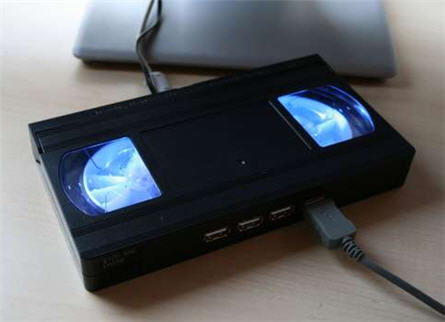
Instructables posted a great little USB hack for turning an old VHS tape into a glowing USB hub. I like this mod because it takes an old, out of date medium, puts some retro lighting in there which creates a modern day device I can use everyday.
Instructables also brings up a good point with hubs getting smaller these days, it’s more likely you’ll lose it behind your desk. Having a honk’in big VHS tape solves that problem.
So what is this USB tutorial all about? Well, in short, you will destroy an old VHS tape, cut out some through-holes for USB ports and power. Secure some LEDs for effect and reassemble everything to impress your buddies. Since this outline isn’t enough to start or finish the project, jump over to Instructables for the full low down.
Continue Reading
Waterproofing your USB drive is a good preventative maintenance procedure as you never know when it’ll end up in the wash. Below is a video on how to use epoxy and little skill to waterproof your UFD. Enjoy this USB tutorial:
Continue Reading
Here is an illuminating tutorial for you. A simple “how to” on making a USB flash light. In just a few minutes you can have a handy flash light for peaking into your PC tower, under the desk or behind the office credenza for that lost business card.
Continue Reading
WiHood is a relatively new service which is the world’s first “virtual laptop” that protects children online [ anywhere & at all times] with the WiHood’s USB bracelet.
The concept is ideal and it appears the user interface, setup and configuration is just as simple. This is what WiHood is: A USB bracelet which auto-launches a virtual desktop when connected to any computer. The virtual desktop runs off the WiHood servers which monitor and update website, programs, virus etc 24/7 for a completely kid friendly computer system.
From personal experience, my kids have trashed my computer – by mistake of course – but it still took time and skill to restore my PC. The WiHood USB bracelet eliminates this risk because a virtual desktop is all your child can use. The other issue I have with my kids using “the parent’s PC” is constant maintenance to monitor website, filters and content. With WiHood, that daunting task is automatically taken care of.
“WiHood protects children, saves parents from purchasing a new PC, and kids love that they have their own “virtual laptop” which stores their pictures, music, homework, etc. and can be worn on their wrist!”
The USB bracelet uses the internal storage to save files, folders, pictures, music etc…but those files are only accessed through the virtual desktop which runs off the WiHood servers. This means your kids will enjoy all the performance of a PC with the security of a remote server running the underlining PC desktop.
The WiHood is free to try and costs $49 for 6 months service or $100 per year. Stack that cost up against purchase of a dedicated PC for the kids and the WiHood is the clear choice.
Still interested. Maybe some more information? Check out the WiHood FAQ page. Or their WiHood Virtual Laptop home page.
WiHood was founded in August 2007 and has been honored to be awarded funding from Innovation Norway, a division of the Norwegian government providing capital to the most innovative companies in Norway.
Continue Reading
With over 5,300 Diggs, I figure this would be a good article to report about on how to make a sawed-off USB key. Nothing about this project is too technical, but the idea is clever enough it’s gained a lot of attention.
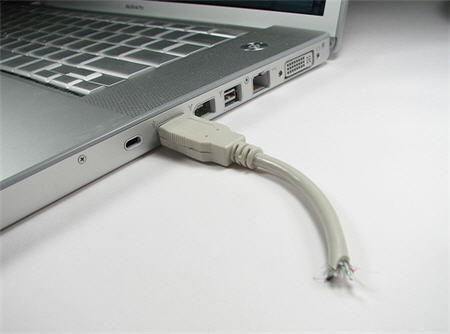
The sawed off UFD is a mod of using a slim Kingmax USB drive, USB cable and some glue + knife for a very cool looking storage device.
The intro line to this tutorial from the main page is:
“Holy crap– somebody just went and TORE MY FREAKING USB CABLE IN HALF while it was still attached to my laptop!!!
No– wait– sorry. That’s just my USB drive. My bad. Never mind.”
Which I think is pretty funny.
So besides getting a slim Kingmax USB drive (here is a 4GB for $15), you will need the following:Â USB cable, X-acto knife, glue, pliers, small screwdriver and some mad cutting skills.
First thing you will want to do is cut open the female end of the USB cable so you can insert the memory for storage. It’s fairly straight forward in the process. Some additional pictures are available
Continue Reading
Wouldn’t it be nice to have a background image for the USB window upon connection of your USB storage device? This simple, quick USB hack will show you how to create a background image. In this example, I inserted the GetUSB logo at the bottom of my USB window, like this:
To perform this simply copy the following information:
[ExtShellFolderViews]
{BE098140-A513-11D0-A3A4-00C04FD706EC}={BE098140-A513-11D0-A3A4-00C04FD706EC}
[{BE098140-A513-11D0-A3A4-00C04FD706EC}]
Attributes=1
IconArea_Image=your background picture
Change: the IconArea_Image= to the name of your jpeg file…I did: getusb.jpg
Next, save the code above as desktop.iniLast: place the ini file and the jpg file in the root of your USB drive.
Refresh or reconnect your device and …bamb…USB background image done. Tip: The image will repeat so when creating the jpeg be sure to leave plenty of white space in your image file. I used a canvas size of 800 x 800 pixels and placed the GetUSB logo near the bottom.
Continue Reading
Cruising around last night, I found CoolBuzz posting some new USB designs – which are far from Cool Buzz. (sorry guys). Lets take a look:
I like the idea of convergence, but a cyber-latte which “fills up” during USB data loading is a little rediculous. Maybe good for a 2nd grader who needs to understand the concept, but I think we are all savvy enough to check capacity using the properties function.
Next up, and along the same line would be the hourglass and pie-chart shape. Wouldn’t you love to have that pie-chart sticking out the side of your laptop? Introducing a heating plate on that huge platter to keep your latte warm might be worth it, but even then a hard sell. The hourglass?  Come on. No comment there.
The only product I could see working is the Empty or Full USB device, and this would only work in one niche market. NASCAR.
Continue Reading
The Parasolar umbrella performs the very obvious of shielding you from UV rays, but did you know it soaks up those UV rays and converts them to energy? Oded Shorer is thinking outside-the-box with this concept design. The Parasolar pops open a cloth canopy which converts the sun’s rays into electric energy thanks to it’s integrated photovaltaic panels.
The Parasolar can discharge it’s stored energy via a 12v outlet or two USB ports. As UberGizmo points out, this is a great gadget for those camping trips. After all, what’s worse than losing iPod energy while stomping the North 40?
Continue Reading
Here is a Master Card commercial in the making – a USB gadget designed to randomly turn on or toggle a computer’s Cap Locks.
USB connector = $1.30
Some logic = $4.00
A bit of code = $0.00
Watching your work buddy get frustrated because of random Cap Locks = Priceless.
This DIY gadget will intermittently set the caps lock anywhere between 30 seconds and 8 minutes on the host system. What’s creative about this hell gadget is no software code is loaded to the system, thus spyware wouldn’t catch the culprit. Although it is hardware based – so probably not a good gadget trick for a laptop user or a savvy computer geek, but connecting it to the backside port of the idiots PC next to you at work – Priceless.
If you are interested in the full tutorial, then check out Macetech.com. Or check out my other list of USB Hacks.
Continue Reading
Here is a nice quick and easy USB tutorial.
Swapping storage can become a headache in Windows as you never know or can remember which drive letter Windows assigns your drive. At Lifehacker, they posted a nice tip on assign USB drives to folders. This method not only keeps things organized, but adds one additional benefit most wouldn’t think of.
First, the tip.
Create a main USB folder where we will mount all the USB drives once connected. Then assign all your USB devices to sub-folders within that main folder. After creating the folder structure, do the following for assignment.
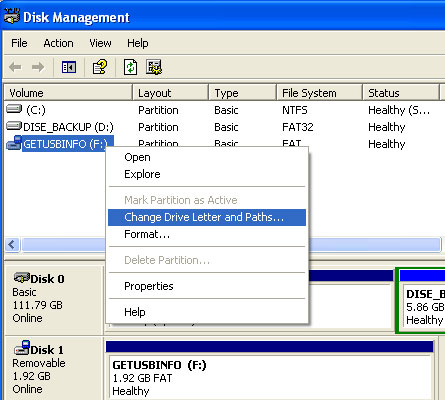
Click > Start > Run then enter diskmgmt.msc and hit enter. This opens the Disk Management configuration that should display all drives and devices currently connected to your computer.
Pick an USB device from the list and right-click that entry. Select Change Drive Letter and Paths from the menu.
This should open a new window that is displaying the current drive letter of the device and three buttons at the bottom which are named Add, Change and Remove.
Click on the Add button, select Mount into the following empty NTFS folder and click on browse. Now navigate to the subfolder that you want to assign the usb drive to and confirm the assignment. The USB drive will from now on be accessible from that folder as well if it is connected to the computer.

 WiHood is a relatively new service which is the world’s first “virtual laptop” that protects children online [ anywhere & at all times] with the WiHood’s USB bracelet.
The concept is ideal and it appears the user interface, setup and configuration is just as simple. This is what WiHood is: A USB bracelet which auto-launches a virtual desktop when connected to any computer. The virtual desktop runs off the WiHood servers which monitor and update website, programs, virus etc 24/7 for a completely kid friendly computer system.
WiHood is a relatively new service which is the world’s first “virtual laptop” that protects children online [ anywhere & at all times] with the WiHood’s USB bracelet.
The concept is ideal and it appears the user interface, setup and configuration is just as simple. This is what WiHood is: A USB bracelet which auto-launches a virtual desktop when connected to any computer. The virtual desktop runs off the WiHood servers which monitor and update website, programs, virus etc 24/7 for a completely kid friendly computer system.


 Here is a Master Card commercial in the making – a USB gadget designed to randomly turn on or toggle a computer’s Cap Locks.
USB connector = $1.30
Some logic = $4.00
A bit of code = $0.00
Watching your work buddy get frustrated because of random Cap Locks = Priceless.
This DIY gadget will intermittently set the caps lock anywhere between 30 seconds and 8 minutes on the host system. What’s creative about this hell gadget is no software code is loaded to the system, thus spyware wouldn’t catch the culprit. Although it is hardware based – so probably not a good gadget trick for a laptop user or a savvy computer geek, but connecting it to the backside port of the idiots PC next to you at work – Priceless.
If you are interested in the full tutorial, then check out
Here is a Master Card commercial in the making – a USB gadget designed to randomly turn on or toggle a computer’s Cap Locks.
USB connector = $1.30
Some logic = $4.00
A bit of code = $0.00
Watching your work buddy get frustrated because of random Cap Locks = Priceless.
This DIY gadget will intermittently set the caps lock anywhere between 30 seconds and 8 minutes on the host system. What’s creative about this hell gadget is no software code is loaded to the system, thus spyware wouldn’t catch the culprit. Although it is hardware based – so probably not a good gadget trick for a laptop user or a savvy computer geek, but connecting it to the backside port of the idiots PC next to you at work – Priceless.
If you are interested in the full tutorial, then check out