How To: Turn off USB Autoplay in Windows 7
Windows 7 is much like XP in accessing the feature to turn off the USB auto play function.Ă‚Â We don’t have a Window’s 7 machine, but I did find a great tutorial from DemoGeek.Ă‚Â Here is the info you need to turn off USB Auto Play in Windows 7.
Go to:Ă‚Â START > SEARCH > type “group policy”
From there Windows 7 will narrow down your options, select the “Edit group policy” option.Ă‚Â Should be the first one listed.

From here, it’s virtually the same as Windows XP.
Go to:
> COMPUTER CONFIGURATION
> ADMINISTRATIVE TEMPLATES
> WINDOWS COMPONENTS
> AUTOPLAY POLICIES
With having “AutoPlay Policies” highlighted, you will see on the right side of the dialogue box, “Turn off Autoplay” option.Ă‚Â Click That!

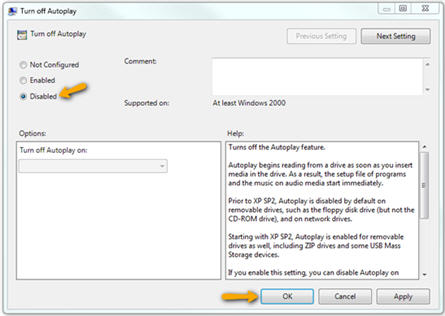
On the dialogue box which pops up, select the “Disable” radial button to turn off AutoPlay for media, which includes USB media and CD/DVD Rom media.
Once you’ve completed this step, close all the windows and you are ready to use Windows 7 safe from Autoplay running your media.
If you need additional help with other Windows operating systems check out our other articles on “how to turn off USB autoplay feature in windows.”
Let GetUSB.info keep you updated.
Receive article notifications about USB storage, flash memory, and duplication updates in your preferred language. We average a couple of articles per week.


