GetUSB.info Logo

Posts Tagged ‘how to’

How To: Fix Windows 11 Update Computer Issues

How To:  Fix Windows 11 Update Computer Issues

A recent update to Windows 11 is causing some significant issues for users, leaving many users frustrated and entire sure what to do. How To: Fix Windows 11 Update Computer Issues is a brief summary of the problem below and link to the solution (a Microsoft Windows utility to fix it all) This update, released on 26th September and labelled KB5043145, has led to major problems like your PC freezing, displaying the dreaded “blue screen of death” or becoming caught in a reboot loop where the computer repeatedly tries to restart itself but fails and thus tries again and again.

In addition to the blue-screens, some users report their USB and/or Bluetooth devices suddenly stopped working after installing the update. This includes a wide variety of peripherals such as keyboards, mice, headphones, microphones, memory sticks, and printers. Essentially, anything connected through USB or Bluetooth seems to be vulnerable to these problems.

One member from our team installed the updated and clearly something was broken in the file system, so they ended up restoring the entire PC. Far cry from an update experience. Our guy wasn’t alone, seems plenty of Windows users are seeing the same or similar issues.

Others have also reported issues with network connections, like their Wi-Fi no longer working, as well as problems with certain software programs like VirtualBox which runs Linux type OS subsystems.

If you found yourself dealing with these problems Microsoft advises that its Automatic Repair tool will help if your PC is stuck in a reboot loop. This tool might automatically pop up, allowing you to resolve the issue. For some users, BitLocker recovery can also be used to fix problems caused by the update, according to Microsoft’s support page.

Microsoft implemented a fix through its Known Issue Rollback (KIR) service, which is designed to undo the effects of problematic updates without requiring a manual uninstall. This tweak might help in automatically resolving these issues for many users. However, if your computer is still not operating correctly, Microsoft suggests attempting a system restart, which could trigger the automatic repair process and potentially get your PC back on track.

We would recomment that until the issues are fully ironed out, it may be worth holding off on installing this particular update, especially if your PC and peripherals are running smoothly as they are. If you’ve already installed it and are experiencing these issues, follow the Microsoft’s troubleshooting steps metioned above about the Automatic Repair Tool might be the best course of action to get everything back to normal.

Godspeed those USB ports and peripherals!

Continue Reading

How To: Hide Files on a USB Flash Drive

How To: Hide Files on a USB Flash Drive

close up picture of flash drive

This article, “How To: Hide Files on a USB Flash Drive,” explains two free methods to conceal files on a USB drive using built-in Windows features. One method is quick and basic; the other is more advanced and harder to detect.

Overview of the Two Methods

Method 1: Standard Hidden Attribute

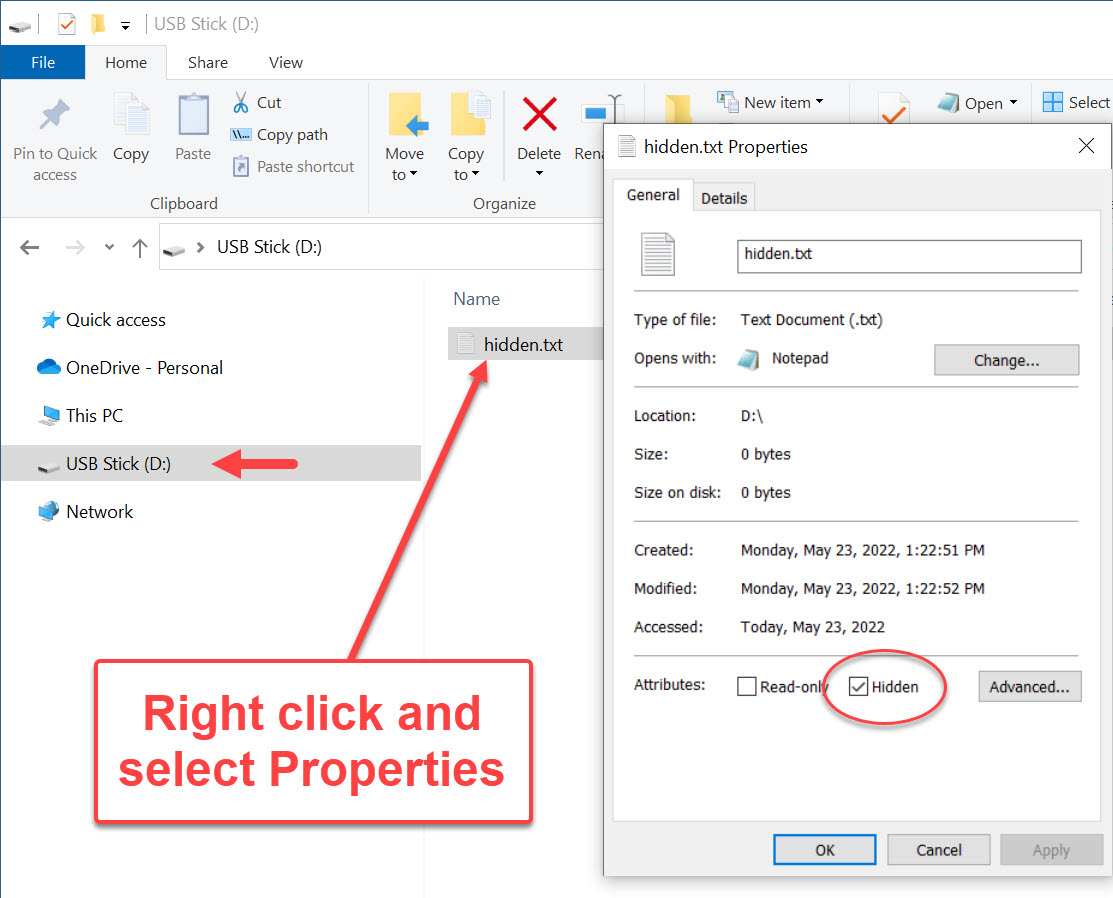
This method is the easiest. Anyone can right-click a file or folder, go to Properties, and select the Hidden checkbox. This will hide the file unless a user has Windows configured to show hidden files.

Pros: Easy and fast
Cons: Easily bypassed

Method 2: System Hidden Attribute

This method hides a file using both the system and hidden attributes. Windows will not show these files—even if “Show hidden files and folders” is enabled—unless the user also disables “Hide protected operating system files.”

Pros: Harder to detect
Cons: Slightly more technical

How to Hide a File Using the Hidden Attribute

Right-click the file or folder ? Properties ? check the Hidden box ? click OK.

properties of hidden file on USB flash drive

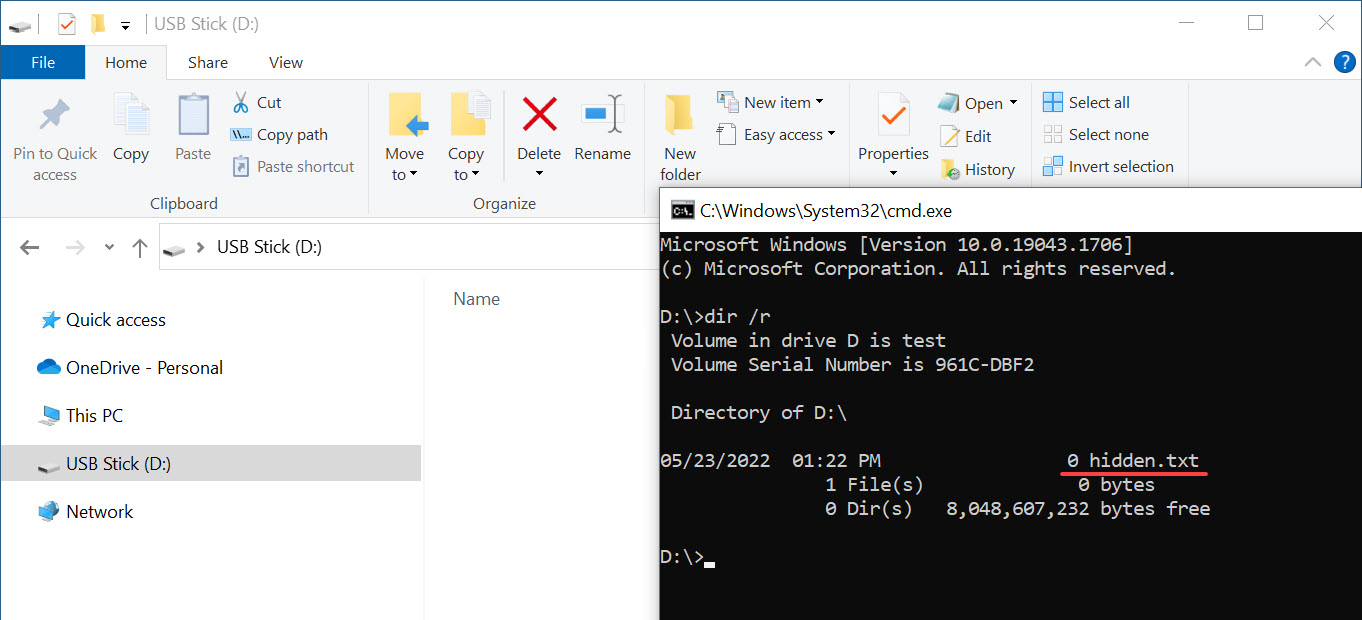
If Windows is set to not show hidden files, it disappears from File Explorer. However, it still shows in the Command Prompt:

command line of hidden file on USB flash drive

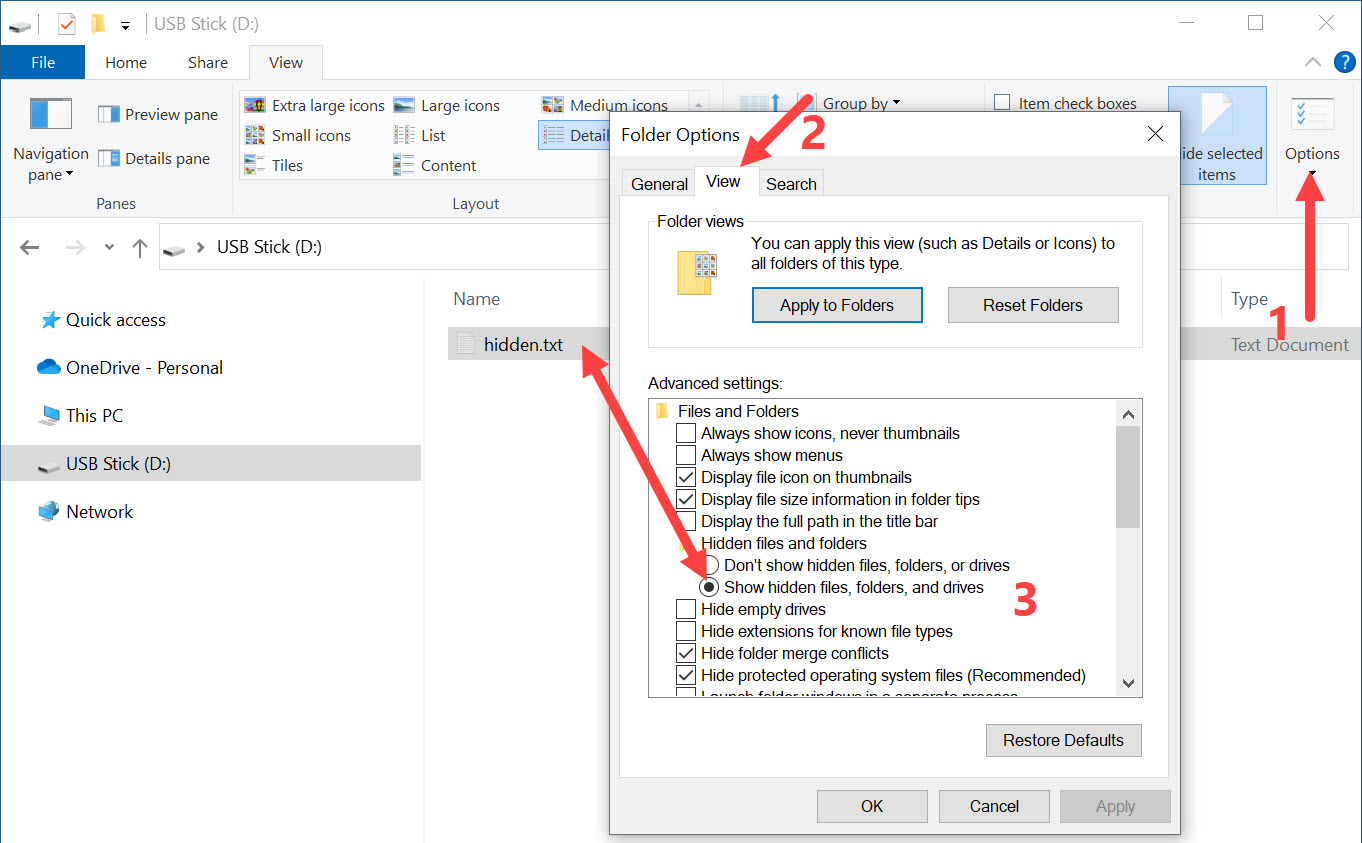
If the user has “View hidden files and folders” enabled, the file is visible again:

show hidden files on USB flash drive

How to Use the System Hidden Attribute

Let’s take it a step further and apply the system attribute in addition to the hidden flag.

Step 1: Prepare the File

Place the file (e.g., text.txt) onto the USB flash drive.

Step 2: Open Command Prompt on the USB Drive

Click in the File Explorer address bar, type cmd, and hit Enter.

use command line to hide files on flash drive

Step 3: Apply the System Hidden Flags

At the prompt, type:

attrib +s +h D:\text.txt

Replace D:\ with your actual USB drive letter.

system hidden file property to hide file on a USB stick

Type exit to close the prompt. Then unplug and reconnect the USB drive. The file will now be invisible—even with hidden files shown—unless the system file setting is also disabled.

Confirming the Hidden File

Open Command Prompt and type:

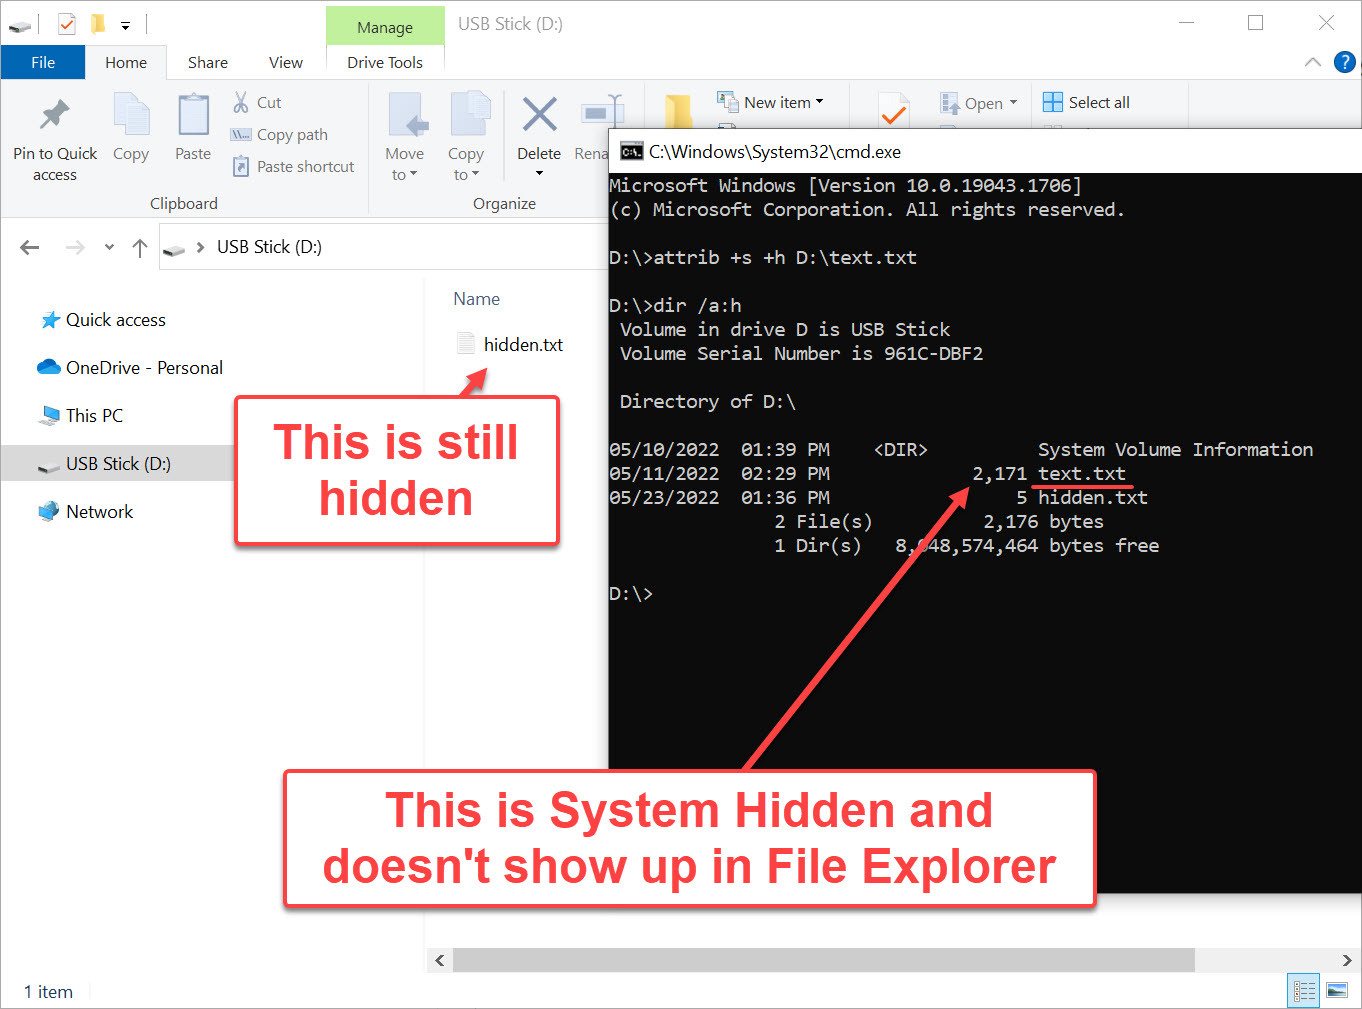
dir /a:h

You’ll see hidden files listed—even the system hidden ones—but they won’t appear in File Explorer.

view system hidden file on USB drive

How to Open or Restore the Hidden File

Option 1: Show Protected Files (Not Recommended)

Enable “Hide protected operating system files” in Windows Explorer. This reveals system-hidden files but also exposes critical OS files to potential deletion.

Option 2: Remove Attributes

In Command Prompt, type:

attrib -s -h D:\text.txt

Option 3: Open Without Changing Attributes

To open the file without unhiding it, use:

notepad D:\text.txt

open hidden file on USB flash drive from command line

Need Stronger File Protection?

If you require stronger security, consider a Secure Disk solution. These USB flash drives hide entire partitions until a password is entered. They’re hardware-based, making them immune to software workarounds or hacks.

For more info, check out Nexcopy’s Secure Flash Drives.

Continue Reading

How To: Copy Protect Digital Photo on USB Flash Drive

I want to copy protect a digital photo on a USB flash drive. The answer wasn’t as obvious as I had hoped, but I did find it.

Below is the process I used to get what I needed.

The first thing I want to emphasize is that I want to protect a digital copy of a photo rather than a physical copy of a photo.

So, how to prevent a digital photo from being copied from a USB flash drive is a difficult question to answer. My first thought is about the medium I intend to use to send a digital photo to someone.

  • Do I offer a download link?
  • Do I send them a digital copy on a storage device like a portable hard drive or USB flash drive?
  • Do I provide them a weblink to view the file from a hosted server?

The more I considered a delivery method, the more questions I had.

My first thought was to host the photo on a private webpage. Only users with access to the page could view the photo.

This isn’t going to work. I realized that once the viewer is on the page and viewing the photo, they can save it or screen capture it. After that, they could share the digital photo with whoever they wanted. There isn’t much protection here.

My next thought was to put the digital photo in a password-protected zip file. That is a good idea. The photo can only be viewed by someone who knows the password.

Oh wait, that doesn’t work either. I end up with the same problem as the hosted webpage. Once the file is accessed, the user can do anything they want.

So it occurs to me… I keep returning to an encryption solution rather than a copy protection solution. Encryption is useful because only those with the correct password can access the photo; however, it is not the same as my ultimate goal, which is to copy protect a digital photo and prevent it from being copied.

I guess you can say encryption is a way of keeping the honest people… well, honest.

I need a way to protect my photo regardless of the recipient’s intent. I realized I needed a solution in which everyone can see the photo but no one can do anything with it. Is it even possible to find such a solution?

When I was talking with a neighbor who is an IT guy, he mentioned a concept that I’d heard of before but didn’t apply to my thinking. Rather than a digital method of sending the photo, he proposed a type of physical dongle that held the photo. He explained that without the physical device, viewing the photo is impossible.

The lightbulb went on!

Continue Reading

How To: Check for Bad Sectors on USB Flash Drive

This how to tutorial describes a simple way to check for bad sectors on a USB flash drive. The instructions below will also fix any bad sectors, if possible, during the scanning process.

A bad sector on a flash drive is a portion of memory on the flash drive which cannot be accessed, written to, or read from and therefore cannot be used. A bad sector on a flash drive sounds easy enough to diagnose, but it’s important to know there are two types of bad sectors: hard and soft.

Physical damage to a USB flash drive will create a hard bad sector. A hard bad sector cannot be repaired or fixed and is typically induced from physical abuse. A good example: leaving a flash drive in your pocket and it went through the wash, or the device was dropped and hit the ground is such a way, physical damage happened to the memory.

A soft bad sector on a flash drive are memory logic problems. A soft bad sector can occur from a software or data error during the write process. In lower quality flash drives, it is possible the incorrect firmware was written into the USB controller ROM and thus creates instability via soft bad sectors.

Bad sectors cannot be repaired; however soft bad sectors can be repaired.

The soft bad sectors can be fixed by using the CHKDSK utility in the Windows operating system. This same utility will also flag any hard bad sectors not to be used again, and of course not repaired.

Some signs of a bad sector on a flash drive include:

  • Cannot read a file on the flash drive
  • A file location is no longer available
  • Unable to format the USB flash drive
  • A disk read error occurs during operation

In our opinion, run the check disk one time to see if your issue is resolved, but if subsequent scans are required, we recommend discarding the flash drive to avoid further issues.

Running the chkdsk scan is really easy:

Insert flash drive to computer

Using Windows Explorer navigate to the drive letter

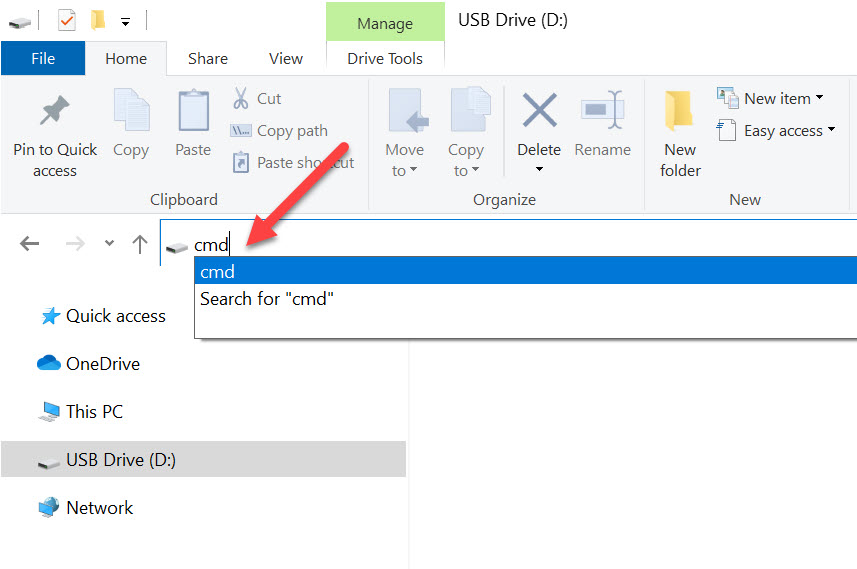
In the Explorer window type cmd and press enter

access usb flash drive cmd command

Once inside the command line utility type chkdsk d: /f /r /x and click Enter. NOTE: *The letter d represents the drive letter of the flash drive.

chkdsk commands for usb flash drive

  • The /f parameter tells CHKDSK to fix any errors it finds.
  • The /r parameter tells Windows to repair/restore bad sectors (if possible).
  • The /x parameter unmounts any “handles” to the drive or said another way, this step will not allow any other resource to access the flash drive during the scan.
Continue Reading

How To: Check if My USB Flash Drive is Bootable?

The following article will explain how to check your USB flash drive for if it’s bootable. There is no software needed, no download, just a couple of simple commands in your Windows 10 operating system.

A master boot record (MBR) is a special type of boot sector at the very beginning of a partition storage device like a fixed disk (hard drive) or removable drive (USB thumb drive). The MBR contains executable code to function as a loader for the installed operating system. This loader turns over the functions of the hardware (mother board bios) and passes that loading responsibility off to the operating system (Windows).

This is how you check if your USB is bootable, or not:

First, please have only the one USB stick connected which you want to check if it’s bootable. It’s not required to do this, but will my the instructions below a bit easier to follow, that’s all.

Using the Windows search function copy and paste this into the search field and click Enter

compmgmt.msc

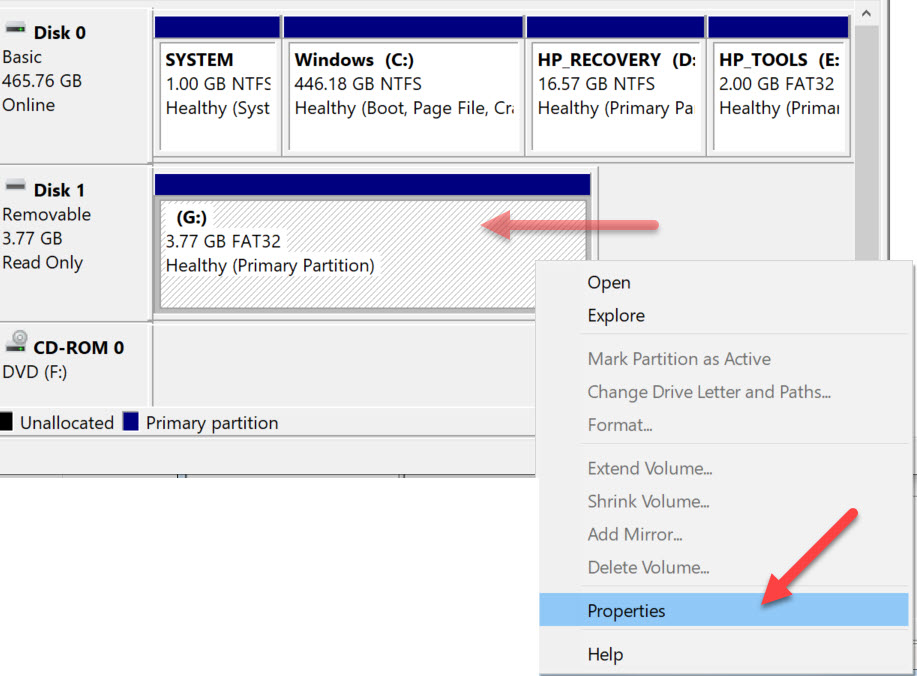
The screen shot below will pop up after you click Enter. Using the image as a reference, select “Disk Management” under the “Storage” folder“. In the middle of the dialogue box you will see the drive letter associated with your USB flash drive. In the middle of the box you will probably see the USB listed two different times. The top portion of the box, the USB will be listed along with other devices, like your hard drive and optical drive. The bottom portion of the box, the USB will be shown as “Removable

Once you’ve determined which drive letter is your USB drive, you may Right Click on the drive letter and select Properties.

A Properties dialogue box appears giving you the option to select any one of the devices show in the previous window (the Disk Management window). From this dialogue box, click the Hardware tab and select the “Mass Storage USB Device” by a single click. Then click the Properties button at the bottom.

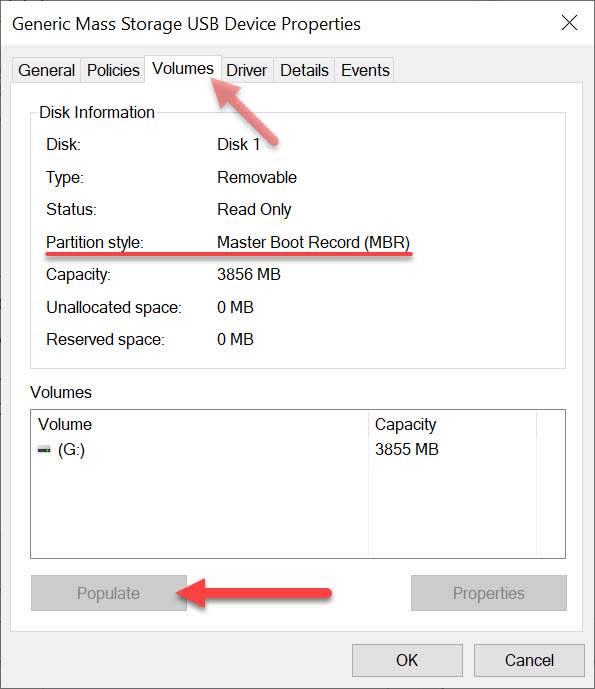
The last dialogue box are the Properties of your specific flash drive.

Click the Volumes tab at the top, you then must click “Populate” to get the device information. . The “Partition Style” will read either Master Boot Record (MBR) or the field will be empty.

If the above information isn’t detailed enough for the information you are looking for, the next step is to use a hex editor and check if the boot strap code is actually in the Master Boot Record. This is a bit more detail and the guys at Hakzone did a really good job of summarizing how this would be done using a hex editor program.

Continue Reading

How To Enable Disable USB Write Protection in Windows 10

The link below is for a ZIP file that contains two batch files to either enable or how to disable USB write protection on a Windows 10 computer. These batch files also work on Windows 7 machines.

This solution is ultra-easy and very quick: one click to run the registry edit file and one click to confirm the task. That’s it.

Typically, a person will want to lock down the USB ports of a computer to ensure a virus doesn’t spread through a USB device, such as a flash drive. This batch file provides a fast and simple way to both lock down your USB ports and easily unlock them again.

Important: Do not have a USB flash drive connected to the system when you run either batch file.

For those seeking more technical details, here is the specific registry edit being applied. Changing the DWORD value to 00000001 sets the device policy for the computer to be write-protected. Changing that value back to 00000000 restores normal read/write access.

[HKEY_LOCAL_MACHINE\SYSTEM\CurrentControlSet\Control\
StorageDevicePolicies]
“WriteProtect”=dword:00000001

Note: This USB write protection method is specific to the PC on which it is applied. It is not device-specific and will not follow the USB drive to other machines.

If you require USB write protection that is permanent on the device itself and universal across all computers, contact Nexcopy.com and ask about their Lock License USB drives. This hardware-level solution is embedded in the USB controller, ensuring the drive is always write-protected, preventing any possibility of a virus being written to the USB stick. This is the best universal solution for USB write protection.

Screenshots of the Batch File Process

Batch files included in the ZIP:

USB Write Protection batch files

Windows confirmation prompt after running the batch file:

Windows confirmation prompt

Task completion screen:

USB write protection task complete

Download link for the two batch files:

USB Write Protection Registry Edit Batch Files

Continue Reading

How To: Fix MacBook Air and USB Ethernet Adapter

How To: Fix MacBook Air and USB Ethernet Adapter

If you are one of the few who rushed out to purchase the MacBook Air, you might have found yourself in a bit of a pinch.  How to get the USB Ethernet Adapter working?  If this is you, or a friend you know, here is a quick fix until a new Apple update is published.

MacBook Air USB Ethernet Adapater

First, it appears that some have luck plugging the adapter into different ports on the MacBook Air, but it’s not a universal solution. After a bit of investigative work sifting through the Apple forums, you can do the following for a sure thing fix: Continue Reading

How To: Make Favicon For Flash Drive

How To Make a Favicon for a Flash Drive

In the heat of getting a new site launched over the weekend, I needed an .ico Favicon for the website.  I came across this free on-line tool which made everything a snap.  No software download, no .exe to load…just down and dirty ico creator.  Today I thought it would be a great review [from original post] to go over How To Make a Favicon for a Flash Drive. It’s just several easy steps.  Lets begin.
  1. Using a program to create an image file, make a jpeg for what you want the ico to look like.  You can use something as simple as Microsoft Paint or something as fancy as Photoshop.  When you make the jpeg, make the overal shape square.  Try and keep the logo simple – simple will translate best into an ico file.
  2. Browse to Chamie and click the “Favicon from Pics” link.  Upload your file.  Chami will automatically generate your ico file.  Chami gives you some great options for the USB favicon file.  You can get a static image or an animated .gif file.
  3. Once you have the .ico file, save that image to the root of your USB flash drive.
  4. Next, open Notepad in Microsoft [or any plain text editor] and type the following:
[autorun] icon=favicon.ico
Save this to the root of your USB stick as “autorun.inf

USB favicon - How To Make

Once you’ve done all the above, Continue Reading

Copyright

Copyright © 2006 +

USB Powered Gadgets and more...

All Rights Reserved

Advertise with us

GetUSB Advertising

This is a high value website providing great exposure to your product and brand. Visit our advertising page to learn specifics.

For more information
Visit our advertising page.

Nexcopy Ad

Nexcopy Provides

USB copy protection with digital rights management for data loaded on USB flash drives.

Contact us learn more

Resources and References Page

Resources and References Page