GetUSB.info Logo

Posts Tagged ‘format’

I can’t Format FAT32. Where did FAT32 go? Where did it start and end?

I can't Format FAT32.

Has anyone noticed FAT32 format option is gone in Windows?

Microsoft has not issued an official statement explaining why the FAT32 formatting option is unavailable for storage devices 32GB and larger but we’ve done some digging and came up with a possible answer.

On both Windows 10 and Windows 11, users are typically presented with formatting options for NTFS (New Technology File System) or exFAT (Extended File Allocation Table). The choice to format a drive as FAT32 is missing once the drive exceeds 32GB in capacity.

Since Microsoft has not clarified this change, it’s widely assumed that the decision was made to avoid problems caused by FAT32’s limitations—especially its inability to store files larger than 4GB. As file sizes have continued to grow over the years, this limitation has become more noticeable.

The FAT32 file system cannot handle single files larger than 4GB. This is due to its 32-bit file allocation table, which caps the maximum file size at 4,294,967,295 bytes. Regardless of the cluster size, FAT32 simply cannot address a file above that cluster size.

For users who need to store high-resolution videos, system backups, or other large files, switching to exFAT or NTFS is essential. NTFS, which is the default for most internal drives in Windows, offers better support for large files, access permissions, and journaling. ExFAT, on the other hand, was created as a lightweight, high-capacity alternative for external storage that’s compatible across multiple operating systems. But don’t format USB flash drives as NTFS as we’ve mentioned before.

We think Microsoft removed the FAT32 option for drives above 32GB to prevent user confusion and/or support issues. For example, trying to copy a 5GB video file to a FAT32 drive will result in a frustrating error message. By defaulting to exFAT, Windows helps users avoid this issue without needing to explain file system limits.

ExFAT supports significantly larger file sizes compared to FAT32. In theory, exFAT can handle files up to 16 exabytes (16 million terabytes), although real-world limits are much lower and depend on the device’s implementation. Even so, it’s more than sufficient for most consumer and professional use cases, from video production to large-scale backups.

While exFAT offers excellent cross-platform compatibility and large file support, users should be aware that some older operating systems or embedded devices might not support it natively.

Real Quick: A Brief History of File Systems

The concept of a file system—the method by which data is organized and stored on a storage device—has evolved steadily since the early days of computing.

General Motors needed a file system in the 1950s to help their early computers store and organize large amounts of business data—like payroll, inventory, and production schedules. Working with IBM, they developed one of the first operating systems (GM-NAA I/O) to manage these tasks. It allowed the computer to access and manage files on magnetic tape, making it easier to run multiple jobs and retrieve information efficiently. This basic file system helped move computing from scientific use into real-world business operations.

A few years later, more advanced systems like MIT’s Compatible Time-Sharing System (CTSS) introduced features like named files and user access control. By the 1970s, UNIX and Multics brought in hierarchical directory structures that closely resemble the file systems we use today.

Dumb Question: Why Did Microsoft Call It “FAT”?

Continue Reading

How To: Add USB Flash Drive to Roku TV Getting Pause and Rewind Features

It is not difficult to get some premium functionality from Roku TV like pause and rewind by simply adding a USB flash drive to your setup

You will need to configure the Roku TV and the flash drive to work together, but it’s not hard to do.

To get close to 90 minutes of pause or rewind time you will want to use a 16GB or larger flash drive. So using something small like a 2GB or 4GB USB drive, probably isn’t worth the effort.

The other caveat is that the pause function is only available on the live TV input, limiting you to whatever’s coming over your antenna or cable connection.

So if the above sounds like something worth trying, let us show you the way:

What you’ll need:

  • Roku Smart TV (not the dongle or box). Said another way, a Smart TV with the Roku app.
  • Live TV input (usually either antenna or cable)
  • Roku TV remote control (standard with Roku purchase)
  • A 16GB or larger flash drive. Can be either USB 2.0 or USB 3.0

Once you’ve selected your flash drive be sure nothing is on the USB stick. This process will format the drive and remove any files you have on the drive.

Getting Started

Locate a USB port on your Smart TV. Any port will work. These will be found on the back side of your Smart TV. Connect the flash drive to a USB port.

Going to your Roku home screen and move the cursor until you are highlighting the LIVE TV option. This will be a tile on the home screen.

Don’t click LIVE TV, but rather get into the Options menu of Roku. You can either click the Gear button on the Roku remote, or you can press the Home button on the remote five times.

roku tv remote with gear, setting, button

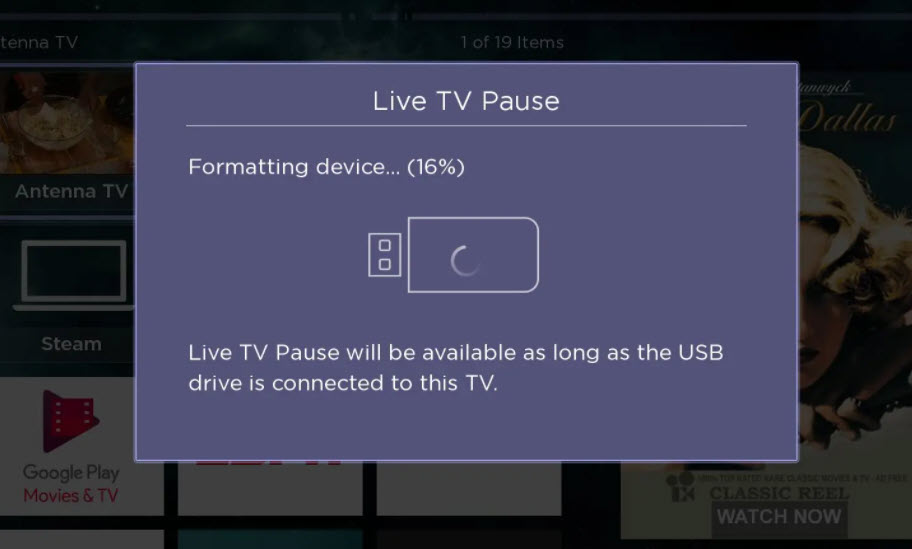
In the Options menu select the “Set up Live TV Pause” and follow the on-screen instructions. Part of those instructions will include formatting a USB flash drive so Roku can sync with the flash memory for pause and rewind features.

Roku software will ask you to confirm the formatting process via a pin. This is only to make sure you think before you format because once you format the drive, any old data on the USB stick will be gone!

roku tv format usb flash drive

Done

Once live TV pause is enabled, you will be able to pause live television using the play/pause button on the Roku remote. You can also rewind up to (about) 90 minutes of live TV. This gives you plenty of time to have a nice family dinner while the Roku is on pause… then come back to finish the show.

Continue Reading

How To Format a Flash Drive as UDF (Windows 7 & 10 Solution)

How to Format a USB Flash Drive as UDF in Windows

When trying to format a flash drive in Windows (7 or 10), you will see the file system options best suited for the device. The proper file systems for a flash drive are: FAT, FAT32, or exFAT. Windows also provides NTFS as an option for USB flash drives, but as mentioned before, NTFS is not the best file system for a USB drive. During the format process, only the most compatible file systems will be displayed in Windows.

Why is UDF not listed as an option?

First, let me say it IS possible for Windows to format a USB flash drive as UDF (Universal Disk Format). Microsoft just doesn’t want you to do it—and with good reason.

Important: If you think formatting a flash drive as UDF will make the thumb drive appear as an optical drive in the computer, you are mistaken!

According to the Universal Disk Format (UDF) specification governed by the Optical Storage Technology Association, many believe UDF will make a device work like a disc. UDF is most widely used for DVDs and newer optical disc formats. While it can be used on flash drives, it does not make them function as optical drives.

Some may assume that formatting a USB flash drive as UDF makes it universally compatible across Windows, Mac, Linux, Symbian, and other proprietary systems. In reality, exFAT offers the same cross-platform compatibility without the drawbacks of UDF.

Why You Should Avoid Formatting USB Drives as UDF

Here are the main reasons not to use UDF on USB flash drives:

  • Lack of fully functional filesystem check tools.
  • 64GB limit with Windows & Linux (a bug, not an inherent UDF limit).
  • Risk of quick wear-leveling failure on SD and USB mass storage devices.
  • UDF is read-only on Windows XP.

The most important issue is the lack of filesystem check tools. If the USB is removed during operation and data corruption occurs, there are no tools available to diagnose or repair the UDF file system. Since flash drives are designed for portability and frequent quick access, this risk makes UDF a poor choice.

How to format a flash drive as UDF:

1. Connect the USB flash drive to your computer and note its assigned drive letter.

2. Make sure no programs or data are accessing the drive.

3. Navigate to your C: drive in Windows Explorer. In the search field, type “CMD” (case-insensitive) and press Enter. Administrator privileges are required.

How To Format a Flash Drive as UDF

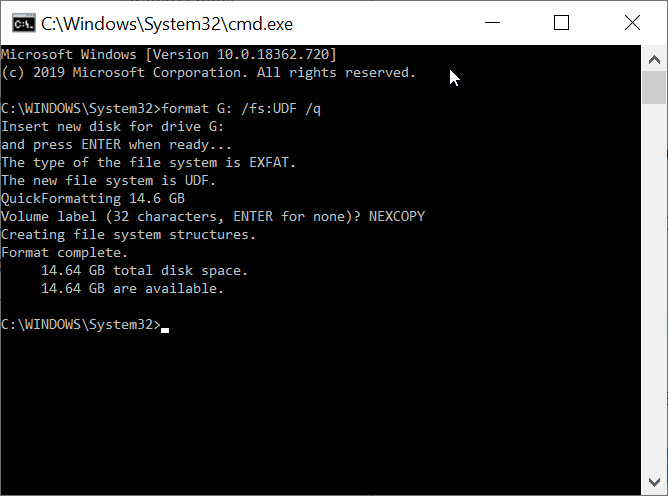
4. In the command prompt window, type the following command:

format G: /fs:UDF /q   (Replace G with your USB drive letter.)

The /fs parameter specifies the file system (UDF), and the /q parameter tells DISKPART to perform a quick format.

5. The OS will prompt you to insert the drive (it’s already inserted), press Enter.

6. Next, you’ll be prompted to enter a Volume name. Press Enter to leave it blank or type a custom name (e.g., “Nexcopy”).

How To Format a Flash Drive as UDF, other than FAT or exFAT

DISKPART will process the command and notify you once formatting is complete.

7. Type exit to close the command prompt window.

Note: The /q command deletes the file table and root directory of the previously formatted flash drive but does not perform a full sector scan for bad areas. This highlights the problem mentioned earlier: UDF lacks robust filesystem check tools, making it a risky choice for USB flash drives.

Continue Reading

Does Erasing Flash Memory Shorten It’s Life?

Yes. Performing an Erase or “full format” shortens the life of the device. The erase function is also very slow.

Here are some additional questions based on the answer above which we will address in today’s post:

Is “erase” and “format” the same thing?

Erasing flash memory (a.k.a. Setting all bits to 0, also called a “full format” by Windows) does more damage. Flash memory has a limited number of times that it can be written, and the more you write to it, the more it degrades. With an erase function, you’re writing to the entire device.

With a format, all that’s happening is changing a few bits at the front of the device to say the rest of the memory space on the flash drive is available to be overwritten. This saves the life of the flash memory because the old data is not being overwritten, just flagged to do it at a later time.

Why would you need to erase a drive?

Since a format is changing just a few bits at the front of the device, it means all the data is still on the drive. The few bits we are talking about which are changed, is related to the file allocation table. The changed bits in the file allocation table, mean there are no longer instructions about the location of the digital files. Recovery software can scan the memory space and retrieve those files even though the file allocation table isn’t giving instructions on where they are located.

Think of the file allocation table as the table of contents of a book. If you tear out the table of contents of a book, but all the pages of the story are still there, it’s the same concept as formatting a device. Sure you can scan the pages to find chapter 12 with the part about Paul getting a bucket of water, it’s just hard. Same thing with formatting a drive, you can use recovery scanning software to find the files, but it’s hard. Coming back to the original question, why would someone want to erase a USB flash drive? One possible reason could be a security risk of some kind and the operator wants to insure no data is on the drive. For example, you are donating a flash drive and you had financial or medical records on the drive. By performing an erase, that data cannot be recovered.

Why does an erase take longer?

Continue Reading

How To Format Any Size USB Drive as NTFS

If you take a typical USB stick and select the Windows format option, you only get the FAT and FAT32 option for anything under 4GBs.  However, there are times you might want to format as NTFS.  For example, you want to set specific file and folder privileges to the content and you feel NTFS is the best way. Well, there is an easy solution and it’s just a matter of setting the options correctly in Windows for your device. This is how you do it: Start > My Computer > Right click on the drive letter for the USB stick and select Properties.

ntfs for usb

Next click the Hardware tab of the Properties dialogue box and select the device which you’d like to change.  In this case, it’s drive letter F shown as “Simple Flash Disk 2.0 USB Device“  From here you can double-click the device or highlight in blue and click the Properties button. Continue Reading

Copyright

Copyright © 2006 +

USB Powered Gadgets and more...

All Rights Reserved

Advertise with us

GetUSB Advertising

This is a high value website providing great exposure to your product and brand. Visit our advertising page to learn specifics.

For more information
Visit our advertising page.

Nexcopy Ad

Nexcopy Provides

USB copy protection with digital rights management for data loaded on USB flash drives.

Contact us learn more

Resources and References Page

Resources and References Page