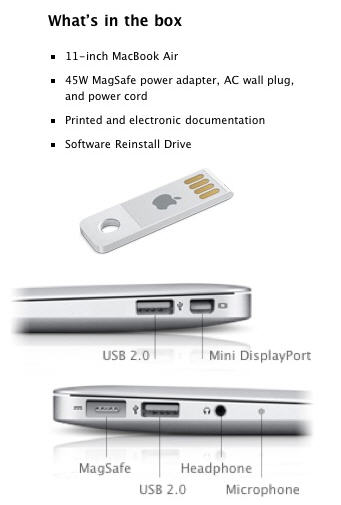
With Apple’s recent news about the MacBook Air being ultra thing, ultra long lasting and ultra cool, what many overlooked was the reinstall software shipping on a USB drive.
With companies trying to save energy, reduce cost and reduce product sizes, it’s no surprise [at least to me] that Apple dumped the optical drive in favor of solid state memory…for both the computer and the restore media.
“Even the flash drive looks awesome from Apple,” says my colleague who does a ton of iPhone and iPad applications…with a new one coming out.
Beside the fact of flash being faster than optical, we also save space on the internal SSD drive by not having the reinstallation software loaded, but rather off-line and secure. Just be sure to wrap a key-chain around it, the Apple restore USB drive looks pretty small.
We have already seen USB sticks getting to the 64GB capacity, but it doesn’t go without some serious trouble or expense in making them. Currently all 64GB sticks are made up of four 16GB NAND chips. The drives are huge and far more expensive than a 1TB USB hard drive. But this will all change…
Samsung announced that it has begun mass production the industry’s first 3-bit-per-cell, 64 Gb (8 GB) MLC NAND flash chip using 20-nm-class processing. In addition to the larger capacity, Samsung’s new NAND flash will use Toggle DDR (Double Data Rate) 1.0 specifications, offering a 60-percent higher productivity level than the previous 30-nm-class, 32 Gb 3-bit NAND using SDR (Single Data Rate).
Samsung’s chips are expected to arrive in USB flash drives, Secur Digital cards, smartphones and SSDs while replacing the current 4 GB (32 Gb) devices on the market. Samsung did not comment on time-frame; however the new devices may begin to appear in the market and offer 8 GB minimum and 64 GB maximum.
Continue Reading
It’s a bit amazing we haven’t seen more iterations of the iPhone bumpers with power packs built in. I guess the primary reason would be the bulkiness added, but once company doesn’t care and that’s Energizer.
Energizer introduced their AP1201 battery pack earlier this month for the iPhone 4. It’s a iPhone 4 specific bumper which includes a built in batter pack. The battery inside the silicon bumper is made of their patented lithium polymer battery technology. The power pack adds another 200 extra hours of standby time, 27 extra hours of music time, 7 extra hours of video time, or 5 extra hours of talk time on 3G networks.
It’s hard to tell from the picture how much bigger it makes your device, but the video after the jump gives you a real world comparison.Â
Continue Reading
Do you see something odd about this picture? Maybe the fact an LED is illuminating from a USB connector with no PC in site? Ya that’s it. Good job Sherlock.
So what we have here is a How To or USB Hack on running an LED from a Super-capacitor. If you are non-technical, then we basically mean a very short lived battery to run the LED. A super-capacitor has the ability to store energy for longer periods of time over traditional capacitors – yet still not long enough as with batteries.The concept of this tutorial is to wire a super-capacitor to a USB socket whereby your computer can charge up the capacitor and when disconnected you’ll get about 10 minutes of LED illumination.
Granted there isn’t much day-to-day use with this USB hack, but just a fun little project if you have the time.
Over on the Instructables website there is an updated USB tutorial which includes
Continue Reading
With netbooks gaining popularity, the fact that no optical drive is included with the product has become a bit of an issue. With out an optical drive, software manufacturers are forced to provide download links for the installation packages. With very large installation packages, a download option may not be available, so vendors need to switch to a solid state device like a USB thumb drive or SD card.
Today Hitachi is trying to tackle this problem and provide a solution where everyone wins. Their ODD Hybrid Drive is the solution. The ODD [Optical Disc Drive] is a combination of a solid state hard drive and optical disc drive. Together, the hybrid drive allows the smaller netbooks and soon tablet PCs the ability to have optical accessibility.Having optical is also critical for Windows restore procedures in the event the operating system needs to be restored or repaired.
The added feature of this type of hybrid drive is the speed. Check this out, Windows 7 boots in about 29 seconds. Starcraft 2 Battlenet loads in about 38 seconds. Of course these numbers will very depending on your hardware setup, but it gives you an idea of performance.
The report from Aving didn’t mention price, but did say the hybrid drive will become available mid Oct 2010.
Source:Â Aving.net.
Continue Reading
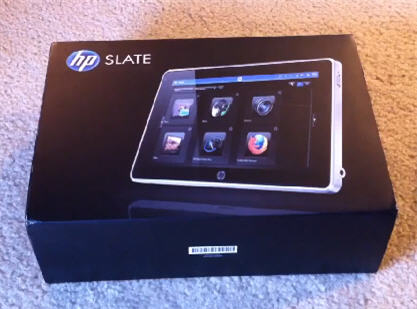
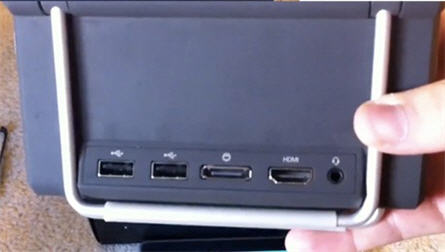
We’ve seen some talk about the HP Slate coming back. It was canned several months ago, but just recently we’ve started to hear about reviews and product spotted out in the wild. Most recently is a blog post from Engadget [source for these images]:
It’s well known the Slate was canceled back in March and I find it very unlikely the company would about-face yet again to re-launch the tablet PC.
My theory is the guy posting video on the web, is a guy who got his hands on a prototype unit while it was in development. The HP Slate most likely had hundreds if not thousands of prototypes made and clearly some of them have leaked into the public sector.
The HP Slate shown in the video on Engadget’s site does show so interesting tips. For example the processing time to switch between landscape and portrait. We also like the SD and USB connectivity along with nice dock station for the tablet PC. In our opinion, these to features alone, set it apart from the iPad product.
Of course, we’ll leave it up to you to decide.
Source: Engadget [including Video clip]
Continue Reading
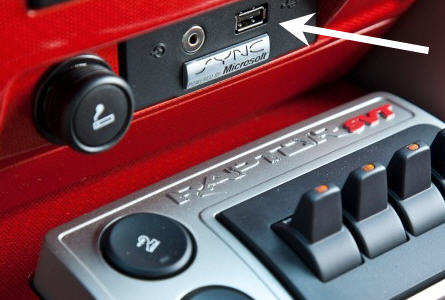
Wouldn’t that be nice – an app store for cars? Ford isn’t there yet, but they could be. I read earlier this week that Ford is pushing out a new SDK for software developers to create applications for For Motor cars.
A simple example of an app would be syncing your smartphone with the car [via USB] and run Pandora music or Stitcher internet radio.The new SDK from Ford includes access to the voice recognition utilities to help developers integrate voice command applications. An example here would be syncing the voice command functions of your phone through the speaker system of your car stereo. Developers could also design apps where you ask the car
Continue Reading
So cruising the news today for USB updates, I stumbled upon this article about an Australian company dreaming up a giant sky balloon to carry stuff.
When you need to get heavy gear into remote places a road can’t always get you there. Sometimes the gear is so large, air lifting it in wont get you there either. So what to do? How about a ginormous sky balloon?
To give you an idea of the type of problem this Australian company [Skylifter] is trying to solve; a helicopter is the only aircraft which can float in a product of great size or weight to a remote location – but it’s got limitations. A helicopter can only carry about 50 tons of gear. What if the stuff weighs more than 50 tons?
The balloon is 150-meters wide and could carry up to 150 tons. The balloon would have a flight range of 1240 miles and would act like a parachute on decent to make a gentle touchdown. A mini RC version of the balloon is now being tested and is 9 feet across. It can carry about 1 pound with a full-size prototype set to start building in the coming three years.
Continue Reading
You might have heard the next gen iPad will include a miniUSB port, but for those looking for an easier interface today, or want a standard USB interface for even the upcoming iPad, you should get the USB connector kit from USB Fever.
The kit has a SD and USB connector which talks with the iPad through the female Apple connector you use for synchronizing or connecting to your computer.The kit gives you an easier way to upload images, video and PDF documents. It also gives you an easier way to connect your iPhone or other digital camera or video recorder to your iPad. Hell, you could almost toss out the PC…oh way, you’ve still got to sync and update.
The USB port could also be used to connect your keyboard to the iPad for typing emails, etc. Sure you all love the keypad on the iPad, but it’s still not as easy to use as a traditional keyboard.
USBFever webpage [$35].
Continue Reading
Whether you are a serious musician or just like playing as a hobby to relax, chances are you have a guitar and a tuner. As with most musicians your budget is probably tight or with the casual player you don’t keep up on the up-keep of your gear, so when your guitar is out of tune, you go for the tuner. But most likely the battery is dead because A) you didn’t want to spend the cash or B) hadn’t played in so long, the batteries just went dead. This is why the solar powered guitar tuner makes perfect sense.
Tascam has done a great job with this tuner and thought about including a USB port just in case that tuner was stuffed in your guitar case for too long and you need a quick fix to get back in tune.
Released just in time for the holidays and priced right [under $20] with a range of hues to select from: black, pink, orange, green, blue, white.
Continue Reading
When Sony officially supports the USB 3.0 specification by supplying a dual USB 3.0 port on their new VAIO laptops, it’s safe to say the transition is picking up steam.
The Sony desktop-replacements are HD VAIO laptops coming with possibly everything you can hope for with the exception of 3D and SSD. The more expensive model ($2,970) will have Core i7-740QM, GeForce GT 425M 1GB graphics card while the lower end laptop ($2,140) will only carry a Core i5-460M and GeForce 310M 512MB. Both Sony VAIO models are stocked with 4GB RAM, the same Blu-ray optical reader, 500GB 2.5″ drive and a dual HDTV tuner as well as a 16.4″ full HD LCD.
In the connectivity department, both laptops will feature not one but two USB 3.0 ports – likely powered by
Continue Reading
Here is a 7 minute video on how to wire up any USB port and suck the power right out for that USB gadget you dreamed up at 3am. For DIY projects, USB hacking is one of the most popular forms of taking something ordinary and making something unique. So if you’ve never tried a hack or USB tutorial, this is a great building block for yourself. Enjoy!
Source: YouTube.
Continue Reading
 We have already seen