GetUSB.info Logo

Why Some ISO Files Work for USB Duplication — And Why Microsoft ISOs Don’t

Why some ISO files work for USB duplication and why Microsoft ISOs do not

Not All ISOs Are Equal: Why Windows Installer ISOs Break USB Duplication

Most people assume an ISO file is universal. If a file ends in “.iso,” it must behave like every other ISO, right? In the USB duplication world, that assumption causes more confusion than anything else. Customers load a Microsoft Windows installer ISO into their duplication workflow expecting it to behave like a classic disc image, only to discover the file refuses to write correctly or the resulting USB does not boot.

The problem is simple once you know what is really going on: a true CD or DVD ISO is a sector-for-sector copy of a disc, while a Microsoft Windows ISO is not a disc image at all. It only looks like one on the surface. Under the hood, it is a container holding a compressed operating system image, multiple boot loaders, and a hybrid filesystem designed for modern installation tools. For everyday users, the shared “.iso” extension makes these files seem interchangeable, but the two formats behave nothing alike during USB duplication.

Continue Reading No Comments

Why There Is No Universal Bootable USB Flash Drive

Universal Bootable USB Flash Drive Illustration

Understanding why a truly universal bootable USB flash drive cannot exist, even though millions of people keep searching for one.

People search for a universal bootable USB flash drive because the idea sounds so simple: one USB stick you plug into any computer, and everything just starts. Windows, Mac, Linux, old laptops, new desktops — one drive to boot them all. If millions of people keep looking for it, surely it must exist, right?

But the truth is more like walking into a hardware store and asking for one key that unlocks every house on Earth. Not because the idea is silly, but because every house is built differently. Some have old metal locks, some have smart deadbolts with keypads, some slide, some latch, some spin, and some are designed never to open unless the owner approves it. The problem isn’t the key. The problem is the doors.

A universal bootable USB flash drives drive runs into the exact same issue.

People imagine a USB stick as a magic power switch — plug it into any machine and the computer should wake up and run from it. But computers don’t share a single design. They’re more like different types of vehicles. A Ford pickup, a Tesla, a Harley-Davidson motorcycle, and a jet ski all have engines, but you can’t fire them up with the same ignition key. You wouldn’t expect the same engine to fit in all of them either.

Continue Reading No Comments

What Is a Security Dongle?

Security dongle being inserted into a laptop USB port

A security dongle is a small USB key that protects licensed software by proving ownership through hardware, not just a password.

A security dongle, sometimes called a license dongle or hardware key, is a small device—usually USB—that unlocks or enables specific software when connected to a computer. It’s a physical token of trust. Inside the dongle lives a secure chip holding cryptographic keys or even small snippets of executable code that verify whether the software is legally licensed. Without it, the program won’t start or runs in limited mode.

The idea dates back to the 1980s when developers needed a way to stop high-value software from being copied endlessly. CAD/CAM engineers, translators, and music producers were early adopters. Today, dongles still play a big role in industries where software value is tied to expensive workflows—think engineering design suites, broadcast editing, industrial control, or medical imaging. Despite decades of progress, the goal remains the same: make sure only authorized users can run what they’ve paid for.

Why Hardware Still Matters

Continue Reading No Comments

USB Local Disk in 2025: The Reliable Way to Make a Flash Drive Appear as a Hard Drive

USB Local Disk in 2025: The Reliable Way to Make a Flash Drive Appear as a Hard Drive

USB “Local Disk” in 2025: the XP-era hack had its moment—here’s the cleaner way (plus a product we found)

If you landed here from our old tutorial about making a USB stick look like a hard drive, you’re reading a time capsule. That guide leaned on an XP-friendly INF/registry trick (tweaking the removable bit with a modified driver). It was clever back then. On modern Windows 10/11, it’s unreliable, brittle with updates, and a magnet for driver-signing hassles. Even when you shoehorn it in, many apps and corporate policies now check the device class the hardware presents—not the label you forced with a file edit.

What changed under the hood

  • Windows storage stacks matured (UASP, policy and security hardening), and driver signing isn’t casual anymore.
  • Backup, imaging, and install tools increasingly verify “fixed disk” at the hardware level. A spoofed driver doesn’t pass that sniff test.
  • Enterprise environments often block or restrict “removable” media regardless of what the OS UI says.

What actually works now

You start with hardware that natively enumerates as a fixed disk. No patched drivers, no post-install gymnastics. The device tells Windows, “I’m a hard drive,” and everything—from Disk Management to BitLocker to fussy installers—behaves accordingly. The brilliant bit about this method is the configuration follows the device. No more editing every PC the USB is connected to.

A product that does exactly that

We found a solution from Nexcopy called USB HDD Fixed Disk . It’s a USB flash device configured at the controller/firmware level to appear as a Fixed Disk / Local Disk on any computer. No utilities to run, no INF edits, no per-PC setup—just plug in and it registers as a hard drive.

Continue Reading No Comments

The USB Ghost That Wouldn’t Die — and How to Exorcise It (Windows 10)

How To: Fix the issue of Windows sticking the same USB Flash Drive name to any USB connected

Windows wont change the name of a USB flash drive in Explorer

Ever plug in a flash drive and watch an old name crawl back from the grave? You format it, rename it, swear at it… and Windows still insists the drive is called something from a previous flash drive connection like TEST or better yet something like CentOS 7 Boot. The stick isn’t haunted. Windows is just clinging to a stale label it cached ages ago.

Windows doesn't change the name of a USB flash drive in Explorer

Continue Reading No Comments

Forget Hubs — This Board Packs 25 USB Ports

ASRock’s X870 LiveMixer WiFi puts USB connectivity first with twenty-five total ports for creators, gamers, and power users.

A Motherboard With More USB Ports Than You’ll Probably Ever Use

Most boards today give you a few decent USB connections and expect you to figure out the rest with hubs and adapters. That’s fine for casual setups, but chances are if you’re running external drives, cameras, audio gear, or other devices, you’ll run out of ports fast. The ASRock X870 LiveMixer WiFi flips that script. This board comes with twenty-five USB ports in total, which is way more than you’ll see on a typical motherboard.

Rear panel options

The first thing to understand is that the back panel is stacked. You get sixteen ports right out of the box, and two of those are USB4 Type-C. Those are your heavy hitters: up to 40 Gbps transfers, plus display output if the CPU supports it. That kind of bandwidth makes external SSDs or capture gear run like they should.

You also get another Type-C rated for USB 3.2 Gen1 speeds and about seven Type-A ports in that same Gen1 class. That’s plenty fast for most peripherals — webcams, audio interfaces, or storage that doesn’t need crazy speed. Then there’s the legacy support: six USB 2.0 ports still hanging around. They’re slow at 480 Mbps, sure, but perfect for things like keyboards, mice, dongles, or older hardware that doesn’t benefit from more bandwidth.

Internal headers and front access

Add another nine ports through the internal headers and you hit the big twenty-five.

Continue Reading No Comments

I can’t Format FAT32. Where did FAT32 go? Where did it start and end?

I can't Format FAT32.

Has anyone noticed FAT32 format option is gone in Windows?

Microsoft has not issued an official statement explaining why the FAT32 formatting option is unavailable for storage devices 32GB and larger but we’ve done some digging and came up with a possible answer.

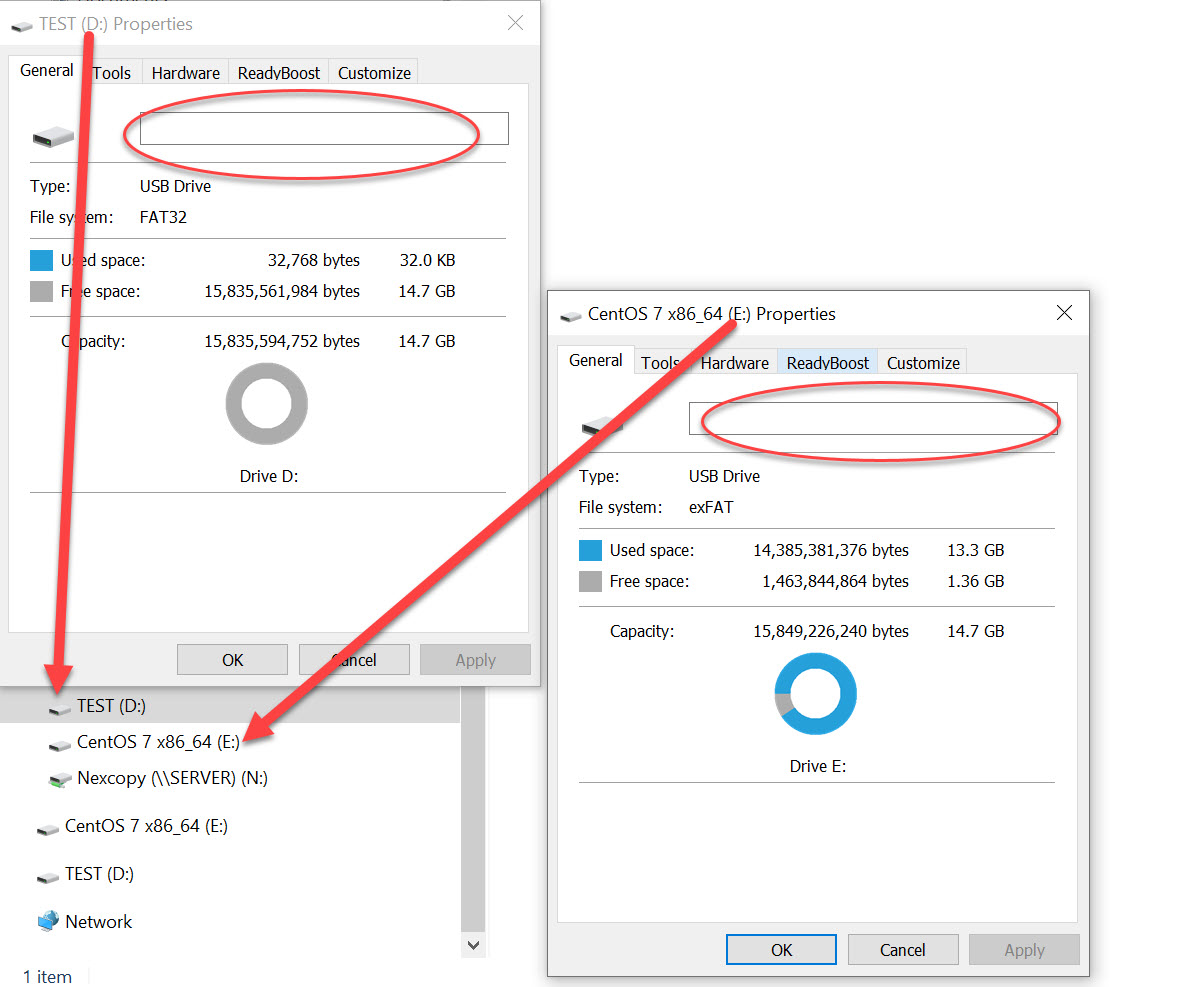
On both Windows 10 and Windows 11, users are typically presented with formatting options for NTFS (New Technology File System) or exFAT (Extended File Allocation Table). The choice to format a drive as FAT32 is missing once the drive exceeds 32GB in capacity.

Since Microsoft has not clarified this change, it’s widely assumed that the decision was made to avoid problems caused by FAT32’s limitations—especially its inability to store files larger than 4GB. As file sizes have continued to grow over the years, this limitation has become more noticeable.

The FAT32 file system cannot handle single files larger than 4GB. This is due to its 32-bit file allocation table, which caps the maximum file size at 4,294,967,295 bytes. Regardless of the cluster size, FAT32 simply cannot address a file above that cluster size.

For users who need to store high-resolution videos, system backups, or other large files, switching to exFAT or NTFS is essential. NTFS, which is the default for most internal drives in Windows, offers better support for large files, access permissions, and journaling. ExFAT, on the other hand, was created as a lightweight, high-capacity alternative for external storage that’s compatible across multiple operating systems. But don’t format USB flash drives as NTFS as we’ve mentioned before.

We think Microsoft removed the FAT32 option for drives above 32GB to prevent user confusion and/or support issues. For example, trying to copy a 5GB video file to a FAT32 drive will result in a frustrating error message. By defaulting to exFAT, Windows helps users avoid this issue without needing to explain file system limits.

ExFAT supports significantly larger file sizes compared to FAT32. In theory, exFAT can handle files up to 16 exabytes (16 million terabytes), although real-world limits are much lower and depend on the device’s implementation. Even so, it’s more than sufficient for most consumer and professional use cases, from video production to large-scale backups.

While exFAT offers excellent cross-platform compatibility and large file support, users should be aware that some older operating systems or embedded devices might not support it natively.

Real Quick: A Brief History of File Systems

The concept of a file system—the method by which data is organized and stored on a storage device—has evolved steadily since the early days of computing.

General Motors needed a file system in the 1950s to help their early computers store and organize large amounts of business data—like payroll, inventory, and production schedules. Working with IBM, they developed one of the first operating systems (GM-NAA I/O) to manage these tasks. It allowed the computer to access and manage files on magnetic tape, making it easier to run multiple jobs and retrieve information efficiently. This basic file system helped move computing from scientific use into real-world business operations.

A few years later, more advanced systems like MIT’s Compatible Time-Sharing System (CTSS) introduced features like named files and user access control. By the 1970s, UNIX and Multics brought in hierarchical directory structures that closely resemble the file systems we use today.

Dumb Question: Why Did Microsoft Call It “FAT”?

Continue Reading No Comments

Why My USB-C Isn’t Working – Microsoft Is Cleaning Things Up

Why My USB-C Isn't Working - Microsoft Is Cleaning Things Up

Microsoft is trying to ending USB Type-C port confusion by addresses the user issues they face with USB-C ports on Windows 11 devices. Even though USB-C is ‘supposed to be’ universal the ports themselves do not offer the same functionalities – leading users to confusion and frustration.

To combat this, Microsoft has implemented new standards through the Windows Hardware Compatibility Program (WHCP) to ensure consistency and reliability across USB-C ports on certified Windows 11 devices.

Understanding the Problem

Continue Reading No Comments

Pros and Cons of the Raspberry Pi USB 3 Hub

It is common to hear Raspberry Pi owners want more USB ports. GetUSB.info just read about them introducing an official 4 port USB hub. Sweet. To note, most Raspberry Pi single-board computers, except for the Raspberry Pi Zero and A+ models, include a built-in USB hub that splits one USB connection into several USB Type-A ports. Just recently they launched the official Raspberry Pi USB 3 Hub, a high-quality USB 3.0 hub that offers four additional USB ports.

This hub includes a single upstream USB 3.0 Type-A connector with an 3 inches (8 cm) built-in cable. The “upstream” port is the socket used to communicate with the host device, which in this case is the Raspberry Pi. It also has four downstream USB 3.0 Type-A ports and can reach data transfer speeds up to 5 Gbps. There’s a USB-C socket for an optional external 3A power supply but that isn’t included with the $12 purchase. Quick note, the downstream port is are the sockets used to communicate with the devices, like a USB flash drive, hard drive, mouse, keyboard, printer, etc.

One driving force on why Raspberry Pi wanted to sponsor their own USB hub is the fact most ‘other’ hubs are just too expensive. One fundamental goal of Raspberry Pi is to provide an unparalleled offering for computer code development and the lowest possible price. Usually, you either pay a high price for a reliable, well-designed product, or you buy a cheaper option that’s unreliable, doesn’t work with various devices, or simply looks bad.

With this hub, there is no “race to the bottom,” where cheap, poor-quality products pushed out better options, and online marketplaces like Amazon became filled with low-quality hubs. To offer a better solution the Raspberry team got together with with Infineon to source a quality hub chip called the CYUSB3304.

Based on user beta testers and user comments here are the pros and cons of the Raspberry Pi USB 3 Hub:

Pros and Cons of the Raspberry Pi USB 3 Hub

Continue Reading No Comments

Encrypt a USB Flash Drive, Windows 10, Free Feature!

Encrypt a USB Flash Drive, Windows 10, Free Feature!

Encrypting a USB flash drive is quick and easy in Windows 10. The PRO version of Windows 10 will allow anyone to activate Microsoft’s built in bitlocker technology to encrypt an entire flash drive, or part of a USB flash drive.

Microsoft BitLocker is a disk encryption technology designed to enhance data security by encrypting entire disk volumes on Windows operating systems. Introduced with Windows Vista and included in subsequent versions, BitLocker provides a robust defense against unauthorized access and data breaches.

The primary purpose of BitLocker is to protect sensitive data in case a device is lost, stolen, or accessed by an unauthorized user. It uses full-disk encryption to secure the entire contents of a disk, including the operating system, system files, and user data. Even if someone physically removes the hard drive and attempts to access it on another system, the data remains inaccessible without the proper authentication credentials.

BitLocker employs various encryption methods, with Advanced Encryption Standard (AES) being a commonly used algorithm.

The encryption process is transparent to the user once configured, and access is granted through authentication methods like PINs and passwords.

Below are nine screen shots and simply follow along in your Windows 10 Pro computer and do what you see below. The process is very easy to do. The longest part of this entire setup is the encryption of the USB stick itself. The time required to encrypt the drive will depend on a couple of factors, such as the GB capacity of the USB drive and the processing power of your computer. In the example below, using a USB 2.0 device with a 16GB capacity the encryption time took only 4 minutes.

Continue Reading No Comments

Get USB Flash Drive Serial Number with PowerShell or Command Line

Easily get the hard coded serial number of a USB flash drive with either the Command prompt in Windows or Powershell. Of the two, Powershell is easier. Below are the instructions. After the instructions there is a bit more information about the different types of serial numbers which can be found associated with a Mass Storage Device (USB flash drive) so be sure to read that part as well, so you get what you want!

In the Windows Search bar, type “powershell” and click Enter

The Powershell utility will run and simply copy and past the following:

Get-WmiObject Win32_DiskDrive | select Model, Name, InterfaceType, SerialNumber

The screen shot below shows the hard drive of the system and a USB flash drive. The command doesn’t clearly label each, so be a little aware of the devices connected compared to what is listed. It is suggested to have only one USB device connected while running Powershell so it is easy to identify the device.

get usb serial number using powershell

For the Command prompt, go to the USB flash drive itself. In the navigation field at the top (where you can type things) type in cmd. This will open the Command prompt for the USB flash drive itself. From here, copy and paste the following:

wmic path Win32_USBControllerDevice get Dependent | find “USBSTOR”

The screen shot below shows the same result as the Powershell command, BUT the string does have an extra &0 which is not part of the USB flash drive device. So a bit of parsing is required when looking at the number, or parsing of code if you plan to use the Command prompt to find the device serial number programmatically.

get usb serial number using command line

From the two above the Powershell solution is a bit more elegant.

However; may we suggest a third option? If you find yourself on this page, there is a high probability there are other features you can benefit from, like making an Image file of your USB stick, or speed benchmarking the performance of your flash drive.

If that is the case, then we recommend our free program, no installation required, standalone exe file that will fetch the serial number of a device as well as provide a tool to create image files or speed test your USB flash drive.

usb flash drive utility, image file, speed test, get serial number

You may download the free program here. Again, no installation required, this is a standalone exe file that can run from your flash drive or hard drive:

FREE DOWNLOAD: Nexcopy USBScrub

Continue Reading No Comments

Disable USB Flash Drive Pop Up Messages in Windows 10

Users can turn disable USB flash drive pop up messages in Windows 10 by performing a very simple step in Settings. While it may seem counterproductive to turn off USB notifications in Windows 10, once you’ve been using Windows for a while you will likely want to reduce the number of pop-up messages.

There are two ways to disable USB flash drive messages in Windows. Performing a RegEdit or modifing a Settings feature in the Windows GUI

Disable the USB flash drive pop up message via Windows Registry Edit

  • Open RegEdit by typing “regedit” in the Search bar
  • Navigate to: HOKEY_LOCAL_MACHINE\SOFTWARE\Miscrosoft\Shell\USB
  • Click the USB folder on the left of the screen to highlight the registry entries for \USB\
  • On the right side of screen select “NotifyOnUsbErrors” by clicking on it
  • Right click and select “Modify”
  • Set the value to “0” (zero). Zero is off, One is on

Disable USB message Windows 10, regedit

NOTE: Most users will receive a message saying they do not have privileges to modify the registry value. That is meant by design, and please see the comments at the end of this article for why.

Disable the USB flash drive pop up message via Settings

  • Type “settings” in the Seach bar of Windows
  • Select “Devices”
  • Select the USB tab near/at the bottom on left
  • Uncheck “Notify me if there are issues connecting USB devices

Disable USB message Windows 10, Settings

The second method via Settings is the preferred method because changing registry entries is not recommended unless the user is very experienced with computers. Windows 10 does a good job of not allowing users make registry changes that would crash their computer or brick the operating system, but the risk is still there.

If you received some sort of permissions message when attempting our regedit method, I would stay away from trying to resolve that security message. The reason Miscrosoft locks downt he registry in certain areas is to provide a more secure computer system for the user and reduce potential risk of malware or hackers getting control of your computer.

Over the years, numerous reports have come out about how hackers will expose certain USB protocols to insert malware or take control of a system. The registry is the main point of focus for hackers.

If you are persistent about changing the registry entries the first thing you can try is running RegEdit as Administrator. If that doesn’t resolve your issue then you may Google search for your specific error message and see if another website offers up a solution.

Continue Reading No Comments

Copyright

Copyright © 2006 +

USB Powered Gadgets and more...

All Rights Reserved

Advertise with us

GetUSB Advertising

This is a high value website providing great exposure to your product and brand. Visit our advertising page to learn specifics.

For more information
Visit our advertising page.

Nexcopy Ad

Nexcopy Provides

USB copy protection with digital rights management for data loaded on USB flash drives.

Contact us learn more

Resources and References Page

Resources and References Page