
USB Tutorial: Turn a USB stick into a Hard Drive or Local Disk
NOTE: The original article can be found at the bottom of this page — jump there now.
UPDATE (2025): USB “Local Disk” without the XP-era driver hack
The old method on this page uses an XP-friendly INF/registry trick to flip the removable bit. It was clever, but on modern Windows 10/11 it’s brittle (driver signing, updates) and many tools/policies now check the device’s hardware class, not a label you force with a file edit.
What changed
- Windows storage stack + signing tightened; spoofed drivers are fragile after updates.
- Backup/imaging/installers increasingly verify true fixed disk at the controller level.
- Enterprise policies often block anything enumerating as “removable,” regardless of UI text.
What works now
Use hardware that natively enumerates as a fixed disk. The device tells Windows “I’m a hard drive,” so Disk Management, BitLocker, and picky installers behave accordingly—no per-PC driver editing.
Product we tested
Nexcopy USB HDD Fixed Disk appears as a Local Disk on any host (controller/firmware set). No utilities, no INF edits, just plug in. It’s suited for tools that require “Local Disk,” imaging, BitLocker, or multi-partition workflows.
Quick self-check
- Just need multiple partitions? Windows can create multiple partitions on many USB sticks. They won’t enumerate as “fixed,” but the partitions work—standard USB is fine.
- Need true “Local Disk” behavior? Choose fixed-disk hardware (e.g., Nexcopy) for installers that refuse “removable,” full-disk imaging, BitLocker parity, or corporate environments that block removable-class media.
Bottom line
The legacy hack is useful history, but for real-world deployments start with hardware that already identifies as a hard drive. For a full, modern walkthrough, see our new article covering 2025-ready options and workflows.
Original Article Starts Here
This is a very valuable tutorial, especially if you are looking to partition a USB stick. Another application for turning a removable drive into a local disk, is that now many software programs can be loaded directly to a USB drive. The first program which comes to mind is iTunes. I know you need My Documents and a Local Disk to install it, so after this tutorial, I’ll try installing iTunes and share the results.
The process of turning a USB stick into a hard drive is fairly easy. However, there are limitations. For example, this works best with Windows XP operating systems. You also need to update the drivers for the device for any computer you are going to use. Typically, this isn’t a big deal as you can easily do this for your work and home computers. However, this isn’t a great solution if you are trying to create a partitions USB stick for distribution to many possible users [say trade show give-away].
Couple of items you’ll need:
- USB_LocalDisk.zip files [download here]
- Windows XP
- USB stick
What we will do, is connected the USB stick, find the driver code, update the driver code and re-connect the device. Simple.
Here are the details:
- From a running Windows XP system, Insert your USB flash drive
- Download USB_LocalDisk.zip and extract. A USB_localDisk folder is created.
- From the USB_LocalDisk folder, right click cfadisk.inf and open the file with Notepad or text editor.

- Navigate to line 26 of the cfadisk.inf file. We are going to be editing the section labeled “device_instance_id_goes_here“. Good idea to keep this file open because we will be using it in about 40 seconds.
- From your Windows Desktop, click Start > Run and type devmgmt.msc and click OK
- Under Disk drives, locate your USB stick and right click, select Properties.

Click the Details tab and select the item listed. Use the Ctrl C function to copy this driver for your USB stick.

Next, go back to your open file cfadisk.inf and lets insert the drive code you just copied and update the file. Find the text which says: “device_instance_id_goes_here” should be around line 26. Paste the drive code you have by Ctrl V.
Now click Save. We’ve just created an updated driver for the device so it will read as a Local Disk. But now we need to update the driver itself.
Click Start > Run > type devmgmt.msc and locate your USB stick again. Right click the device and select “Update Driver”
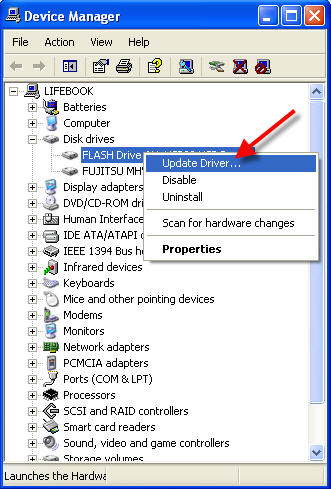
Inside the Wizard we need to follow specific instructions to manually update the driver to change your USB stick to a hard drive or Local Disk. It’s easy, just follow along…
Select: Install from a list or specific location > Next
Select: Don’t Search. I will choose the driver to install > Next
Select: Have Disk…
Navigate to the location of the “cfadisk.inf” file > click Open
Select: Next in the Windows wizard and that’s it! You may need to reconnect your device to the OS.
Two additional tips.
- Save the “cfadisk.inf” on your USB stick so you may use it at different locations when updating your home or work computer.
- To partition your USB stick using the Windows utilities you can find that function by:
Start > Control Panel > Administrative Tools > Computer Management > Disk Management under the Storage folder.
Helpful Reference: Lance Hoff.

