GetUSB.info Logo

Posts Tagged ‘windows 10’

Encrypt a USB Flash Drive, Windows 10, Free Feature!

Encrypt a USB Flash Drive, Windows 10, Free Feature!

Encrypting a USB flash drive is quick and easy in Windows 10. The PRO version of Windows 10 will allow anyone to activate Microsoft’s built in bitlocker technology to encrypt an entire flash drive, or part of a USB flash drive.

Microsoft BitLocker is a disk encryption technology designed to enhance data security by encrypting entire disk volumes on Windows operating systems. Introduced with Windows Vista and included in subsequent versions, BitLocker provides a robust defense against unauthorized access and data breaches.

The primary purpose of BitLocker is to protect sensitive data in case a device is lost, stolen, or accessed by an unauthorized user. It uses full-disk encryption to secure the entire contents of a disk, including the operating system, system files, and user data. Even if someone physically removes the hard drive and attempts to access it on another system, the data remains inaccessible without the proper authentication credentials.

BitLocker employs various encryption methods, with Advanced Encryption Standard (AES) being a commonly used algorithm.

The encryption process is transparent to the user once configured, and access is granted through authentication methods like PINs and passwords.

Below are nine screen shots and simply follow along in your Windows 10 Pro computer and do what you see below. The process is very easy to do. The longest part of this entire setup is the encryption of the USB stick itself. The time required to encrypt the drive will depend on a couple of factors, such as the GB capacity of the USB drive and the processing power of your computer. In the example below, using a USB 2.0 device with a 16GB capacity the encryption time took only 4 minutes.

Continue Reading

Disable USB Flash Drive Pop Up Messages in Windows 10

Users can turn disable USB flash drive pop up messages in Windows 10 by performing a very simple step in Settings. While it may seem counterproductive to turn off USB notifications in Windows 10, once you’ve been using Windows for a while you will likely want to reduce the number of pop-up messages.

There are two ways to disable USB flash drive messages in Windows. Performing a RegEdit or modifing a Settings feature in the Windows GUI

Disable the USB flash drive pop up message via Windows Registry Edit

  • Open RegEdit by typing “regedit” in the Search bar
  • Navigate to: HOKEY_LOCAL_MACHINE\SOFTWARE\Miscrosoft\Shell\USB
  • Click the USB folder on the left of the screen to highlight the registry entries for \USB\
  • On the right side of screen select “NotifyOnUsbErrors” by clicking on it
  • Right click and select “Modify”
  • Set the value to “0” (zero). Zero is off, One is on

Disable USB message Windows 10, regedit

NOTE: Most users will receive a message saying they do not have privileges to modify the registry value. That is meant by design, and please see the comments at the end of this article for why.

Disable the USB flash drive pop up message via Settings

  • Type “settings” in the Seach bar of Windows
  • Select “Devices”
  • Select the USB tab near/at the bottom on left
  • Uncheck “Notify me if there are issues connecting USB devices

Disable USB message Windows 10, Settings

The second method via Settings is the preferred method because changing registry entries is not recommended unless the user is very experienced with computers. Windows 10 does a good job of not allowing users make registry changes that would crash their computer or brick the operating system, but the risk is still there.

If you received some sort of permissions message when attempting our regedit method, I would stay away from trying to resolve that security message. The reason Miscrosoft locks downt he registry in certain areas is to provide a more secure computer system for the user and reduce potential risk of malware or hackers getting control of your computer.

Over the years, numerous reports have come out about how hackers will expose certain USB protocols to insert malware or take control of a system. The registry is the main point of focus for hackers.

If you are persistent about changing the registry entries the first thing you can try is running RegEdit as Administrator. If that doesn’t resolve your issue then you may Google search for your specific error message and see if another website offers up a solution.

Continue Reading

Quickly Eject USB Flash Drive in Windows

It seems the Microsoft updates are endless for Windows 10. Most users don’t bother with reading the notes about what has changed or been updated, myself included.

Today we noticed the eject feature in the Windows toolbar for quickly unmounting USB flash drives.

This isn’t breaking news. Simply a post about a feature you might not have noticed.

How to quickly eject a USB flash drive in Windows:

Click the access arrow in your tool bar

Hover over the USB icon and click

Your list of connected devices will show up. Hover over the USB flash drive device you want to Eject and click it.

That’s it. Your USB flash drive is now ejected.

Continue Reading

How To Format a Flash Drive as UDF (Windows 7 & 10 Solution)

How to Format a USB Flash Drive as UDF in Windows

When trying to format a flash drive in Windows (7 or 10), you will see the file system options best suited for the device. The proper file systems for a flash drive are: FAT, FAT32, or exFAT. Windows also provides NTFS as an option for USB flash drives, but as mentioned before, NTFS is not the best file system for a USB drive. During the format process, only the most compatible file systems will be displayed in Windows.

Why is UDF not listed as an option?

First, let me say it IS possible for Windows to format a USB flash drive as UDF (Universal Disk Format). Microsoft just doesn’t want you to do it—and with good reason.

Important: If you think formatting a flash drive as UDF will make the thumb drive appear as an optical drive in the computer, you are mistaken!

According to the Universal Disk Format (UDF) specification governed by the Optical Storage Technology Association, many believe UDF will make a device work like a disc. UDF is most widely used for DVDs and newer optical disc formats. While it can be used on flash drives, it does not make them function as optical drives.

Some may assume that formatting a USB flash drive as UDF makes it universally compatible across Windows, Mac, Linux, Symbian, and other proprietary systems. In reality, exFAT offers the same cross-platform compatibility without the drawbacks of UDF.

Why You Should Avoid Formatting USB Drives as UDF

Here are the main reasons not to use UDF on USB flash drives:

  • Lack of fully functional filesystem check tools.
  • 64GB limit with Windows & Linux (a bug, not an inherent UDF limit).
  • Risk of quick wear-leveling failure on SD and USB mass storage devices.
  • UDF is read-only on Windows XP.

The most important issue is the lack of filesystem check tools. If the USB is removed during operation and data corruption occurs, there are no tools available to diagnose or repair the UDF file system. Since flash drives are designed for portability and frequent quick access, this risk makes UDF a poor choice.

How to format a flash drive as UDF:

1. Connect the USB flash drive to your computer and note its assigned drive letter.

2. Make sure no programs or data are accessing the drive.

3. Navigate to your C: drive in Windows Explorer. In the search field, type “CMD” (case-insensitive) and press Enter. Administrator privileges are required.

How To Format a Flash Drive as UDF

4. In the command prompt window, type the following command:

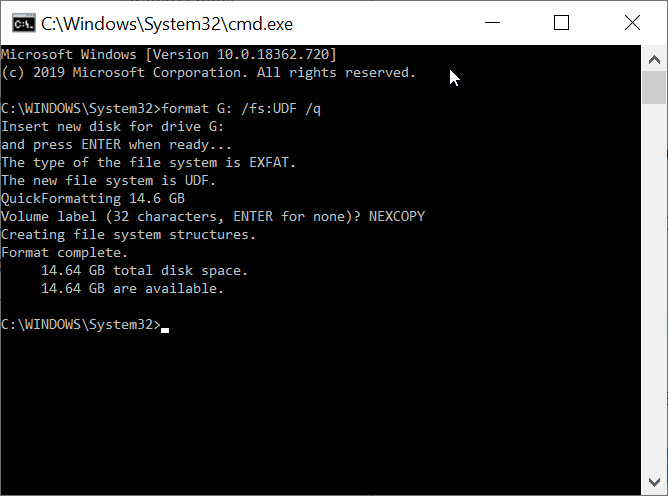
format G: /fs:UDF /q   (Replace G with your USB drive letter.)

The /fs parameter specifies the file system (UDF), and the /q parameter tells DISKPART to perform a quick format.

5. The OS will prompt you to insert the drive (it’s already inserted), press Enter.

6. Next, you’ll be prompted to enter a Volume name. Press Enter to leave it blank or type a custom name (e.g., “Nexcopy”).

How To Format a Flash Drive as UDF, other than FAT or exFAT

DISKPART will process the command and notify you once formatting is complete.

7. Type exit to close the command prompt window.

Note: The /q command deletes the file table and root directory of the previously formatted flash drive but does not perform a full sector scan for bad areas. This highlights the problem mentioned earlier: UDF lacks robust filesystem check tools, making it a risky choice for USB flash drives.

Continue Reading

Copyright

Copyright © 2006 +

USB Powered Gadgets and more...

All Rights Reserved

Advertise with us

GetUSB Advertising

This is a high value website providing great exposure to your product and brand. Visit our advertising page to learn specifics.

For more information
Visit our advertising page.

Nexcopy Ad

Nexcopy Provides

USB copy protection with digital rights management for data loaded on USB flash drives.

Contact us learn more

Resources and References Page

Resources and References Page