What could be better than working with USB, robots, legos and our imagination? Our beloved memories of childhood play with Legos has now turned into adult fun with the new robotic line of Mindstroms.
The Mindstroms from Lego is based off their NXT Technology whereby a main NXT brain unit controls 5 different robotic functions for you to let the imagination run free. Build anything you want with the legos, intuitive robotic software or get extreme with Lego’s open source developers kit.
So what are the 5 building blocks of the Mindstrom units?
Touch sensor
Sound sensor
Light sensor
Ultrasonic sensor
Servo motors
Through these sensors, some crafty lego design build your robot and communicate via USB for software download and development stages. The world’s next Frankenstein is only a lego or two away.
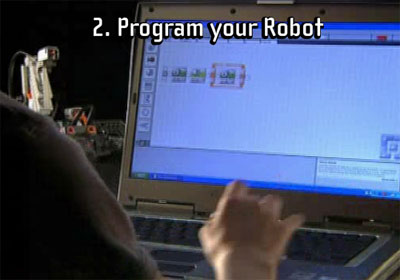
So this is how it works.
Build your lego monster with available parts kits.
Launch the intuitive robot software and use pre-defined commands to build motion, touch, light and other sensory functions.
Last, connect and communicate via USB to test your functions and ultimately download the finished firmware version to the NXT Lego robot.
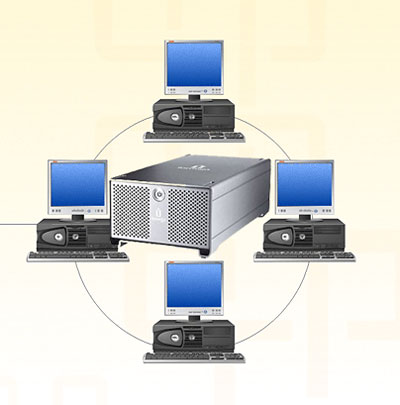
Someone once asked the question if they could network their external USB hard drive so other computers could share and store information on it.
Surprisingly it isn’t that hard. There is no need to build a NAS (Network Attached Storage) server or configure NAS software on a host computer. All you need is changing some privileges to the USB external hard drive.
Granted, this solution isn’t for the hard-core network user(s) environment, nor is it ideal for business applications where large or frequent data storage transfers are required or networks where users are accessing storage via a remote server. Rather, this is a simple solution for a home network or small business office.
Simply use the file and printer sharing setting in Windows to network a USB external hard drive. Or you can use the Windows mapping tool to map and share a drive to other computers on the network.
Continue Reading
I enjoy the Instructables weekly email about DIY projects. Occasionally you see one worth trying or sparks your interest enough to consider trying. This week we found an instructable for a DIY iPod Video Porjector.
To turn your dream into a reality, you’ll need an iPod, mirror, lens and flat wall for projected image.
Here’s the DIY video for the iPod video projector…and sure you could get a dock station and connect your iPod to your TV, keep the lights on and enjoy the latest Jon Stewart download…but where’s the sizzle in that?
Source and full tutorial: Instructables video iPod.
Continue Reading
The guys at Instructables have come up with yet another great tutorial to add some USB gadgetry to your closet. This time we take a look at building a USB telescope from an old analog zoom lens, webcam and PVC piping for housing. Reading through the instructions, the USB tutorial is a seven step process. You will need some prep work done at the hardware store and have your zoom lens and webcam available (both items can be found on eBay for under $15 each). Here is a video summary:
For the full USB Telescope tutorial make the jump.
Continue Reading
Readyboost is a Windows Vista feature which uses flash memory to enhance computer performance. The reports have varied about it’s success, but one thing is for sure – you need a Readyboost drive to use the feature – well, until now.
Here is a USB hack or work-around for turning any regular USB stick into a Readyboost drive. First, lets look to see what Windows would like in a Readyboost drive:
The USB Key must be at least USB 2.0.
The device must be able to do 3.5 MB/s for 4 KB random reads uniformly across the entire device and 2.5 MB/s for 512 KB random writes uniformly across the device.
The USB Key has to have at least 64mb of free space.
If your USB key is at least USB 2.0, but is rated slower for the random reads and writes required to use ReadyBoost, more than likely you have seen this message:
If so, plug in the USB Key, and cancel Autoplay if it pops up.
Click on Start button, and select “Computer.” After Windows Explorer opens, in the right window pane find the USB Key you want to use.
Right click and select Properties, then select
Continue Reading
The first couple of times I connected a USB drive to my computer it was nice to see the pop-up window asking me what I wanted to do with the drive. However, the pop-up window gets old. Here is how to disable the autoplay pop-up window for USB drives:
Go to your Windows Start button and navigate to RUN… type in:
gpedit.msc then click OK
A Windows Group Policy window pops up. This is where you configure the pop-up window setting.
Click the Administrative Templates folder, then click the System folder.
On the right side of the window you will see (may have to scroll down) the “Turn Off Autoplay” item. Double click that item.
Another window pops up and this is where you enable the turn-off autoplay pop-up window dialogue box. Simply click the radial button for “Enable” now select “All drives” or “CD-ROM drives”  Click OK or Apply and you’re set.
Please note, this setting will also affect your CD-ROM autoplay function as well. I’d like to see the ability to select only USB devices, but that’s just not the case.
To reverse the setting, follow the above instructions and set the radial button to either “Not Configured” or “Enabled”
If using Windows Vista – the process is just a little easier. Go to your Start button, or Windows Logo and navigate to “Dafault Programs” here a pop-up window opens and click the link for “Change AutoPlay Settings” which then takes you to the following window to configure your autoplay settings for all your devices.
Continue Reading
For many IT managers USB port connectivity can still pose a large threat to company security. One quick down-and-dirty method is disabling the read and write from any system USB port. This can be done through a quick registry edit.
Here is the full Microsoft article explaining how to disable a USB port (link). Note:Â This is a registry edit so be sure to backup your registry first and know how to restore it in case something terrible happens.
To disable the access to USB port, in windows XP and 2000:
1. Click Start, and then click Run.
2. In the Open box, type regedit, and then click OK.
3. Locate, and then click the following registry key:
HKEY_LOCAL_MACHINE\SYSTEM\CurrentControlSet\Services\UsbStor
4. In the right pane, double-click Start.
5. In the Value data box, type 4, click Hexadecimal (if it is not already selected), and then click OK.
6. Quit Registry Editor.
To re-enable a disabled port:
1. Click Start, and then click Run.
2. In the Open box, type regedit, and then click OK.
3. Locate, and then click the following registry key:
HKEY_LOCAL_MACHINE\SYSTEM\CurrentControlSet\Services\UsbStor
4. In the right pane, double-click Start.
5. In the Value data box, type 3, click Hexadecimal (if it is not already selected), and then click OK.
6. Quit Registry Editor.
Continue Reading
I reported a while back on a product called Unlocker if you are having problems unlocking your USB drive from a Windows operating system. Today I bring you another package which does the same function; however, is easier to use.
USB Drive Ejector is a simple utility which lists all USB devices on your buss and with a double click – you can unlock and eject the device.
This is a great tool to have in case you’ve ran into:
Cannot delete file, access denied
Sharing violation
Source destination file in use
File is in use by another program, etc.
However, you should always proceed with caution when a stubborn drive wont eject. Sometimes…and I mean sometimes…there are reasons. Such as virus software scanning the memory device or Windows writing to the device in cache memory. These examples are far and few between so a couple of common sense activities might be in order, such as
Continue Reading
Unlocking the iPod Touch isn’t too difficult and the transformation allows for some powerfull and fun applications to find their way into your iPod Touch. Take for example, this tutorial which gives you the tools to run Instant Message on your iPod Touch
If you have a few minutes and want to sharpen some Photoshop skills you can run through this tutorial on how to create a USB drive. I for one will definitely do this, as my USB Forum link needs an updated look.
This Photoshop tutorial would also be a good project for anyone running a gizmo or gadget website to create some stock images for those random posts.
Before you make the jump, the tutorial uses 19 steps to create the image below.
However, I think a little more time is needed to make the object more proportional and some attention to shadows would also help. But if you are in a pinch and need something quick – this will work.
Jump to Photoshop tutorialContinue Reading
There have been plenty of moments in my computer life I’d like to turn back time. Especially those Vista Upgrades or even the minor events like accidentally deleting files. For the last [mentioned] brain fart, there is some U3 Software which can help; NT File Recovery. The file recovery software is designed to recover any deleted file from a NTFS system.
Many USB file recovery software packages only support files and folders, but this package includes support for getting back applications and media files such as wmv and mpeg files.
Another point worth consideration, is the convenience of running the software from your U3 drive as to eliminate the risk of overwriting your data from the PC you’re try to salvage data from. This U3 application is absolutely free, and ready for the taking.
U3 Software NT File Recover download page.
Continue Reading
Have you ever wanted to hide files on your computer or flash drive? I could think of several “categories” of data in which I’d like to hide from people around me. Of course I’m talking about valuable data such as passwords, financial records and the priceless contact list for GetUSB.info network of publishers.
Today I found a small utility called HideFlash 1.0 which does just what the name says. Hides your data on a UFD.
The USB security software protects files and folders from others who are trying to view them without permission. What works for me with this package is not only do you have the 128bit encryption working for you, but the Hide Flash software also hides the files and folders it’s protecting. This means when a USB drive is plugged into any computer, the user wouldn’t even know there’s extra data.
The USB security software remains hidden on any computer and invisible to even
Continue Reading
 What could be better than working with USB, robots, legos and our imagination? Our beloved memories of childhood play with Legos has now turned into adult fun with the new robotic line of Mindstroms.
The Mindstroms from Lego is based off their NXT Technology whereby a main NXT brain unit controls 5 different robotic functions for you to let the imagination run free. Build anything you want with the legos, intuitive robotic software or get extreme with Lego’s open source developers kit.
So what are the 5 building blocks of the Mindstrom units?
What could be better than working with USB, robots, legos and our imagination? Our beloved memories of childhood play with Legos has now turned into adult fun with the new robotic line of Mindstroms.
The Mindstroms from Lego is based off their NXT Technology whereby a main NXT brain unit controls 5 different robotic functions for you to let the imagination run free. Build anything you want with the legos, intuitive robotic software or get extreme with Lego’s open source developers kit.
So what are the 5 building blocks of the Mindstrom units?


 For many IT managers USB port connectivity can still pose a large threat to company security. One quick down-and-dirty method is disabling the read and write from any system USB port. This can be done through a quick registry edit.
Here is the full Microsoft article explaining how to disable a USB port (
For many IT managers USB port connectivity can still pose a large threat to company security. One quick down-and-dirty method is disabling the read and write from any system USB port. This can be done through a quick registry edit.
Here is the full Microsoft article explaining how to disable a USB port (


 There have been plenty of moments in my computer life I’d like to turn back time. Especially those Vista Upgrades or even the minor events like accidentally deleting files. For the last [mentioned] brain fart, there is some