GetUSB.info Logo

Author Archive

Matt LeBoff

Kicking around in technology since 2002. I like to write about technology products and ideas, but at the consumer level understanding. Some tech, but not too techie.

Maintenance for USB Flash Drive Duplicator

USB flash drive duplicators are typically in production type environments because the equipment is being used to make hundreds or thousands of flash drives. Maintenance for USB flash drive duplicators is key to keeping the equipment operating at peak performance.

As with any flash memory duplicator system, there are no moving parts. This certainly makes it easier on keeping the gear in tip-top shape. Although there are no moving parts there are still cleaning steps one can take. There are three areas to consider for maintenance for USB Flash Drive Duplicator.

Maintenance for USB Flash Drive Duplicator, usb 3.0, super speed

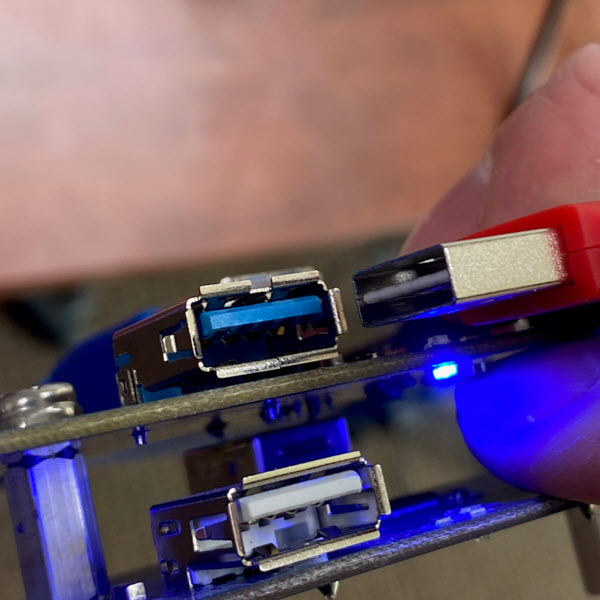
The USB socket of a USB duplicator receives the most wear-and-tear. The standard USB socket has a specification of 100,000 connection cycles. During that time, it’s possible dirt and dust can get into the USB socket. However, more likely will be plastic shavings form the USB stick itself found inside the socket. If a user connects a USB stick at a slight angle and with a bit of force, it’s possible some of the plastic inside the USB stick connector is shaved off and falls into the USB socket of the flash drive duplicator.

If this happens the quick, simple and effective solution is applying compressed air into the USB duplicator socket to blow out any debris, dust or dirt. By cleaning out the sockets you will insure a better point of contact between the pins of the USB flash drive and the pins of the USB socket.

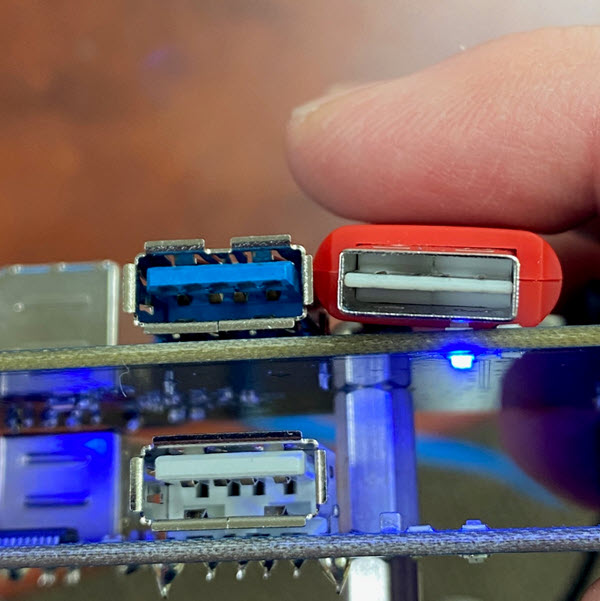
Another common issue with USB duplicators are the sockets themselves getting lose from all the connection cycles during the production process. Inside each USB socket there are metal tongs which provide tension as the USB stick is connected to the socket. Over time, these tongs lose some of their elasticity and thus result in less tension. When there is less tension between the socket and device, it is possible a good connection is not made. By taking apart the duplicator and adjusting the tongs of the USB socket you can create good, strong tension.

Here is a close up picture of a USB socket from a USB flash drive duplicator made by Nexcopy. The red arrow points the tension tong. Using some sort of sharp mechanical tool, push the tension tong down towards the inner part of the USB socket. Do not push or bend the tong too much, but enough to create good tension when a USB flash drive is inserted into the socket. Apply this technique to all sockets of the duplicator.

Maintenance for USB Flash Drive Duplicator, tension thongs on usb socket

The last bit of maintenance for a USB flash drive duplicator would be the internal fan and components. As with any computer, the internal fan will pull or push dust into the chassis and cover the components. The dust itself will not damage the components, but the dust will cover the components on the inside and make them run hotter than what is ideal. For this reason, it is a good maintenance step to open the duplicator unit and apply compressed air to the inside of the unit.

By thoughtfully and methodically applying the above maintenance steps your USB flash drive duplicator will continue to run for many years.

Continue Reading

Transfer Rates Faster Than USB

In the world of physics, heat represents resistance. Think about touching your car tire before you’ve driven anywhere — it’s cool. Touch that same tire after driving to the store and it’s warm. That warmth is resistance.

Copper found in USB connectors and USB cables is the material where this resistance shows up. As copper heats up, data transfer rates slow down because heat represents inefficiencies in the material.

Research presented at February’s IEEE International Solid-State Circuits Conference by lead author Jack Holloway, along with co-authors Ruonan Han and Georgios Dogiamis, introduced a data transfer system capable of transmitting information up to 10 times faster than USB. The new link pairs high-frequency silicon chips with a polymer cable as thin as a strand of human hair.

Mr. Holloway explains, “Copper wires, like those found in USB or HDMI cables, are power-hungry — especially when dealing with heavy data loads. There’s a fundamental tradeoff between the amount of energy burned and the rate of information exchanged.”

Polymer cable technology for high-speed data transfer

The most commonly suggested alternative to copper wiring is optical fiber. Optical cables rely on photons and are extremely efficient, but the challenge lies in how photons interact with silicon chips. Because photons don’t interface cleanly with silicon, a direct connection between a fiber-optic cable and a computer chip is not ideal.

The technology developed by Holloway and his team uses a plastic polymer material that performs exceptionally well at sub-terahertz frequencies. These very high-frequency signals make the polymer a competitive alternative to fiber optics.

To complete the system, the team engineered a low-cost silicon chip that pairs directly with the polymer conduit. While traditional silicon chips struggle at sub-terahertz frequencies, this new design generates high-frequency signals with enough power to transmit data directly into the conduit. The clean interface between chip and conduit allows the entire system to be manufactured using standard, cost-effective processes.

Physically, the plastic polymer conduit is about the same diameter as a human hair.

Resource: Fiber optics.

Continue Reading

Universal USB Type A Connector – Doesn’t Matter What Side Is Plugged In

There are several USB articles circulating right now about the USB Type-A connector and how it often takes three tries to make a connection. We agree with the frustration — but it doesn’t have to be that way. A universal USB Type-A connector does exist; it’s just not widely available.

Would you buy this? Shoot us an email if you’re interested (gmo [@] getusb [.] info).

Pictures first. Below are three close-up images of the universal USB connector.

Universal USB Type-A connector close-up

Universal USB Type-A connector front view

Universal USB Type-A connector internal orientation

Physically, a USB Type-A connector appears symmetrical. It’s rectangular in shape, with no obvious marking indicating the top or bottom. Most users eventually learn that the seam on the connector indicates the bottom, while the smooth side is the top. HDMI connectors, for example, are much easier to orient because each side is shaped differently.

However, the USB Type-A connector is not truly symmetrical. Looking inside the connector reveals a slight offset in the internal contacts — one orientation places the contacts higher, the other lower.

It’s unclear why this connector design never gained broader adoption among vendors and manufacturers. Our company received samples several years ago, accompanied by the claim that products would eventually shift to this connector style. That transition, however, has never materialized.

Continue Reading

Quickly Eject USB Flash Drive in Windows

Microsoft updates for Windows 10 seem endless. Most users don’t bother reading the update notes about what has changed or been added — myself included.

Today, we noticed the eject feature in the Windows taskbar that allows you to quickly unmount USB flash drives.

This isn’t breaking news — just a quick post about a feature you may not have noticed.

How to quickly eject a USB flash drive in Windows:

Click the access arrow in your taskbar.

Windows taskbar access arrow showing USB eject option

Hover over the USB icon and click it.

A list of connected devices will appear. Hover over the USB flash drive you want to eject and click it.

Windows USB device list showing eject option

That’s it. Your USB flash drive is now safely ejected.

Windows notification confirming USB device ejection

Continue Reading

How To Get Large Videos Off iPhone

There are two popular methods to get large videos off your iPhone.

The most common problem is having a large video on your iPhone that you need on your computer. Email programs usually limit file sizes to around 20 MB, so if the file is larger, what can you do?

Two popular options come to mind: using QuickTime or using a USB flash drive.

Option #1

Use QuickTime. Macs already include QuickTime in the operating system, but Windows users must install it separately. Before choosing this route to transfer large videos off your iPhone, here are a few things to consider:

  • You must back up your iPhone through QuickTime before accessing the video
  • You need your computer (an authorized computer) to perform the backup
  • Windows users must download and install QuickTime
  • QuickTime is an invasive program that many Windows users dislike
  • This is not a portable way to move videos off your iPhone
  • However, this is a free solution

Option #2

Use a flash drive.

Yes, you need to purchase a specific flash drive, but after this one-time investment, it becomes far easier to move videos off your iPhone. Some advantages worth considering:

  • Transfer large videos without using a PC
  • Share videos immediately with another user’s computer
  • Use the drive as external storage for video backups

Point number one is really the value in all of this ?.

While you won’t be able to make the transfer immediately without the hardware, once you have the USB device, the process is quick and repeatable.

Certain USB drives include software that works with iOS, allowing files to be copied directly from the phone to the drive. The device tested here is the SanDisk iXpand flash drive with 128 GB capacity, which typically costs around $40.

SanDisk iXpand flash drive for iPhone

The process is very straightforward:

  • Download the iXpand app from the Apple App Store
  • Connect the flash drive to your iPhone
  • Select the files you want to transfer
Continue Reading

Disk Signature Collision While Cloning

Microsoft Windows has been sending out updates which have created some problems for those cloning mass storage devices like USB flash drives and USB hard drives. This article should help you resolve those issues.

The Disk Signature is a unique ID Windows will assign to a device inside the Master Boot Record or MBR. The disk signature is 6 bytes long and sits in the first sector of the mass storage device. The disk signature becomes a problem for those cloning flash drives or hard drives with either a software utility or a large duplication equipment like a USB duplicator. The disk signature compounds itself if a multi-partition device is being cloned.

Many times a multi-partition device is created in Linux and at the time of create only one disk signature is assigned to the physical device. However, if multiple units of those copies are put in a Windows computer, Windows will try and assign a disk signature to each partition. This will cause a collision.

There are different situations one could have a disk signature collision, so this is only one example.

GetUSB.info did a write up about this a couple months back, here is the full blog post:
https://www.getusb.info/only-1-usb-drive-can-be-use-others-are-ignored/

In addition, we found the following website which does a fantastic job about how one would edit the disk signature using a hex editor:
http://www.multibooters.com/tutorials/view-and-change-disk-signature-in-mbr.html

Continue Reading

Press Release: Nexcopy Introduces Default State USB Write Protection Flash Drive – Lock License

“The fundamental change towards how our flash drive works should draw attention for those looking for USB write protection for flash drives” says Greg Morris, CEO of Nexcopy Inc.

What is unique about the Lock License approach is whenever power is cut to the device, for example disconnection, the USB is automatically write protected. This is the strongest first line defense against malicious software or virus jumping onto a flash drive without the user knowing. It is impossible to infect a USB drive if the device is write protected.

Lock License flash drives require a password upon first use. This password is used to unlock the write protection and make the USB a read/write device. This feature provides a personalized solution for each business which uses the Lock License technology. There is no need to set the write protection after being unlocked because simply cutting power to the device will put the USB into its default state: A read-only device.

USB write protection, Nexcopy Press Release

The Nexcopy Lock License USB flash drive has the following features:

  • Default state of drive is read-only, a.k.a write protected
  • User assigned password to remove write protection
  • No password is required to read from the drive, acts as normal WORM device
  • Graphical User Interface (GUI) to set password and remove write protection
  • Command line utility for custom integration to remove write protection
  • No back door password or feature from Nexcopy to unlock the drive
  • Available in USB 2.0 and 3.0 technology and ranging from 2GB through 128GB capacities

Stan McCrosky, head of Sales, comments, “System Control manufacturers for waterworks, electrical utility and petroleum companies need a solution like this. The ability to load software or firmware to a hardware based USB read-only device gives system control companies an incredible amount of security for in-field deployment via USB. More importantly, the command line utility gives the manufacturers a secure way to unlock the drive and update the content remotely without the worry of the drive remaining read/write. It’s simply impossible for the drive to remain writable.” McCrosky concludes.

The Lock License USB flash drive is simple to implement. Steps include:

  • Connect USB to a Windows computer
  • Open either GUI or command line utility to remove write protection
  • Assign a password to be used when removing the write protection
  • Data load the drive as needed
  • Eject drive from computer once copy process is complete
  • At this point the USB is write protected at the hardware controller level
  • The Lock License drive can be read (used) by any device on any platform
  • Password not required to read data from the drive
  • Password is only used when removing write protection to make the USB read/write

Nexcopy Lock License media is available in USB 2.0 and USB 3.0 technology and range it capacity from 2GB through 128GB. Nexcopy offers six body styles for the Lock License media with a wide range of body colors available for each stye, all available for custom branding. The six body styles include Oxford; a capless swivel style drive. Newport; a classic rectangular shape with cap. Lexington; a classic rectangular style with rounded edges and cap. Augusta; a shorter style drive with large lanyard loop. Huntington and Geneva which uses an aluminum body for more durability and also better suited for laser etch branding.

The Oxford style swivel drive is the in stock media Nexcopy carries for same day printing and shipping. Nexcopy inventories USB 2.0 media of 2GB and 4GB capacity and in stock USB 3.0 media of 8GB, 16GB, 32Gb, 64GB and 128GB capacities. The in stock Oxford media is a black body with white swivel clip with full color printing via the Nexcopy Logo-EZ USB flash drive printer.

The Lock License utility is available for download off the Nexcopy support page. The utility requires a Nexcopy licensed USB flash drive. The Lock License USB write protection is not a universal solution for any thumb drive, a Nexcopy drive is required in order to take advantage of the increased security the technology offers.

Official press release:

Read more about Nexcopy on this website.

Continue Reading

5 (legit) Reasons a USB Flash Drive Disconnects and Reconnects in Windows

Roll Play Scenario:

  • Windows: Sound of connecting a USB flash drive…
  • User: Ah yes… let’s get to work!
  • Windows: Sound of a disconnected USB device…
  • User: Oh no, what’s happening?

A quick Google search later and here we are. Let’s take a closer look.

Intermittent USB disconnects are frustrating because they often feel random. In reality, Windows is usually responding to a power, driver, or hardware condition rather than failing silently. The key is to determine whether the issue follows the USB device itself or stays with a specific computer or port. Once you isolate that variable, troubleshooting becomes much more predictable.

Below are five legitimate reasons your USB flash drive might be disconnecting from your Windows computer.

1. Running on Battery

By default, Windows is configured to reduce power consumption when running on battery, which can include powering down USB ports after a period of inactivity. This typically happens after 10–15 minutes, but power profiles can vary. Before changing any settings, plug your laptop into AC power and see if the issue disappears.

To check your USB power settings:

Search for Control Panel and press Enter.

Windows Control Panel

In the Control Panel, click Hardware and Sound.

Hardware and Sound settings in Windows Control Panel

From there, select Change battery settings, then Change plan settings, and finally Change advanced power settings. Scroll through the options to find USB settings and adjust power behavior as needed.

USB power settings in Windows advanced power options

2. Faulty USB Port

The most common cause of USB disconnects is a worn or damaged USB port. Laptop ports see frequent use, and front-panel ports on desktop towers often experience the most wear. If the USB device wiggles easily or inserts with little resistance, the port may be failing.

Continue Reading

How To – View Linux Files on USB Flash Drive

This article explains how to view Linux files stored on a USB flash drive when it is connected to a Windows 10 computer.

This situation is more common than many people expect. As of 2020, roughly 25% of computers run some form of Linux. Because of this, there is a good chance you will eventually receive a USB flash drive formatted on a Linux system that you need to access from Windows. This guide walks through the steps a Windows user can take to read a Linux-formatted USB flash drive.

Linux commonly formats USB flash drives using ext2, ext3, or ext4 file systems. These formats are native to Linux and are optimized for reliability, permissions, and journaling. While Linux can also read and write FAT32 or exFAT, ext-based formats are preferred for system tools, bootable media, and application data.

When a USB drive formatted as an ext file system is connected to Windows, the operating system will usually prompt you to format the drive. Do not format it. Formatting will permanently erase the data. Try the steps below first. You may also find this related guide helpful: best practices for formatting USB flash drives.

Follow these steps to access a Linux-formatted USB flash drive in Windows.

The first step may not be strictly required, but it is strongly recommended for improved compatibility.

In the Windows search field, type Control Panel and press Enter.

This opens the Windows Control Panel.

Click Programs, then select Turn Windows features on and off.

In the dialog box that appears, scroll down until you find Windows Subsystem for Linux and check the box. Click OK to apply the change and close the window.

Continue Reading

The Swiss Army Knife of USB-C Hubs

Did you buy one of those ultra-thin laptops and fall in love with the lightweight design, sleek form factor, and powerful processor—only to realize you can’t use its full potential because it lacks the ports you need? A 9-in-1 USB-C hub solves that problem, giving your laptop desktop-like connectivity.

A USB-C hub allows you to connect a monitor, speakers, headphones, SD cards, and even a 10Base-T Ethernet cable at home. A hardwired Ethernet connection is especially useful, but the ability to connect a spare VGA monitor for a second screen is equally valuable.

USB-C hub with multiple video, USB, and network ports

The 9-in-1 hub is compact, lightweight, and well built. It consists of a wedge-shaped aluminum tube, with the taller side housing the video ports. A circuit board is suspended inside using plastic inserts that also align and cover the port openings. The two end caps are press-fit into the aluminum body without adhesive. If the device were dropped and came apart, it would be easy to snap back together.

USB-C hub 9-in-1 angled view showing aluminum enclosure

Evaluating product quality often requires taking it apart. This hub disassembles easily by removing the plastic cap over the Ethernet port, allowing the internal board to slide out effortlessly. The cap on the cable end can also be removed, though it is not required for board access. The USB-C cable is connected via a displacement-style connector and secured with adhesive. The cable shielding is ungrounded, which adds minimal functionality, but the short cable length helps preserve signal reliability.

Most major components, aside from the DAC, are older parts from reputable manufacturers. Two of the four USB-C high-speed lanes are assigned to USB data, while the remaining lanes are allocated to DisplayPort. As a result, USB operates without compromise, but DisplayPort bandwidth is limited to two lanes. This means higher-bandwidth modes such as 4K at 60Hz are not supported. The onboard 3A DC converter should provide sufficient power for all components, assuming only low-power USB devices are connected simultaneously.

Internal PCB of USB-C hub showing chipset and port layout

  • The USB hub supports up to 2.4A fast charging for a single device; however, the hub is limited to 3A total, so charging multiple devices at high speed is not possible.
  • The HDMI output is limited to HDMI 1.4, but all non-3D display modes within the specification are supported.
  • VGA output supports both widescreen 1080p (16:9) and UXGA (4:3).
  • The card reader supports simultaneous use of microSD and full-size SD cards.
  • The 2-channel DAC requires HDMI audio input and converts HDMI audio to analog stereo output.
  • Ethernet supports link detection and Energy Efficient Ethernet (EEE) to reduce power consumption when idle and during operation. Shorter Ethernet cables may also reduce heat. Wake-on-LAN features are supported.

When compared to the OEM Microsoft Surface Dock, which typically costs around $200, the value difference is significant. This USB-C hub offers strong value at around $30 at the time of this post.

View all articles related to USB hub products published by GetUSB.info.

Continue Reading

How To Copy Protect PDF Files

How to Copy Protect PDF Files Outside Adobe Ecosystem

This article will overview how to copy protect PDF files outside of the Adobe ecosystem. A couple of things worth mentioning before getting into the details:

  • Encryption is different than copy protection. Encryption is a technology solution where the PDF owner assigns a password to the document and after the user enters that password the user can do anything they want with the file. Print, share, screen capture, etc. The idea for encryption is the document being unattainable until a password is entered.
  • Copy protection does not use a password and anyone can see the file. However, the file cannot be copied, printed, shared or screen captured. The idea behind copy protection is the PDF being viewed by anyone, but nothing can be done with the file. When people are searching for PDF copy protection, this is the solution most likely sought after.

Challenges with PDF Security and Copy Protection

PDF or Portable Document Format is an open standard. What this means is the document format was designed to be used in just about any document reader program. The goal for the PDF specification was to make the format as universal as possible. For this reason, it is a bit more difficult than one would think to copy protect a PDF file.

Windows comes pre-installed with Adobe Reader. In addition, Windows has embedded Adobe API code to read PDF files. Even if Adobe Reader was not installed on your computer, or uninstalled, the underlying code is still there to open a PDF. In additional to Adobe Reader (#1 PDF reader in the market) there are dozens of additional PDF reader programs. Again, the goal for all these readers is to open and read a portable document file.

Adobe copy protection solutions are very well known for being cracked. If you Google “Adobe copy protection crack” you will find pages of ways the Adobe security features are compromised. Here and here are two examples of Google search results with web pages dedicated to hacking.

The fundamental problem with copy protection are the lack of controls when viewing a PDF. Meaning a PDF content owner (you) does not have the control over Adobe Reader, or other programs, to stop the user (your client/customer/student) from printing, screen grabbing, sharing and saving.

The idea behind a PDF copy protection solution is a framework where the PDF can be opened and viewed, while you (the content owner) maintains control of the document.

Of course Adobe Reader, FoxIt Reader and others, will not provide the tools to block a user from printing or saving from within their program. In contrast, we need a “reader” or “viewer” with controls to block those functions.

With this in mind, it is difficult to provide a reader with these security functions. Most users who receive a PDF do not want to download and install another program just to read a PDF file. The ease and beauty of a PDF gets lost in that process. No longer is the PDF a portable document format. In addition, a software program that can be downloaded to view a PDF can also be downloaded by a hacker to be reverse engineered. There needs to be something more than just a secure reader/viewer to control the PDF.

The most secure way to copy protect a PDF file is to associate it with something physical. There are some software (only) solutions, but those are not as secure as a solution with something physical.

Continue Reading

How To: Check if My USB Flash Drive is Bootable?

The following article will explain how to check your USB flash drive for if it’s bootable. There is no software needed, no download, just a couple of simple commands in your Windows 10 operating system.

A master boot record (MBR) is a special type of boot sector at the very beginning of a partition storage device like a fixed disk (hard drive) or removable drive (USB thumb drive). The MBR contains executable code to function as a loader for the installed operating system. This loader turns over the functions of the hardware (mother board bios) and passes that loading responsibility off to the operating system (Windows).

This is how you check if your USB is bootable, or not:

First, please have only the one USB stick connected which you want to check if it’s bootable. It’s not required to do this, but will my the instructions below a bit easier to follow, that’s all.

Using the Windows search function copy and paste this into the search field and click Enter

compmgmt.msc

The screen shot below will pop up after you click Enter. Using the image as a reference, select “Disk Management” under the “Storage” folder“. In the middle of the dialogue box you will see the drive letter associated with your USB flash drive. In the middle of the box you will probably see the USB listed two different times. The top portion of the box, the USB will be listed along with other devices, like your hard drive and optical drive. The bottom portion of the box, the USB will be shown as “Removable

Once you’ve determined which drive letter is your USB drive, you may Right Click on the drive letter and select Properties.

A Properties dialogue box appears giving you the option to select any one of the devices show in the previous window (the Disk Management window). From this dialogue box, click the Hardware tab and select the “Mass Storage USB Device” by a single click. Then click the Properties button at the bottom.

The last dialogue box are the Properties of your specific flash drive.

Click the Volumes tab at the top, you then must click “Populate” to get the device information. . The “Partition Style” will read either Master Boot Record (MBR) or the field will be empty.

If the above information isn’t detailed enough for the information you are looking for, the next step is to use a hex editor and check if the boot strap code is actually in the Master Boot Record. This is a bit more detail and the guys at Hakzone did a really good job of summarizing how this would be done using a hex editor program.

Continue Reading

Copyright

Copyright © 2006 +

USB Powered Gadgets and more...

All Rights Reserved

Advertise with us

GetUSB Advertising

This is a high value website providing great exposure to your product and brand. Visit our advertising page to learn specifics.

For more information
Visit our advertising page.

Nexcopy Ad

Nexcopy Provides

USB copy protection with digital rights management for data loaded on USB flash drives.

Contact us learn more

Resources and References Page

Resources and References Page