Microsoft Windows has been sending out updates which have created some problems for those cloning mass storage devices like USB flash drives and USB hard drives. This article should help you resolve those issues.
The Disk Signature is a unique ID Windows will assign to a device inside the Master Boot Record or MBR. The disk signature is 6 bytes long and sits in the first sector of the mass storage device. The disk signature becomes a problem for those cloning flash drives or hard drives with either a software utility or a large duplication equipment like a USB duplicator. The disk signature compounds itself if a multi-partition device is being cloned.
Many times a multi-partition device is created in Linux and at the time of create only one disk signature is assigned to the physical device. However, if multiple units of those copies are put in a Windows computer, Windows will try and assign a disk signature to each partition. This will cause a collision.
There are different situations one could have a disk signature collision, so this is only one example.
This article will help you view Linux files on a flash drive when connected to a Windows 10 computer.
This is a more common problem than one would think. As of 2020 the percentage of computers running Linux is 25%. With this in mind, there is a good chance you will receive a USB flash drive (formatted in Linux) which you’ll need to gain access to. This article is a “how to” for a Windows user to read a USB flash drive from Linxu.
Linux will format USB flash drives as ext2, ext3 or ext4. Note: It is possible for a Linux OS to read/write to a FAT32 or exFAT flash drive.
The following article will explain how to check your USB flash drive for if it’s bootable. There is no software needed, no download, just a couple of simple commands in your Windows 10 operating system.
A master boot record (MBR) is a special type of boot sector at the very beginning of a partition storage device like a fixed disk (hard drive) or removable drive (USB thumb drive). The MBR contains executable code to function as a loader for the installed operating system. This loader turns over the functions of the hardware (mother board bios) and passes that loading responsibility off to the operating system (Windows).
This is how you check if your USB is bootable, or not:
First, please have only the one USB stick connected which you want to check if it’s bootable. It’s not required to do this, but will my the instructions below a bit easier to follow, that’s all.
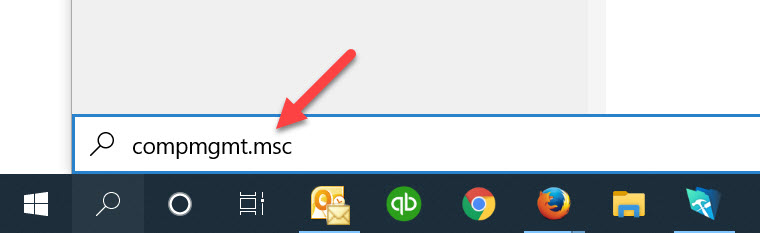
Using the Windows search function copy and paste this into the search field and click Enter
compmgmt.msc
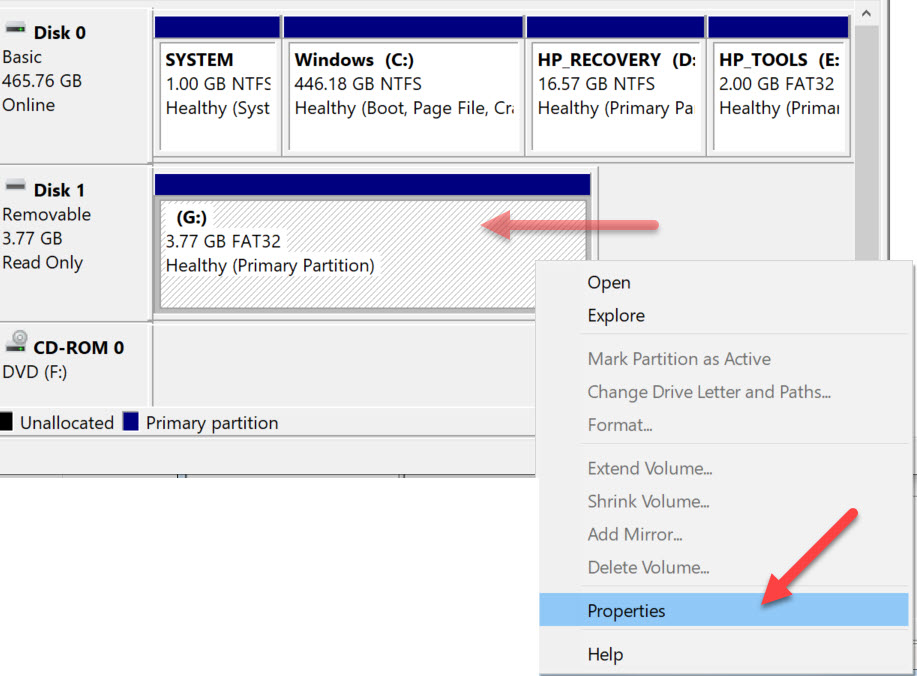
The screen shot below will pop up after you click Enter. Using the image as a reference, select “Disk Management” under the “Storage” folder“. In the middle of the dialogue box you will see the drive letter associated with your USB flash drive. In the middle of the box you will probably see the USB listed two different times. The top portion of the box, the USB will be listed along with other devices, like your hard drive and optical drive. The bottom portion of the box, the USB will be shown as “Removable“
Once you’ve determined which drive letter is your USB drive, you may Right Click on the drive letter and select Properties.
A Properties dialogue box appears giving you the option to select any one of the devices show in the previous window (the Disk Management window). From this dialogue box, click the Hardware tab and select the “Mass Storage USB Device” by a single click. Then click the Properties button at the bottom.
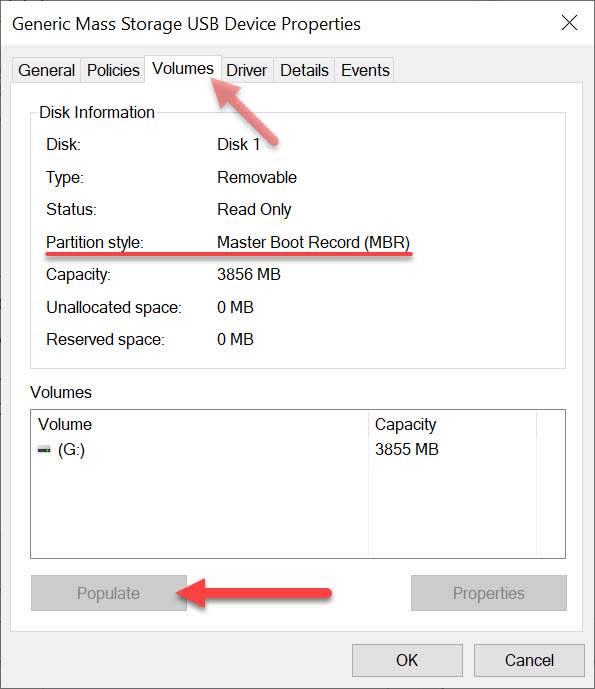
The last dialogue box are the Properties of your specific flash drive.
Click the Volumes tab at the top, you then must click “Populate” to get the device information. . The “Partition Style” will read either Master Boot Record (MBR) or the field will be empty.
If the above information isn’t detailed enough for the information you are looking for, the next step is to use a hex editor and check if the boot strap code is actually in the Master Boot Record. This is a bit more detail and the guys at Hakzone did a really good job of summarizing how this would be done using a hex editor program.
The lifespan of a USB flash drive relates to three factors. In general terms, a flash drive will last much longer than you think and here are some details to help you understand the answer.
The three factors related to the life span of a USB flash drive are:
How the drive is made
Wear leveling technology
How the drive is treated
Flash drives are a commodity product and (generally) driven by lowest price. With that in mind there are plenty of shortcuts a manufacturer can use to save time and money. What is important to understand, is knowing the quality of product you are going to use.
How the drive is made
A flash drive is made up of five primary components: The PCB (printed circuit board) the flash memory, the USB controller, the components and the soldering which holds everything together.
Printed Circuit Board (PCB)
Most promotional memory products (flash drives given away at trade shows) will use a two layer printed circuit board. Two layer boards are bad for use with any USB device, including a flash drive. The USB specification requires four layers for a product to be made to specification. A four layer board will include the, much needed, grounding plane of the PCB to insure transmission without interference from the trace lines. A two layer board is at a much greater risk of not performing as it should. If you received a USB at a trade show, don’t consider that device for “long term” or “important” storage options.
This is an image of a four layer USB flash drive by Nexcopy with Micron memory with write speeds of 12MB/s
Flash Memory
Flash memory used in the production of USB drives stems from a sea of unknown factors. Flash drives are the bottom of the barrel when it comes to NAND memory as part of the BOM (bill of material). All the good quality NAND memory is used for more expensive products like phones, set-top boxes, communications hardware, etc… and the manufacturer of USB flash drives, is typically, the last tier of manufacturing consumption. With that in mind, one trick the flash manufacturers use, is down-sizing the memory wafer (NAND chip). Let us provide an example: Toshiba is the world’s largest memory manufacturer, and after production of say a 64GB chip, they test it. If the quality of the silicon cells in the chip are below a certain percentage, the chip gets downgraded to a 32GB chip. They test it. If the memory is still failing QC, it gets downgraded again. The process continues. So if you are dealing with a 512MB USB stick, you are dealing with the worst part of NAND memory chip. Very unreliable. The quickest way to test the quality of flash memory is test the write speed. For USB 2.0 product, if you see a write speed of 9-10MB/second or better… its’ good quality. For USB 3.0 if you see a write speed of 18-20MB/second or better you are dealing with good quality. A slow write speed means the silicon of the chip is having a harder time making the phase change (positive or negative) to save data to the memory chip.
USB Controller
The USB controller is the chip on the flash drive with all the brains. The USB controller is the gate keeper between the host computer and the USB stick. The chip allows the host computer to read or write data to and from the flash memory on the flash drive. Because the USB controller is the brain of the flash drive, it’s important to have a controller that performs well and is reliable. One of the most important features of the USB controller is wear leveling. This is also one of the most important aspects for defining the lifespan of a USB flash drive. More about wear leveling in a bit. For now, the important point is understanding the compatibility of the USB controller to that of the flash memory. The NAND memory market is very fast pasted. New technology is always developing. For this reason, the firmware inside the USB controller is very important. The firmware “marries” the flash memory to the device and creates a usable flash drive. There are many flavors of firmware for a single controller and it all boils down to how often the USB manufacturer updates those firmware tools. It is very possible to load firmware that is not optimized for the NAND memory used in the production of the flash drive. It’s also very possible the firmware is set for a different objective, for example, the firmware was set to be optimized for capacity rather than read/write speeds. The amount of control the USB factory has with these firmware tools is mind-blowing. The firmware tools are used to configure the USB stick to exactly what they want. In summary, there is no real way to test the quality of the USB controller and it’s firmware other than having an intimate knowledge and relationship with the actual manufacturer of the USB flash drive. The point to explaining the function of a USB controller is to show what a large impact it has on the overall performance of the drive.
Does the title of this article even make sense? Yes, but not to most.
USB enumeration is the process a host computer goes through to identify the type of USB device connected and what the operating system should do with the newly detected device.
Fingerprint would simply imply the different steps a computer operating system goes through when determine the USB device type.
For 99.7% of the people who visit this site, this information doesn’t matter, but for others it does. The security industry would be the prime candidate for wanting this information. If a security expert, team or programmer knows the exact steps an operating system goes through to mount a USB device, it will help them keep programs secure.
Andrea Barisani, a security expert based out of Italy, put together some open source code which compares the USB enumeration fingerprint for the MacOS, Windows and Linux. The open source code is available on Github.com (here).
This bit of code is probably valuable to software programmers who deal with USB flash drives and portable applications.
Always best to scan a USB flash drive before using it.
Did you know Windows Defender could be configured to scan a USB stick automatically the moment it is plugged in? Below are the steps to configure Microsoft Windows to automatically scan a USB drive↓.
Windows Defender is not configured for automatic scanning when the operating system is installed. Not sure why, as malware spreading via USB flash memory is one of the more prolific tech issues of the day. Our only guess is Microsoft giving us free will to make our own decisions, after all, scanning takes time and why not let the user choose when this is done.
This tutorial will take about three minutes to setup. I would suggest read the rest of this article and when done, go back and perform the few steps required to make the Windows Defender scan for USB flash drives.
We are going to make a Group Policy to scan USB flash drives using Windows Defender.
Let us run the Group Policy editor.
Press the Windows Key + R
Type gpedit.msc and press Enter or OK.
Look for the Administrative Templates under the top Computer Configuration directory, expand this directory (folder)
Scroll down to Windows Components, expand it
In that directory scroll down more and look for Windows Defender Antivirus, expand it
Finally, look for the Scan folder and click that folder.
On the right side of the dialogue box you will see additional settings, search for the Scan removable drives and double click that setting
This setting is disabled by default. Please click the radial enable button to enable this setting for your Windows computer.
Click Apply in the bottom right and then click OK.
That is it. Your Windows computer will now automatically scan USB flash drives using Windows Defender.
Alternatively, you can insert a USB stick and right click the drive letter and select Scan with Windows Defender but the problem here, is the USB could have already done it’s virus work before you had a chance to scan for malicious code.
The last two decades have ushered in an enormous number of electronics. Prices get lower, users upgrade, society reapes the benefits of these advancements. This explosive growth in electronics has led to an escalating burst for EOL (end-of-life) electronics and e-waste. When electronic devices are left in traditional landfills toxic materials can be released into the soil and environment.
With new cheap devices, society has reaped tremendous benefits. This explosive growth in the electronics industry, however, has led to a rapidly escalating issue of end-of-life (EOL) electronics or e-waste. In landfills or primitive recycling operations, toxic materials can be released from old electronic devices into the environment.
E-waste is growing, and with that surge comes the need for effective electronics recycling programs. As of 2018, e-waste is now the fastest-growing waste stream in the world, with an estimated waste stream of 48.5 million tonnes in 2018, valued at 62.5 billion US Dollars.
The amount of e-wast from USB flash drives is unknown from the above statistics, yet it’s not entirely necessary to make flash drives part of the e-waste equation. There are options for recycling USB flash drives.
Option One:
Run antivirus software from a USB flash drive.
If your computer is infected with malware, running an antivirus within Windows may not be enough to remove it. If your computer has a rootkit, the malware may be able to hide itself from the antivirus software. The only proven way to ride your system of a nasty virus would be starting your computer from outside the Windows environment and start the cleaning process from there.
This is where bootable antivirus solutions come in. They can clean malware from outside the infected Windows system, so the malware won’t be running and interfering with the clean-up process. The HowToGeek website did a nice write-up on this topic. If this is a tool you need, don’t e-waste your USB flash drive, rather make a bootable antivirus software stick.
Option Two:
Run Linux from a USB flash drive.
As of 2020 the percentage of Windows computer users is still an impressive 88%. Mac users are 10% and Linux users are the remaining 2%. Have you ever used Linux? It’s actually a fantastic operating system and at least something to play around with if you have spare USB media. Rather than e-cycling your USB stick, you can download a Linux operating system and give it a run. The process is not difficult and (nearly) any non-technical person can download and install Linux on a flash drive.
Slax is a well know Linux package. The instructions for download and installation are straight forward and simple. It is highly recommended to try this version of Linux as your first exposure to the operating system.
Several benefits of running Linux from a USB include trying the operating system without investing money in new hardware, or making changes to your current Windows operating system.
Learning to run Linux from a flash drive will give you an advantage in the event of a computer failure. For example, a computer gets bogged down with a nasty virus and you need to access some files quickly. There is no time for a lengthy cleaning process (scanning a hard drive can take hours). Booting into Linux from a USB stick will give you access to the memory of the hard drive to access the files you need.
Option Three:
Recycle USB drives for a good cause.
“One man’s garbage is another man’s treasure.”
Isn’t that how the saying goes? Said another way, you can donate your USB drives to an organization who can re-purpose those drives and provide them to others in need. Pivoting from option number two, a non-profit organization called SugarLabs.org puts a Linux based operating system on a flash drive. The operating system is a special version of Linux and is designed to teach young kids how computers work. The not for profit organization sends these donated drives all over the world. SugarLabs is based in Boston Massachusetts and founded by Walter Bender a graduate of Harvard and technology researcher from MIT Media Labs.
Part of the SugarLabs process is insuring each USB drive is clean from any personal data or potentially harmful malware. RecycleUSB.com is a website and business which manages the sanitizing and cleaning of the donated USB flash drives before sending to Walter and his team at SugarLabs. The recycle USB website lists the “how to” steps on donating media, contact information for any questions someone might have and sanitizing steps used to clear data from the flash drives. The partnership between RecycleUSB and SugarLabs started back in December of 2009 when flash drives began having the storage capacity to hold a portable operating system (about 2GBs).
After reading the above options for recycling USB flash memory and you find yourself still wanting to e-waste the flash drives, be sure to check your community or city about e-waste programs. In nearly all cities and counties it is not recommended to throw away electronics into the standard garbage service. Be sure to enlist the use of recyclers who are certified through either of the voluntary certification programs that have been established to ensure responsible recycling, including R2/RIOS and e-stewards.
Yes. Performing an Erase or “full format” shortens the life of the device. The erase function is also very slow.
Here are some additional questions based on the answer above which we will address in today’s post:
Is “erase” and “format” the same thing?
Erasing flash memory (a.k.a. Setting all bits to 0, also called a “full format” by Windows) does more damage. Flash memory has a limited number of times that it can be written, and the more you write to it, the more it degrades. With an erase function, you’re writing to the entire device.
With a format, all that’s happening is changing a few bits at the front of the device to say the rest of the memory space on the flash drive is available to be overwritten. This saves the life of the flash memory because the old data is not being overwritten, just flagged to do it at a later time.
Why would you need to erase a drive?
Since a format is changing just a few bits at the front of the device, it means all the data is still on the drive. The few bits we are talking about which are changed, is related to the file allocation table. The changed bits in the file allocation table, mean there are no longer instructions about the location of the digital files. Recovery software can scan the memory space and retrieve those files even though the file allocation table isn’t giving instructions on where they are located.
Think of the file allocation table as the table of contents of a book. If you tear out the table of contents of a book, but all the pages of the story are still there, it’s the same concept as formatting a device. Sure you can scan the pages to find chapter 12 with the part about Paul getting a bucket of water, it’s just hard. Same thing with formatting a drive, you can use recovery scanning software to find the files, but it’s hard.
Coming back to the original question, why would someone want to erase a USB flash drive? One possible reason could be a security risk of some kind and the operator wants to insure no data is on the drive. For example, you are donating a flash drive and you had financial or medical records on the drive. By performing an erase, that data cannot be recovered.
You’ve connected a USB flash drive, heard the familiar Windows sound of connection, yet no drive letter shows up. You then go into Disk Management for Windows and you can see the device and memory, but no drive letter.
What should you do?
Most times this process is automatic and Windows will asign a drive letter to any storage device connected to your PC, whether it be a USB stick or a USB hard drive, or any other mass storage device.
However; in the event a drive letter isn’t assigned there is a very quick way to get your computer back to working the way it should.
Open Command Prompt as Administrator
(search for CMD and right click to open as Admin)
Type ‘diskpart’ and hit Enter.
Once in the DISKPART type automount enable and click Enter.
If the above doesn’t do the trick, another issue may be at hand. Maybe some conflicting registry entries from past USB devices connected to the PC and for this reason the automount was disable, or no longer working properly.
Nexcopy has a registry cleaning tool specifically design for USB devices connected to your computer. This utility is an exe file that does not require installation and does not have spyware, malware or anything else. It’s from a company you may
We’ve seen these terms floating around in forums and How To’s for years when someone is explaining what to do with USB flash drives. I think most people glaze over the definitions of Clean, Erase and Format simply because they believe the terms are interchangeable, or they aren’t planning on doing the task mentioned in the post.
I hope the following information will clear up some terms and definitions so we can all better understand what people are talking about when passing along information about flash drives and the Clean, Erase and Format function.
All of these functions can be performed in your Windows 10 computer, or higher. I will start with the least complicated definition and task, and move along from there.
Format
This function is what 98% of Windows computer operators will use. This is the graphical interface inside Windows when you right click a drive letter and ask the operating system to format the drive. What is this function really doing?
Format is the least complicated of the tasks, and this function is removing the File Allocation Table of the USB and creating a new one. Said a simpler way… this function takes away the list of files sitting on the drive so it then appears blank with no data.
It’s important to note, the files are still on the drive, just not listed in an easy, organized manor which you can see through windows explorer (clicking on the drive letter to see the list of files).
Maybe a picture will help. Looking at the image below you can see the “data” is light grey. Meaning the data is still there, just not easily accessible. This data is what recovery software will look for, find, and list back on your drive. Also notice the boot code of the USB (if you want to load an operating system on your USB stick) isn’t touched either.
You might have questions if a USB flash drive should be formatted as FAT, FAT32, exFAT or NTFS and we did a great post about that a bit earlier as well.
Clean
The Clean function is a bit more in-depth than the format function. This function applies directly to the Master Boot Record (MBR) or boot code mentioned just above.
The Clean function will clear out boot code and will remove any partition on the flash drive. The partition of a flash drive is the information which tells a host computer how big the drive is, and if the partition should be bootable in the event you are trying to start the computer from a flash drive.
The Clean function is not accessible through the GUI of Windows, for example you cannot right click on a drive letter and find the Clean function. The Clean function is only accessible through the Windows utility called DiskPart.
Japan has been a long time supplier for three key elements used in the manufacturing of NAND memory and semiconductors. Because of recent trade war issues between Japan and South Korea, these elements are getting very hard to obtain.
Japan produces about 90% of the world’s supply of flurinated polyimide and resists, and about 70% of the world’s supply for hydrogen fluoride. This puts everyone at risk if Japan will not supply those demanding it.
Those chemicals are used by Korean manufacturers to produce semiconductors, and are crucial for making components — including memory chips, microprocessors and integrated circuits.
We have seen the direct impact already. For the first time in over eight months, the price of NAND memory for flash drives have gone up. For each GB capacity the percentage increase is different, but most notably are the 32GB and 64GB wafers. They have jumped nearly 25% from the previous week ( this article was posted on July 25th).
Japan has sited inadequate management of those chemicals by purchasing countries. Said another way, these chemicals can also be used to manufacturer military weapons and Japan is claiming those supplies have been diverted to do just that. Japan’s response; restrictions on the chemicals.
Who will lose from this trade war? None other than any person who uses technology. Cell phones, processors, flash memory, circuit boards, the list goes on.
For a more dry version of this report, and our source visit: here
To learn more about the polyimide chemicals a quick read on this wiki page is fairly interesting.
Continue Reading
From this article, the Raspberry Pi 4’s USB-C power port was designed outside of official USB-IF specifications, making it incompatible with many USB-C chargers and/or power supplies. You can read more about from the link above and the information gathered to come to such a conclusion was done by a well known Google engineer, Benson Leung.
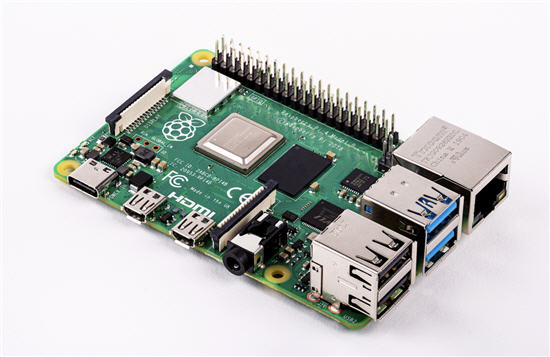
The raspberry Pi is a collection of small computer boards put together in a simplistic way to create the foundation of a computer system. The Raspberry Pi (also known as RPi) was released back in Feb of 2012 in the United Kingdom. The original intent of the RPi was to develop a low cost and simplistic computer which students could learn and develop.
The original model became far more popular than anticipated, and started selling outside its target market for uses such as robotics. It does not include peripherals (such as keyboards and mice) or even come inside a case. Literally a bare-bones product.
To give you an idea of the popularity, the RPi products have sold over 19 million units between its release in 2012 to the end of fiscal year 2018. This makes the RPi one of the best-selling computers in the world, although a computer with limited resources. Until now.
This week the Raspberry Pi Foundation has released the Pi 4. This is one hell of a great product. Check out these specifications:
A 1.5GHz quad-core 64-bit ARM Cortex-A72 CPU (~3× performance)
1GB, 2GB, or 4GB of LPDDR4 SDRAM
Full-throughput Gigabit Ethernet
Dual-band 802.11ac wireless networking
Bluetooth 5.0
Two USB 3.0 and two USB 2.0 ports
Dual monitor support, at resolutions up to 4K
VideoCore VI graphics, supporting OpenGL ES 3.x
4Kp60 hardware decode of HEVC video
Complete compatibility with earlier Raspberry Pi products
In addition to the hardware improvements, the Raspberry Pi Foundation says