Here is a nice quick and easy USB tutorial.
Swapping storage can become a headache in Windows as you never know or can remember which drive letter Windows assigns your drive. At Lifehacker, they posted a nice tip on assign USB drives to folders. This method not only keeps things organized, but adds one additional benefit most wouldn’t think of.
First, the tip.
Create a main USB folder where we will mount all the USB drives once connected. Then assign all your USB devices to sub-folders within that main folder. After creating the folder structure, do the following for assignment.
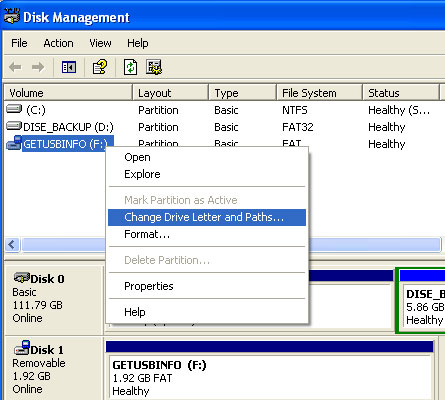
Click > Start > Run then enter diskmgmt.msc and hit enter. This opens the Disk Management configuration that should display all drives and devices currently connected to your computer.
Pick an USB device from the list and right-click that entry. Select Change Drive Letter and Paths from the menu.
This should open a new window that is displaying the current drive letter of the device and three buttons at the bottom which are named Add, Change and Remove.
Click on the Add button, select Mount into the following empty NTFS folder and click on browse. Now navigate to the subfolder that you want to assign the usb drive to and confirm the assignment. The USB drive will from now on be accessible from that folder as well if it is connected to the computer.