Here at GetUSB.info we love the USB steampunk drive. We’ve reported on at least a dozen of them over the past couple years and I’m sure we’ve missed three times that many. Today we are tipping you off to a great tutorial on how to USB steampunk your own flash drive.
Instructables has a very detailed, 9 page tutorial on how to steampunk your own gear. It gives you a list of material, a detailed process, good and creative guidelines along with plenty of pictures and resources.
It’s my goal to actually do this over the July 4th weekend [2010] and post my result. Lets hope for the best!
To give you an idea of the scope of project considering the following list of materials and tools. If it fits into your abilities, then give it a shot!
Continue Reading
The easiest way to remove any virus from a USB stick is this: format it! Be sure to use the Full Format function, not the quick format function.In the very unlikely event you get an error messages saying you cannot format the drive because it’s being used by another program, or for some reason you have data on there you don’t want to format off, then you can try the following.
Before I start however, let me explain the fundamental concept of what we are trying to do.
With most virus’ they make it very hard to delete the files so they can spread their infection. To do this, they use several files and ping each other so they appear to be in constant use. This is why you see the error “being used by another program cannot delete or format.” So what we need to do, is stop that process. In addition, programmers put in attributes to make it hard to delete as well. For example they set the file attribute to Archive, or System File so we’ll need to remove those attributes too.
So lets start: In Windows go to START > RUN. In the field type cmd
This will open the DOS command prompt. Here you should be at the C drive root. If not type cd\ and click return. You will then be at the C:\ root.
Next type the drive letter of your flash drive. In my example that is drive letter F. You can find the drive letter of your flash drive by going to START > MY COMPUTER > and look for the “Removable Disk“Next, type the drive letter, so for me, type f: and hit enter.
After you are in the drive letter of the flash drive, type dir/w/a
This will list all the files in your flash drive, regardless of it’s attributes of being hidden, System file or archive.
Now we should look for suspicious files such as anything listed as a .exe file or a .inf file. Specifically anything with a autorun.inf should be deleted. Some other popular ones are Ravmon.exe, svchost.exe, Heap41a and pagefile.pif.
If you see any of these, then lets remove all the file attributes and try and delet them.
To remove all attributes do the following:
In the DOS command prompt type attrib -r -a -s -h *.*Â This command will remove all attributes for all files.
Now we can delete the files. You do this by typing del filename [be sure to include the exentions too, for example type del autorun.inf and hit enter.
This should do the trick if you’d like to remove problem files without running the Full Format function.
Continue Reading
During the month of July Instructables is running a USB contest for who can make the best mod while incorporating USB technology. For this reason, we’ve been keeping a close eye on what you creative folks are up to.
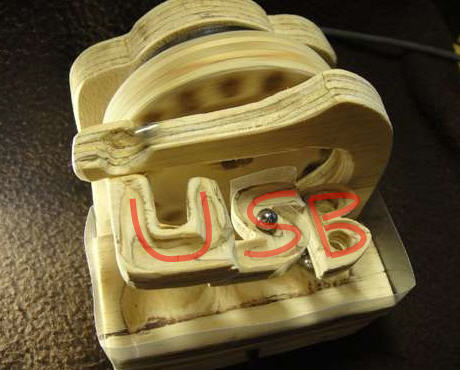
Today we bring you the 100% natural, all wood, USB marble machine.
I will admit the name is more impressive then the look, but the cool factor outweighs the look.
The wood USB marble machine is an excellent DIY project and will open up your eyes to all sorts of different ways you can make an automated, electric motor powered marble machine.
Check out the video, it’s well worth it!
Learn how at Instructables.
Continue Reading
Do you have USB ports on your computer but for some reason the devices connected are not working?
Or maybe your USB ports stop working after a long period of time?
Don’t worry, the USB not working is [most likely] related to your computer configuration, not the ports malfunctioning.
If our hunch is right, the fix is easy. This is what we recommend checking if USB devices are not working on your computer.
Lets check to see if the USB hubs and ports are set to power save when idle. What this setting controls is the ability for a USB port to sleep if not used. The sleep mode of the port is an effort to help your computer save energy going to connected devices that are not in use.
To check the USB power setting lets do the following:
Go to > START > CONTROL PANEL > SYSTEM.
From here go to the Hardware Tab and click the Device Manager.
Next, scroll down to the section labeled Universal Serial Bus controllers and expand it out. Right click on the USB Hub listing and select properties.
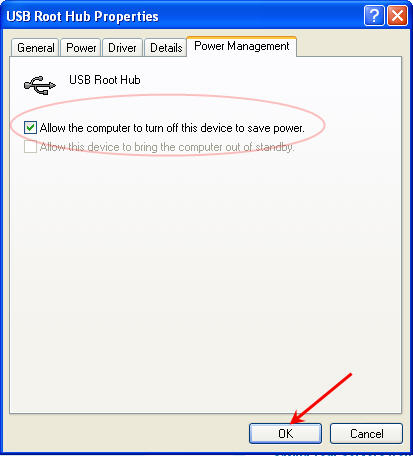
In the properties box, go to the power setting tab and look for the following.
Once you’ve configured this correctly [uncheck] there is a good chance your USB devices will begin working [consistently] again.
Continue Reading
Flash drives are getting very large in size these days, the new SuperSpeed USB 3.0 sticks are getting over 256GB capacity. With these larger sticks, the option to format the device as a NTFS file system is available, but what about the smaller USB sticks?
By default, any USB stick under 4GBs in capacity will not have the Format USB as NTFS file system option, but we can fix that.
Here is the How To: Format USB sticks as NTFS:
Click Start > My Computer > Right click on the drive letter for the USB stick and select Properties.
Now, click the Hardware tab of the Properties pop-up window and select the drive letter of which you’d like to change. In this case, it’s drive letter F shown as “Simple Flash Disk 2.0 USB Device“ From here click the Properties button.
Here is a simple and incredibly fun USB hack where you turn an old CPU into a hot plate for your coffee, tea or some liquid fragrance [in a dish].
This very useful USB hack can be done in 4 steps.
Step 1) Tools and Materials
1. A dead CPU. (Ofcourse you can use a working one but it won’t be feasible.) 2. A USB cable 3. A Fan grill with screws. 4. Any box (I used a wooden tie box cover) 5. A rotary Tool (the best tool ever invented) 6. Epoxy 7. A creative artistic mind…[continute]
Step 2) The Idea
A CPU will still have some working electronic circuits even if it stopped functioning probably. And this project will use the heat generated by running some Volts in the CPU through a USB cable. First things first. Be Very Careful. Connecting a malfunctioning CPU to your computer may and will damage your computer’s ports or even worse. If you don’t have enough…[continue]
Step 3) The Steps
First, prepare the base. You have to find a thin box or a box cover to use as the base of the plate. I used a tie box cover made of wood because it has the same thickness as my laptop. Now put the CPU over the base you picked and mark a square to drill with your rotary device. The square must be a little bit bigger than the CPU. The reason behind the bigger hole…[continue]
Step 4) Preparing the hot plate
locate the ground pins in your CPU and that can be done by reviewing the CPU data sheet or simply by the devastating trial and error. Cut the USB wire and pass it through the hole you made previously in the base. Strip the USB cable and locate the black and red weirs (black wire = ground, Red wire = +5V). You can cut out the white and green data weirs for more space…[continue]
Clearly this tutorial is from Instructables…Thanks Eric!
Continue Reading
MSN did a nice article today about 9 new tech gadgets you can make with the stash of old stuff you probably have laying around. One which fits into the USB category, is this USB fan.
Retro and cool looking, you can put together a nice desk fan with just an old tower or power supply fan along with solder and USB connector.
Other new tech gear from old gadgets include a stone age cell phone tricked into a portable safe. Scanner table where you can display items under the glass cover of the scanner and a USB mouse turned up-side-down and carved out for a plant holder.
Not the most impressive conversion, but a fun article to read on your break or lunch hour.
MSN 9 Uses for Dead Tech Gear…
Continue Reading
iBin is a portable application designed for USB stick so users can restore files which have been accidentally deleted. Since Windows does not redirect a deleted file off the OS into the Recycle Bin, once a user clicks delete, it’s gone forever [well unless you use restore tools to get it back], but iBin resolves that problem.
iBin puts your deleted files in a container on the USB drive itself and sits quietly until your custom flash drive gets to capacity, then you’ll need to do a bit of house cleaning.
iBin includes a collection of management features to set the preferences of the iBin. Items such as confirmation of where to put the “deleted” file, iBin size, how to erase and when to dump the iBin data.
All in all, this is an excellent application for users to add one additional layer of safety for the delete button.
This is a Windows based product and runs on all OS’ from Microsoft, including Windows 7.
Continue Reading
Windows 7 is much like XP in accessing the feature toturn off the USB auto playfunction. We don’t have a Window’s 7 machine, but I did find a great tutorial from DemoGeek. Here is the info you need to turn off USB Auto Play in Windows 7.
Go to:Â START > SEARCH > type “group policy”
From there Windows 7 will narrow down your options, select the “Edit group policy” option. Should be the first one listed.
From here, it’s virtually the same as Windows XP.
Go to:
> COMPUTER CONFIGURATION
> ADMINISTRATIVE TEMPLATES
> WINDOWS COMPONENTS
> AUTOPLAY POLICIES
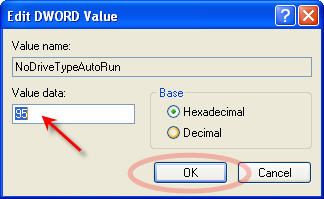
With having “AutoPlay Policies” highlighted, you will see on the right side of the dialogue box, “Turn off Autoplay” option. Click That!
On the dialogue box which pops up, select the “Disable” radial button to
Continue Reading
Last week we posted an article for Windows 7 users to download a utility to make a bootable USB recovery stick. Well, looks like that feature is [temporarily] gone.
So what gives?
It appears Microsoft lifted some GPL code to make their ImageMaster tool for bootable USBs. Interesting.
We posted how you could make your own nt60 USB recovery stick. Check it out.
USB Tutorial:Â How to create a bootable USB stick with the specific nt60 book sector required for Microsoft Vista.
Before we begin the USB tutorial on nt60 boot sector you’ll need to review the check list of items needed before you start. Chances are, if you find yourself searching for this tutorial, you already have everything needed to make a USB bootable with nt60 boot sector.
4GB flash drive will do the trick
Your Vista installation disk
Set BIOS to boot from a USB device
When selecting your flash drive be sure there is nothing you need on the device as this process to create a nt60 boot sector will clean the drive of all data.
Put your Vista disk into the optical drive, if the autorun starts, close it all down and exit without performing any tasks.
Plug in your USB stick which you want to make bootable with nt60.
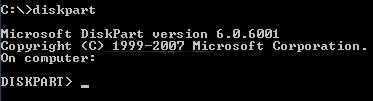
Open into the Command prompt. [you will need Admin rights]
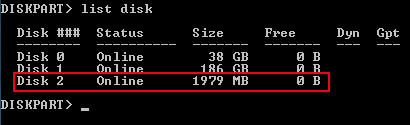
Type ‘diskpart‘ and press Enter
Now type ‘list disk‘ and press Enter All the storage devices connected to your computer will be displayed, make sure the size of the Disk you plan to select is the USB flash drive you intend to use!
Now type ‘select disk [number here]‘Â In this example I typed